Showing posts with label The Crafty Quilter. Show all posts

Monday, May 18, 2015

Burlap Brights Block Hop: Day 8

Welcome to the eighth day of our Burlap Brights Block Hop! We hope you'll enjoy the eleven block tutorials our designing friends are sharing here this week and last week. Be sure to stop by each day to see a new block and have a chance to win some Burlap Brights for yourself!


Today, Julie Cefalu from The Crafty Quilter is sharing a block made using Flying Geese in all six of the rainbow colors. Check out her tutorial and then head over to her blog to enter for a chance to win a fat quarter bundle of the six Burlap Brights prints featured in our hop.


Hey everyone! My name is Julie Cefalu from The Crafty Quilter blog, and not only do I get to teach and work in a quilt shop, I also get to share my creativity online to a much larger audience. I have lots of tips and tutorials that I share on my blog, and I hope you'll visit me there! I am so glad to be participating in the Burlap Brights Block Hop! I'm a fan of burlap, but I'm even more of a fan of the texture and color of these fabrics from Benartex. There is just the right amount of texture and "feel" to these solids and their color is beautifully saturated. When I received my fat quarter bundle of fabric, I felt like I was opening up a box of crayons!
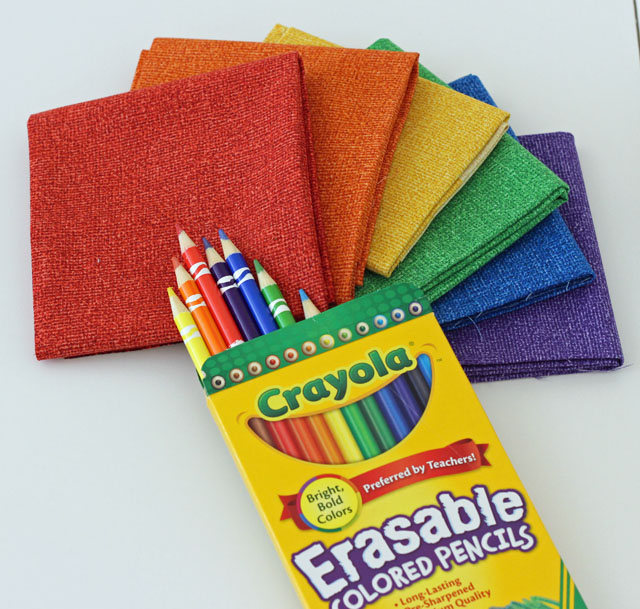
burlap bright crayons    

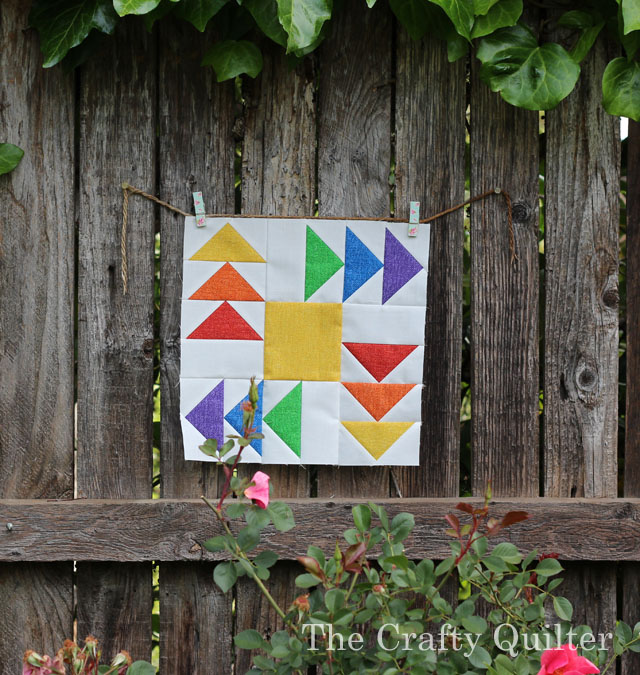
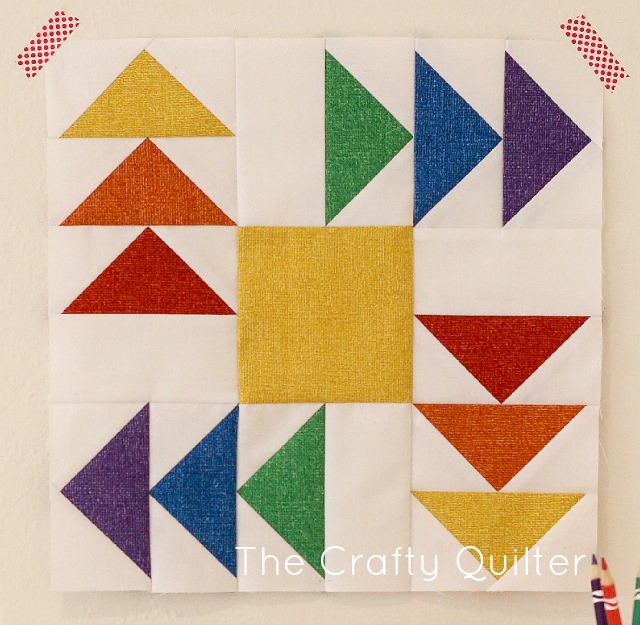
I named my block Rainbow Geese Rotation. I really wanted to use all six of the colors that were provided, and I'm so happy with the design I came up with. It's fairly simple, but the colors make is seem more complex. A little rainbow pizazz in your geese!
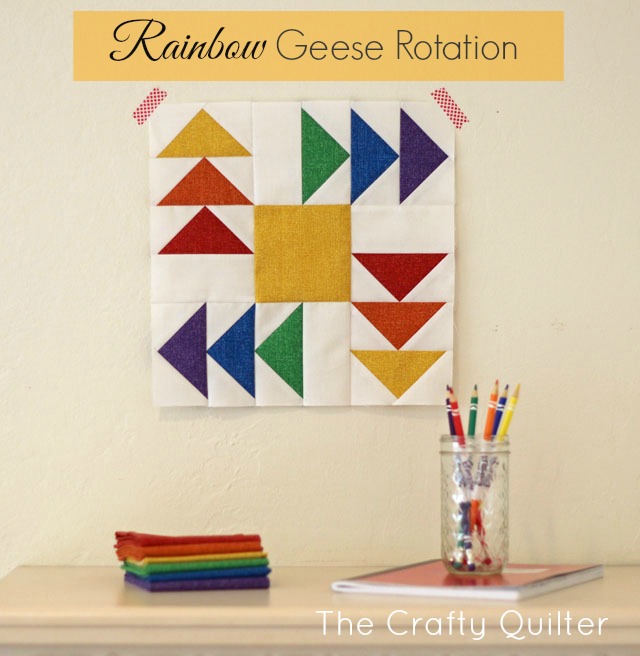
Rainbow Geese Rotation Block tutorial by Julie Cefalu for the Burlap Brights Block Hop at Sew in love {with fabric}    

The construction of this block is pretty straight forward. You will be making two flying geese units of each color that measure 2 1/2" x 4 1/2" unfinished. There are many techniques to make flying geese units. Whenever I can, I like to make my pieced units OVER-SIZED so I can be trim them down to the perfect size later. 
NOTE: The cutting instructions, below, are for making over-sized flying geese units. For this tutorial, I have used a Bloc Loc ruler to trim down the flying geese units. You can also use a square ruler to trim them down. If you prefer, you can cut your pieces to the standard size as follows: for each flying geese unit you need (1) 2 1/2" x 4 1/2" colored rectangle and (2) 2 1/2" squares of white. The piecing technique is exactly the same. 
Here's what you need to make one 12 1/2" (unfinished) block: 

Fabric and cutting instructions:
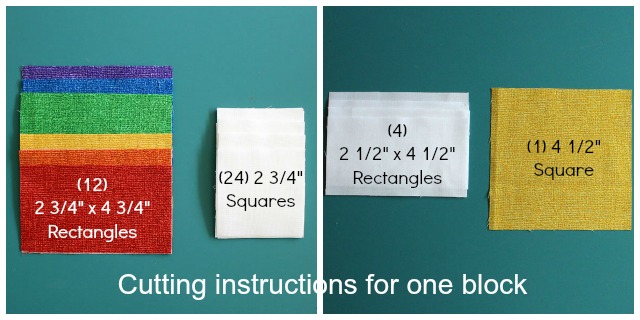
  • White: (4) 2 1/2" x 4 1/2" rectangles, (24) 2 3/4" squares
  • Yellow: (1) 4 1/2" square, (2) 2 3/4" x 4 3/4" rectangles
  • Orange: (2) 2 3/4" x 4 3/4" rectangles
  • Red: (2) 2 3/4" x 4 3/4" rectangles
  • Purple: (2) 2 3/4" x 4 3/4" rectangles
  • Blue: (2) 2 3/4" x 4 3/4" rectangles
  • Green: (2) 2 3/4" x 4 3/4" rectangles
Rainbow Geese Rotation Block tutorial by Julie Cefalu for the Burlap Brights Block Hop at Sew in love {with fabric}

Construction: 
Make flying geese units.
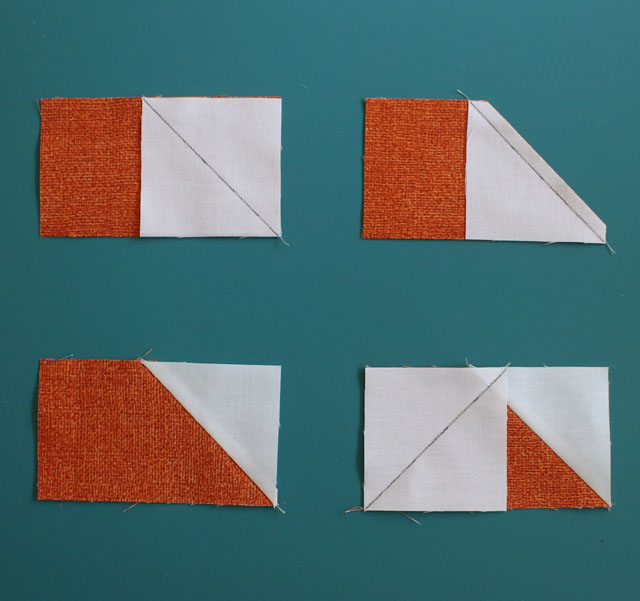
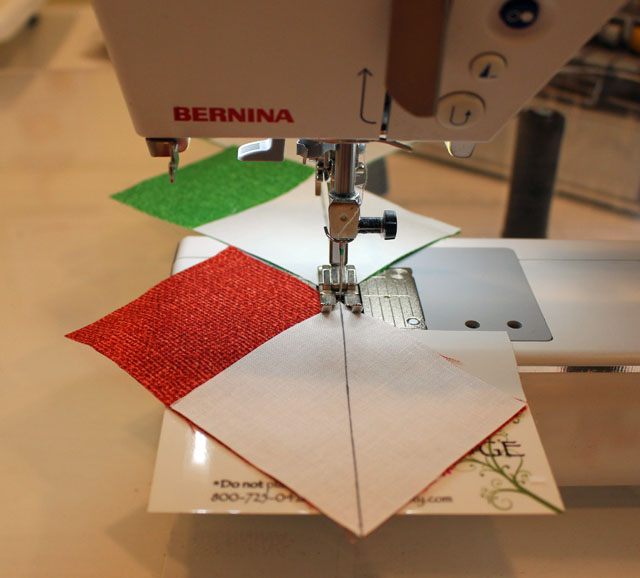
  • Draw a diagonal line on the wrong side of each 2 3/4" white square.
  • Place a white square, right sides together onto one side of each 2 3/4" x 4 3/4" rectangle.
  • Stitch on the diagonal line.
  • Trim. Press toward the corner.
  • Repeat for the opposite side.
Rainbow Geese Rotation Block tutorial by Julie Cefalu for the Burlap Brights Block Hop at Sew in love {with fabric}    

You can chain piece them through to save time and thread: Rainbow Geese Rotation Block tutorial by Julie Cefalu for the Burlap Brights Block Hop at Sew in love {with fabric}    
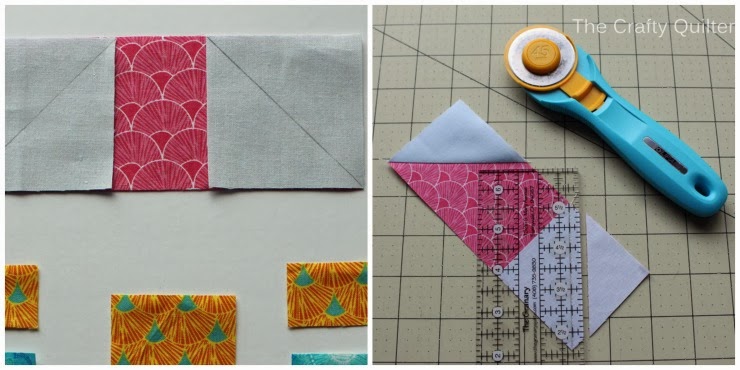
Trim the flying geese units to 2 1/2" x 4 1/2" rectangles. Rainbow Geese Rotation Block tutorial by Julie Cefalu for the Burlap Brights Block Hop at Sew in love {with fabric}
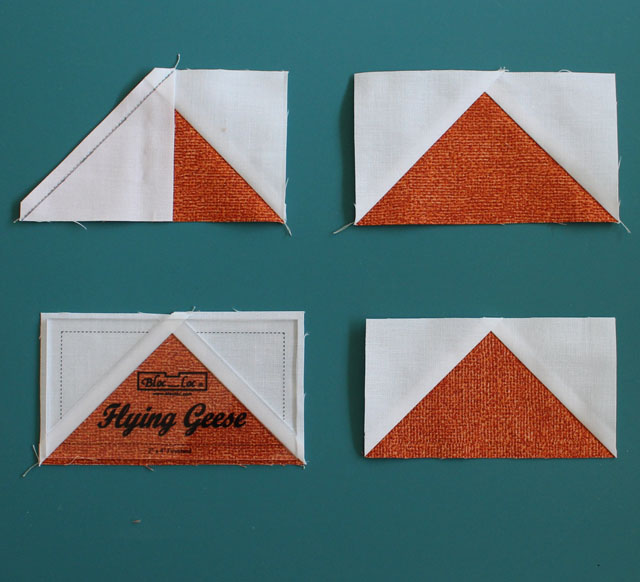
Let me show you how the Bloc Loc ruler works, and then I'll show you how to use a standard, square ruler to trim up your units. The Bloc Loc ruler has a groove on the back side that locks into place along the seam allowances. This allows for quick and easy placement of the ruler and accurate trimming of the first two sides (right and top).
Rainbow Geese Rotation Block tutorial by Julie Cefalu for the Burlap Brights Block Hop at Sew in love {with fabric}    

Then, you rotate the unit around so that you can trim the remaining two sides as shown below:
Rainbow Geese Rotation Block tutorial by Julie Cefalu for the Burlap Brights Block Hop at Sew in love {with fabric}    


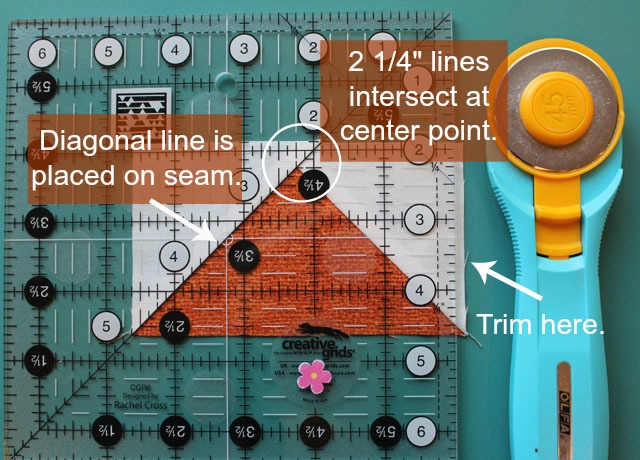
You can use a square ruler with a diagonal line to trim your flying geese units as well. You need to locate the 2 1/4" lines on the ruler. (This is the center of a 4 1/2" side). The 2 1/4" intersection on the ruler gets placed on the center point of the flying geese unit. The diagonal line of the ruler gets placed on the seam. Then you can trim the right edge. Rainbow Geese Rotation Block tutorial by Julie Cefalu for the Burlap Brights Block Hop at Sew in love {with fabric}    
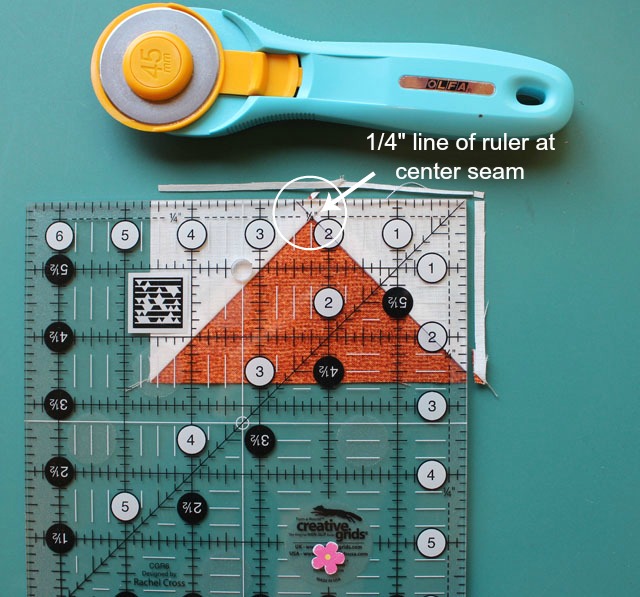
Next, trim the top edge by keeping the right edge of the ruler along the previously trimmed side and placing the 1/4" line of the ruler at the center seam of the unit. Trim along the top edge. trim with square ruler 2    
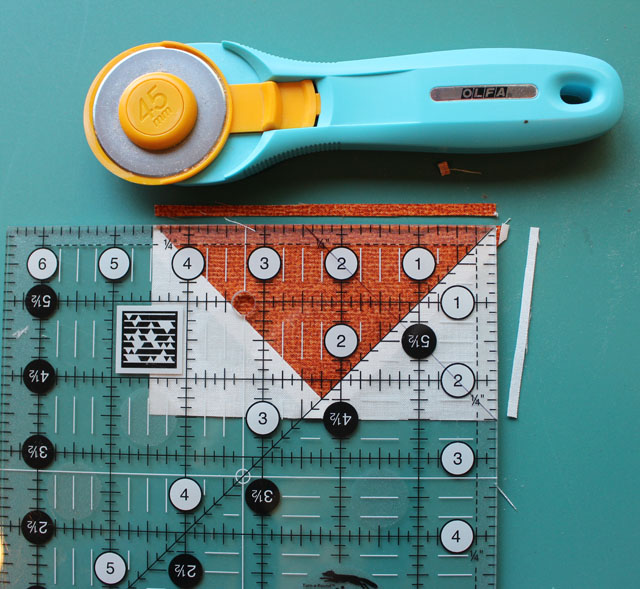
Now you rotate the flying geese unit around so that you can trim the remaining two sides. This time, line up the 2 1/2" and 4 1/2" lines of the ruler on the previously trimmed edges. Trim along the right side and upper edge. Rainbow Geese Rotation Block tutorial by Julie Cefalu for the Burlap Brights Block Hop at Sew in love {with fabric}    
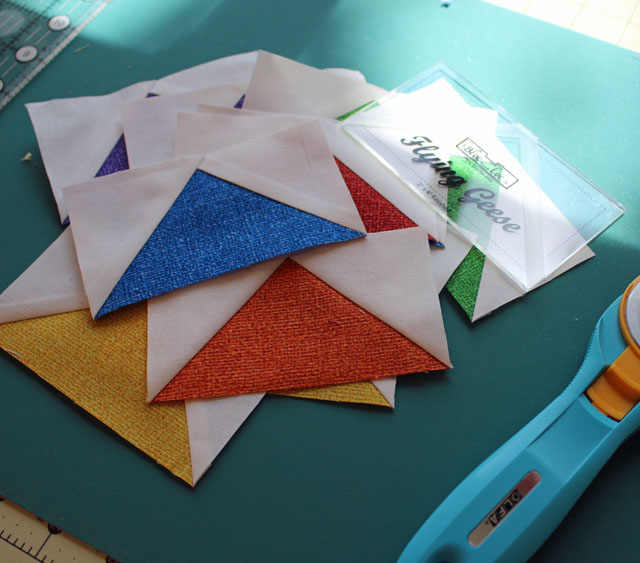
Make two flying geese units of each color: yellow, orange, red, purple, blue and green.
Rainbow Geese Rotation Block tutorial by Julie Cefalu for the Burlap Brights Block Hop at Sew in love {with fabric}    

Assemble the block: 
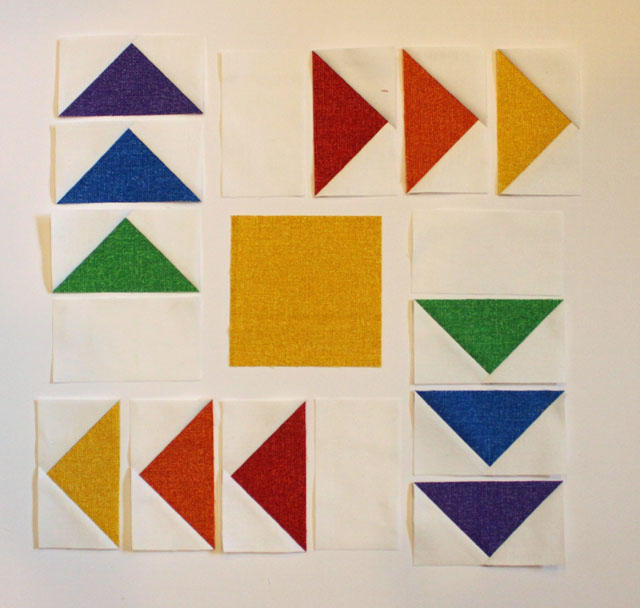
Place the 12 flying geese units, the 4 1/2" yellow square, and the (4) 2 1/2" x 4 1/2" white rectangles as shown below: Rainbow Geese Rotation Block tutorial by Julie Cefalu for the Burlap Brights Block Hop at Sew in love {with fabric}    

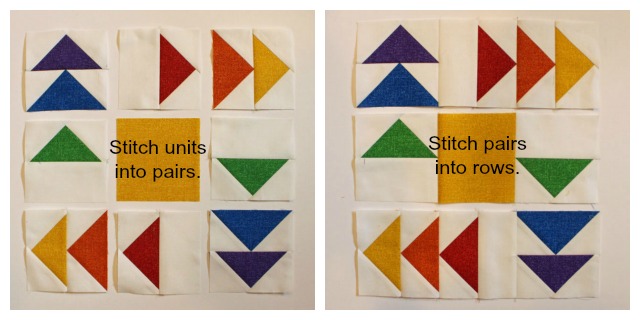
Stitch each unit into pairs; they should measure 4 1/2" square. Then stitch the pairs into three rows as shown below: Rainbow Geese Rotation Block tutorial by Julie Cefalu for the Burlap Brights Block Hop at Sew in love {with fabric}    
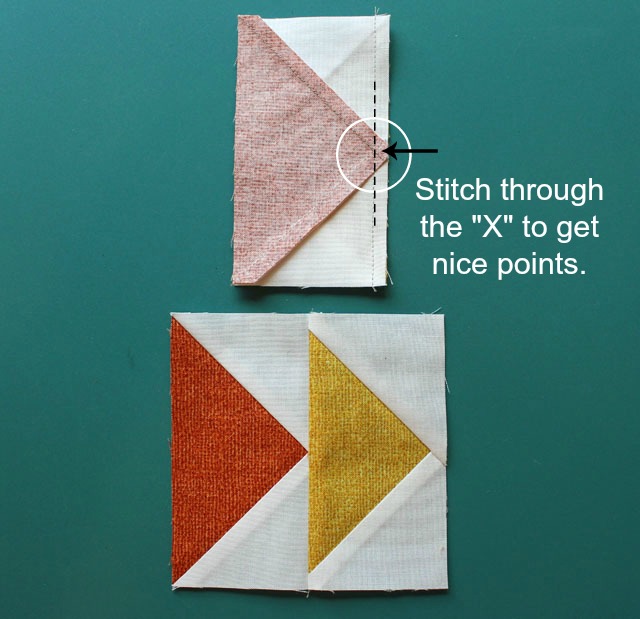
When you sew flying geese units together, make sure you stitch right through the center "X" or point. You'll make nice, sharp points that way! Rainbow Geese Rotation Block tutorial by Julie Cefalu for the Burlap Brights Block Hop at Sew in love {with fabric}    
Sew your rows together, matching seams. Press. Your block should measure 12 1/2" square.
Rainbow Geese Rotation Block tutorial by Julie Cefalu for the Burlap Brights Block Hop at Sew in love {with fabric}    
This is such a happy-looking block. I think it would make a great center for a mini medallion quilt or you could make a bunch of them and you've got a perfect kid's quilt. There are lots of possibilities; I hope you are inspired to make one, too! 
Rainbow Geese Rotation Block tutorial by Julie Cefalu for the Burlap Brights Block Hop at Sew in love {with fabric}  


Thanks Julie! Head over to The Crafty Quilter to enter to win a fat quarter bundle of the six Burlap Brights she used to make her block

Make sure you check out each day's tutorial!


Day 1: Chris from made by ChrissieD
Day 3: Alison from Little Bunny Quilts
Day 4: Debby from Debby Kratovil Quilts
Day 5: Kristen from KD Quilts 
Day 6: Benartex design team
Day 7: Stephanie from Stitched Together Studios
Day 9: Cynthia from Quilting is more fun than Housework
Day 10: Jessica from Quilty Habit 


To see the entire schedule, click here.
Love It? Share It! Facebook Twitter Google Pinterest Email

Tuesday, February 4, 2014

Mug Rug Blog Hop: Day 6


 Welcome back for the sixth day of our Mug Rug Blog Hop! 
Julie from The Crafty Quilter is here today, sharing an adorable pieced house mug rug made using the Sweet Tweet collection. Try out her design (it would make a cute pillow, too!), and then read how you can enter for a chance to win a fat quarter bundle of fabric!


Hey everyone!  I’m so glad to be participating in the Mug Rug Blog Hop at Sew In Love {with Fabrics}.  My name is Julie Cefalu and I blog at The Crafty Quilter where I share all kinds of tips and inspiration for your quilting and sewing pleasure.  I love small projects that can be finished in a day or two and this mug rug fits the bill perfectly!


I love bright and whimsical colors, so I chose the Sweet Tweet line from Benartex to build my Happy House Mug Rug.  This piece in particular, the Sunshine Birdhouse, was my inspiration:


Supplies:
1/8 yard (or scraps) light blue fabric for the sky
1/8 yard (or scraps) pink for the roof (Sunshine Geo Pink)
1/8 yard (or scraps) white floral for the grass (Pom Pom Flowers White)
1/8 yard (or scraps) green for the tree (Sunshine Geo Lime)
1/8 yard (or scraps) yellow for the house (Sunshine Geo Yellow/Blue)
Scraps of red and turquoise for the door, windows and tree trunk
1 fat quarter for the backing (Sunshine Birdhouse, Lt. Blue)
1 8” x 11” piece of batting (I like using Thermolam)

Cutting Instructions:

Light blue fabric: 
·      (2) 2 ½” squares
·      (2) 1 ¾” x 3” rectangles
·      (2) 1” x 2” rectangles
·      1 ½” x 3 ½” rectangle
·      (4) 1” squares

Pink fabric: (1) 2 ½” x 6 ½” rectangle

Yellow fabric:
·      (2) 1 ¼” x 3 ½” rectangles
·      (2) 1” x 3 ½” rectangles
·      (2) 1 ½” x 2” rectangles
·      (2) 1” x 1 ½” rectangles
·      (1) 2” x 1 ½” rectangle

White floral fabric:  (1) 1 ½” x 9 ½” rectangle

Green Fabric:  (1) 2” x 2 ½” rectangle

Red fabric:  (1) 2” x 2 ½” rectangle

Turquoise fabric:  (2) 1 ½” squares, and (1) 1” x 3” rectangle


Assembly Instructions:

Roof:  Draw a diagonal line on the wrong side of the (2) 2 ½” squares of light blue fabric.  Place one on each end of the pink 2 ½” x 6 ½” roof rectangle and stitch on the diagonal line.  Press to the corner and trim seam allowance.

House:  Lay out the house, window and door pieces as show in the photo below.  Stitch pieces together into door and window units.


Sew these units together to make the house.


Attach the roof to the house!  The house should now measure 6 ½” wide by 5 ½” tall.

Tree:  Draw a diagonal line on the 1” light blue squares.  Place these on each corner of the green 2” x 2 ½” rectangle.  I find that using some washable glue instead of pins makes this easier to sew. Stitch on the diagonal lines and press to the corner.  Trim seam allowance to ¼”.


Lay out the light blue sky pieces, tree and tree trunk as shown below.  Stitch pieces together.


The tree unit should measure 3 ½” x 5 ½”.

Stitch the tree unit to the house unit.  Add the 1 ½” x 9 ½” rectangle of grass to the bottom and you’ve built yourself a house!


Layer, baste and quilt your mug rug.  You could just stitch in the ditch for the main house and tree and/or you could add some free motion quilting to add some pizazz!


Thanks for hanging out with me today!  If you want to see more house blocks, visit The Crafty Quilter to find out what I’ve been “building”!


For a chance to win a fat quarter bundle of Benartex or Kanvas fabric, simply sign up to follow this blog, either through Bloglovin' (or another blog reader service) or email (both options are in the right hand sidebar) and leave a comment letting us know you follow. In your comment, since today's project uses a collection called "Sweet Tweet," we're curious--let us know whether or not you're on Twitter. Leave a second comment and receive a second entry by following us on Facebook and letting us know. This giveaway is open through Saturday, February 8 at 11:59 PM EST. 

Make sure you check out all the Mug Rug tutorials!
Day 1: Benartex Design Team featuring Bohemian Rhapsody
Day 2: Debby Kratovil from Debby Kratovil Quilts featuring Fossil Ferns
Day 3: Stitched Together Studios featuring Shaken or Stirred
Day 4: Benartex Design Team featuring Puppy Love and Smooches
Day 5: Candace from Saltwater Quilts featuring Gramercy


Love It? Share It! Facebook Twitter Google Pinterest Email
Tuesday, July 30, 2013

Christmas in July Blog Hop: Day 5


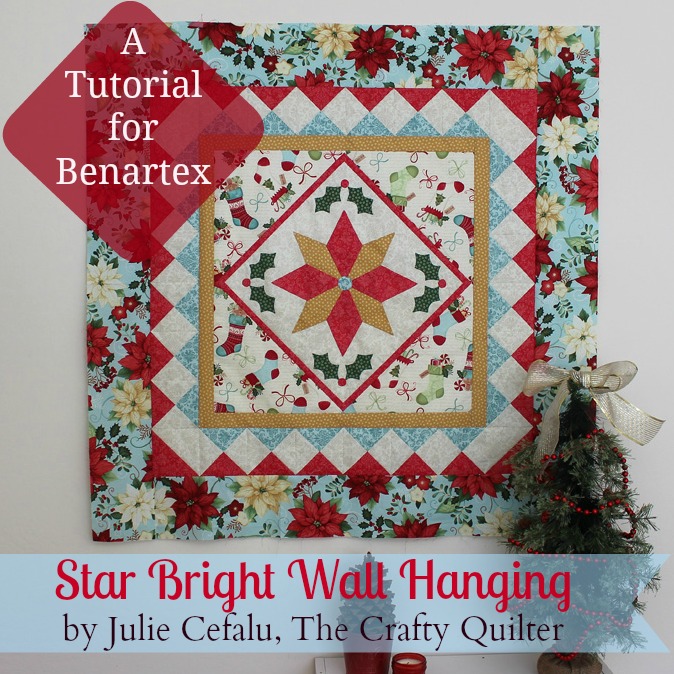
It's Day 5 of our Christmas in July blog hop, and our final tutorial. And it's a great one! Julie from The Crafty Quilter has designed a beautiful wall hanging that includes both piecing and applique, using Michele D'Amore's Home for the Holidays collection. Check out Julie's tutorial below, and then head over to her blog to see how you can win a fat quarter bundle for yourself!

Christmas Wall Hanging by Julie Cefalu for Benartex
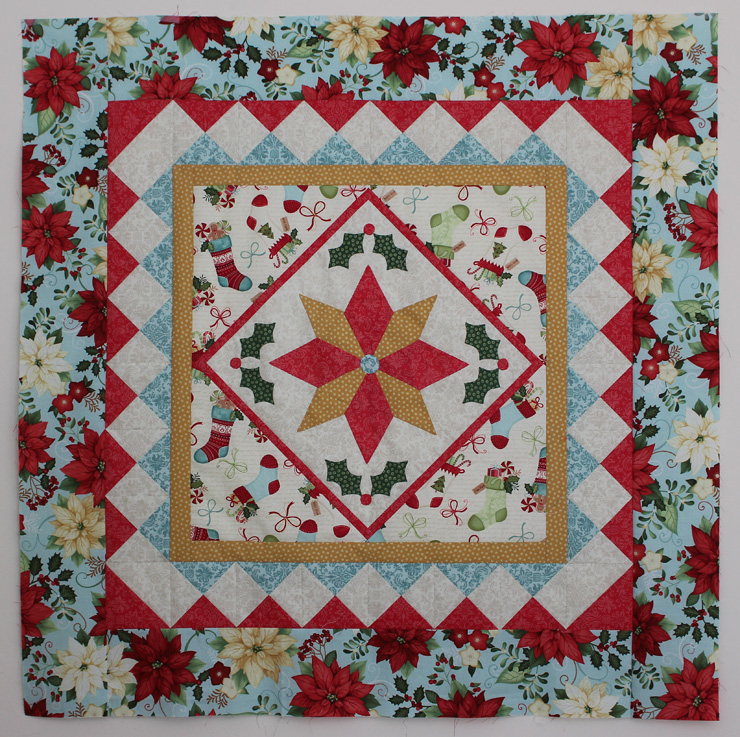
Hello! I'm Julie Cefalu, The Crafty Quilter, and I am so glad to be participating in the Christmas in July Blog Hop for Benartex! I designed this beautiful wall hanging using one of my favorite holiday fabric lines, Home for the Holidays. Finished size: 42-1/2" square

Fabric Requirements:

All fabric is from the Home for the Holidays collection by Michele D'Amore.
  • Ivory Damask: 1/2 yard
  • Light Red Damask: 1/2 yard
  • Aqua Damask: 1/4 yard
  • Ivory Stockings: 1 fat quarter
  • Gold Metallic Dot: 1/4 yard
  • Green Metallic Dot: 1/8 yard
  • Aqua Flower: 7/8 yard
  • Binding: 1/2 yard

Cutting Instructions:

Ivory Damask: Cut (1) 15" square for applique background. From remaining fabric cut (3) 5-1/2" strips, subcut into (12) 5-1/2" squares and (2) 5" squares for pieced border.
 Red Damask: Cut (1) 5-1/2" strip, subcut into (6) 5-1/2" squares for pieced border. Cut (1) 5" strip, subcut into (2) 5" squares for pieced border. Use remainder of this strip for applique. Cut (2) 1" strips, subcut into (2) 1" x 14-1/2" rectangle and (2) 1" x 15-1/2" rectangle for applique border.
Aqua Damask: Cut (1) 5-1/2" strip, subcut into (6) 5-1/2" squares for pieced border.
Gold Metallic Dot: Cut (4) 1-3/4" strips, subcut into (2) 1-3/4" x 22" rectangles and (2) 1-3/4" x 24-1/2" rectangles for inner border.
Ivory Stocking: Cut (2) 12" squares, cut in half diagonally once for setting triangles.
Aqua Flower: Cut (4) 5-1/2" wide strips; Measure quilt top before cutting into the following border pieces: (2) 5-1/2" x 32-1/2" rectangles and (2) 5-1/2" x 42-1/2" rectangles.
 All seams use 1/4" wide seam allowance.

Applique Instructions:

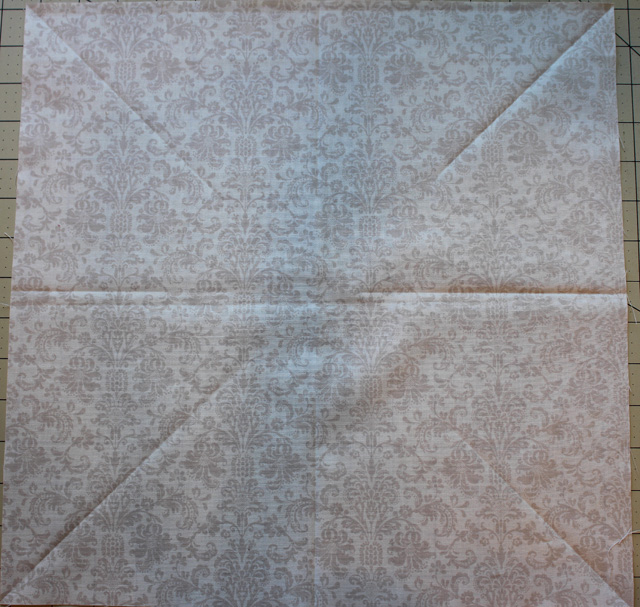
Fold 15" background square in half and in half again; press lightly. Repeat on the diagonal. This will give you placement guides for your applique pieces. applique background
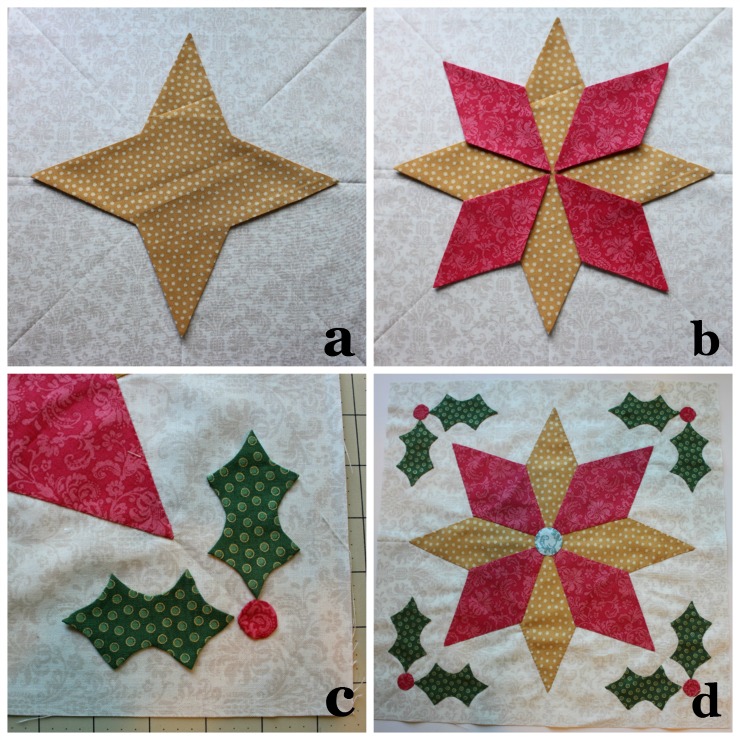
 Using the applique pdf file (click here to download) and your favorite applique technique, make (1) gold star, (4) red star points, (8) green holly leaves, (4) red berries and (1) center circle. a) Place the gold star on the background square so that the points line up on the 90 degree placement lines. b) Add the red star points so that the points line up on the diagonal placement lines and at the center of the star. c) Place one red berry at the diagonal line, 2" from each corner; add two holly leaves extending from each berry as shown. d) Place one aqua circle in center of star.
  applique placement
 Applique all pieces in place. I used a turned edge applique technique and stitched with invisible thread and a blind hem stitch. You can find my tutorial for the invisible machine applique stitch here and my tutorial for raw edge machine applique can be found here. Trim the applique square to 14 1/2".

Applique borders and setting triangles:

Stitch the red 1" x 14-1/2" strips to opposite sides of the applique square. Add the remaining two 1" wide strips to the other two sides. Press toward borders. setting triangles placed 2
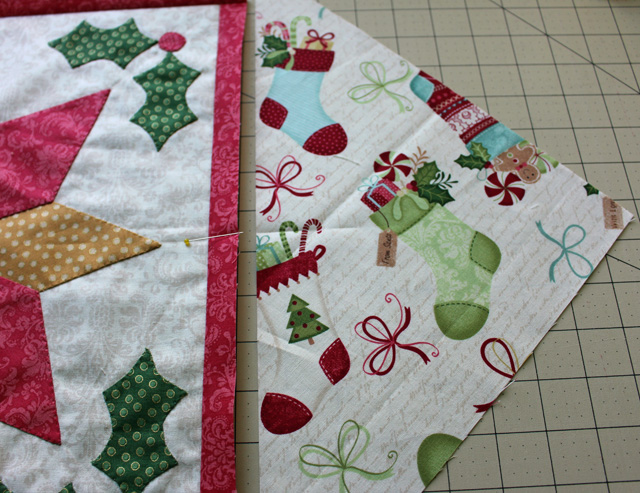
 Match the center of each setting triangle with the center of each side and stitch in place. Press toward setting triangles.
  setting triangle match center
 Trim the center applique unit to 22" square. trim to 22
 Stitch gold 1-3/4" x 22" inner border pieces to the center applique unit. Add remaining 1-3/4" x 24-1/2" inner border pieces. Press towards inner border. inner border in place

Pieced border assembly:

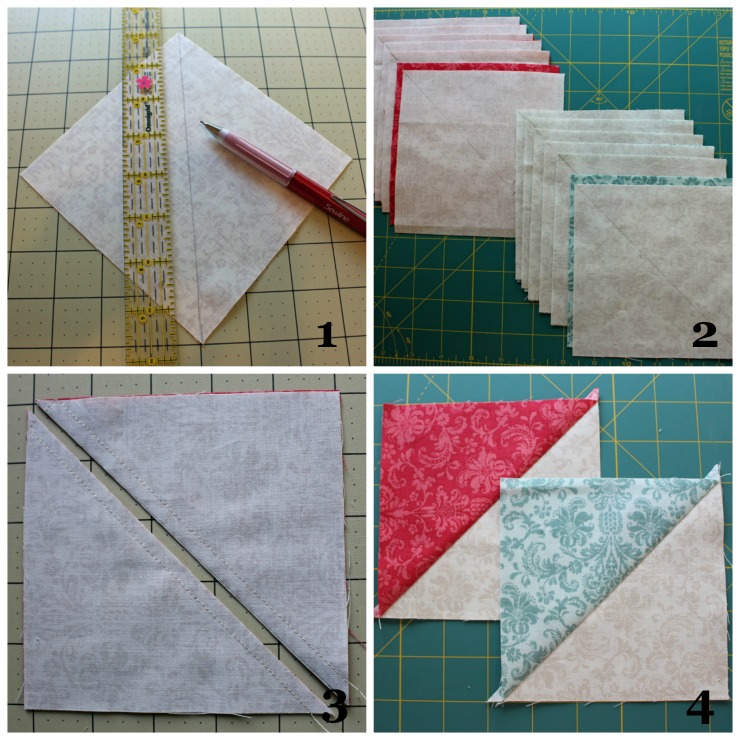
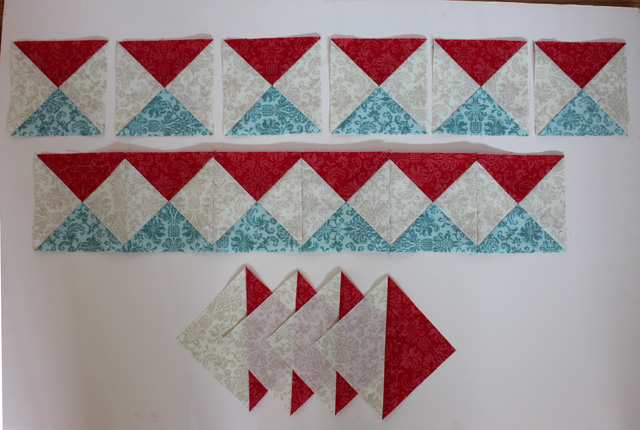
1. Draw a diagonal line on ivory 5-1/2" squares. 2. With right sides together, pair up an ivory square with 6 each red and 6 each aqua squares. 3. Stitch 1/4" on each side of drawn line. Cut in half on diagonal line. 4. Press towards dark fabric. Now you have a total of 24 half square triangle units (HST's).
  HST Steps
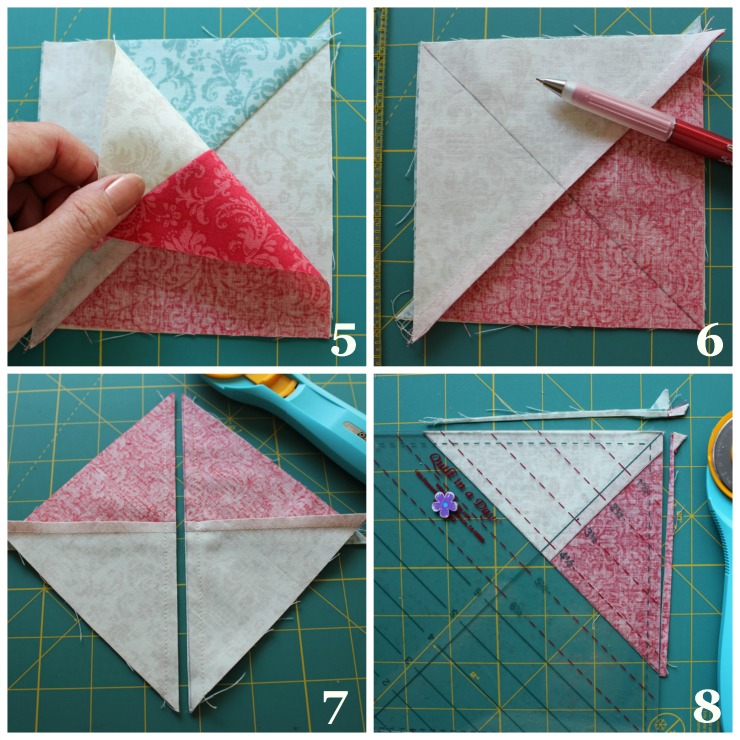
  5. Pair up HST's of opposite colors, matching seams. 6. Draw a diagonal line that runs perpendicular to seam. 7. Stitch 1/4" on each side of drawn line. Cut in half on the diagonal line. 8. Trim unit to 4-1/2" square. I used Quilt in a Day's triangle square up ruler which is so nice for trimming quarter square triangles.
  QST steps
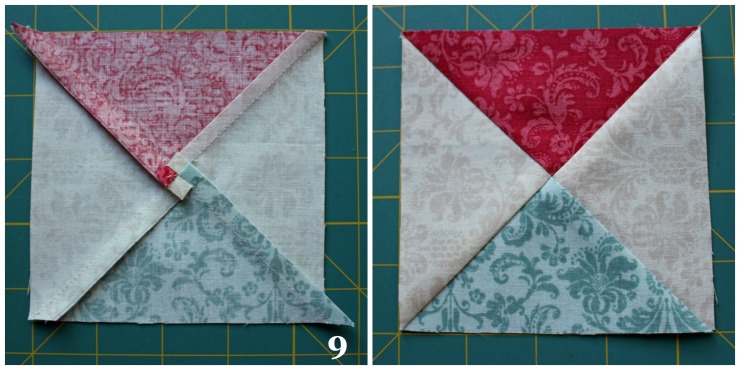
9. Press seam to one side or as shown:
  QST Pressed
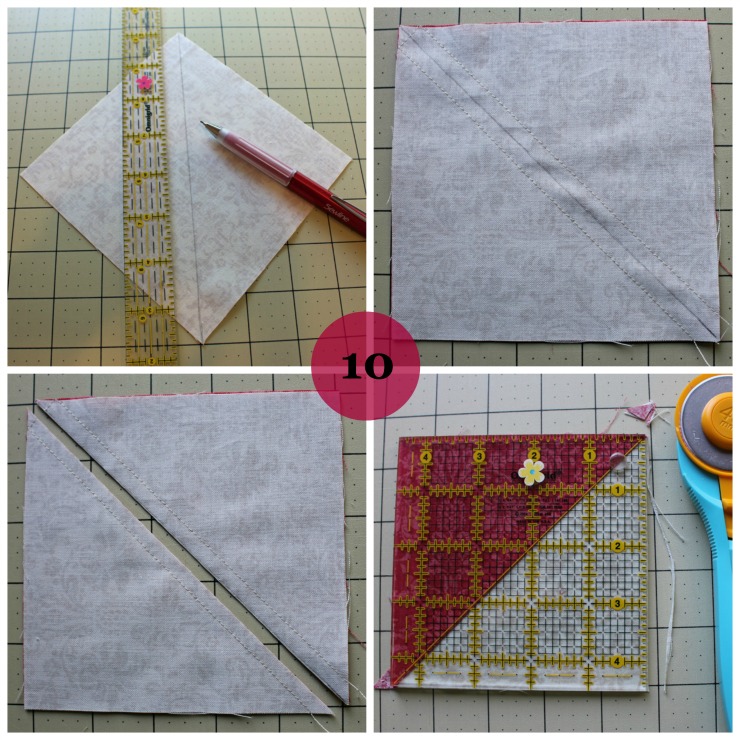
 10. Make four half square triangle units using the (2) 5" ivory squares and (2) 5" red squares as shown. Trim to 4-1/2" square.
  HST Steps 2
11. Stitch (6) quarter-square triangle units together, matching seams. Press seams open. Repeat to make four pieced border units. They should measure 24-1/2" long.

qst rows make

Adding borders:

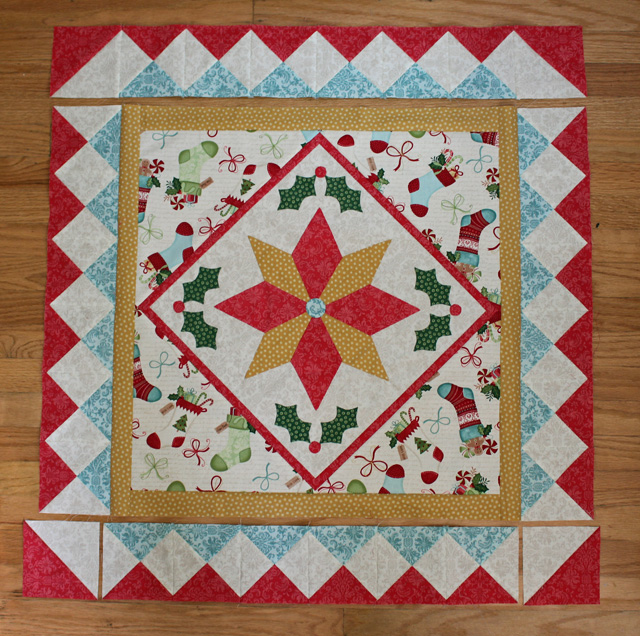
Arrange pieced border units and HST's around the center applique unit. Stitch a pieced border to each side. Press towards inner border.
  pieced border placed
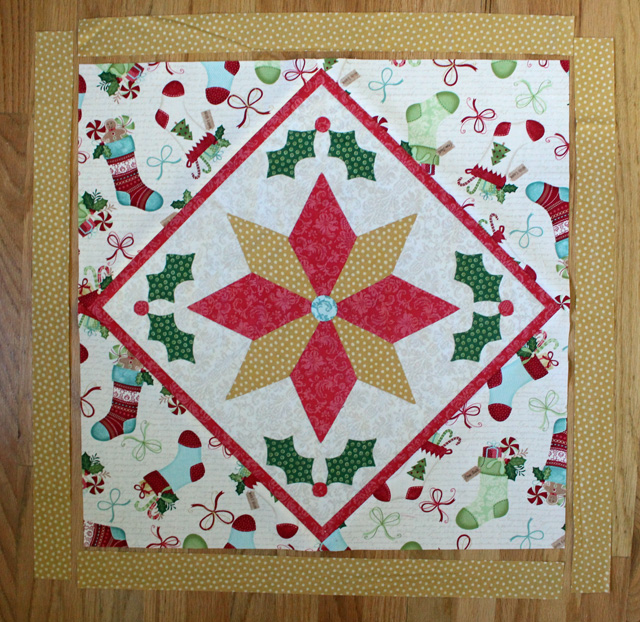
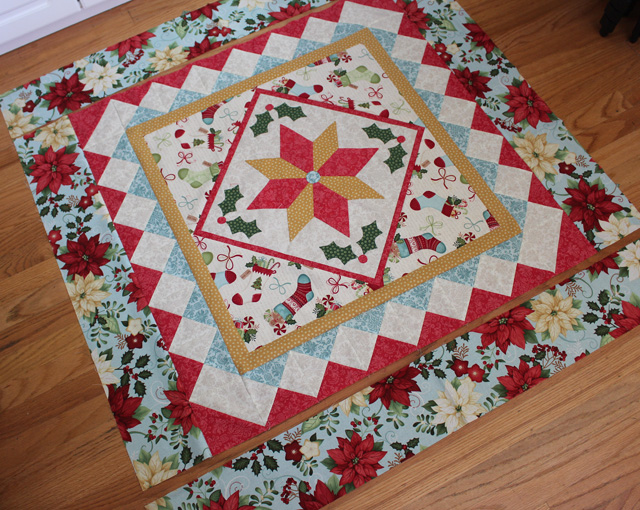
 Stitch the HST's to each end of a pieced border unit. Add to the top and bottom of center applique unit. Make sure to match seams at the corners. Press towards inner border. Stitch 5-1/2" aqua floral border strips to each side of wall hanging. Press towards outer border.

wall hanging side borders 2 

Finishing:

Layer, baste and quilt as desired. Add binding and a hanging sleeve to finish it off. Mine is not finished yet, but I'm working on it!
Star bright Wall Hanging by Julie Cefalu for Benartex
Star Bright Wall Hanging by Julie Cefalu


Thanks, Julie! What a gorgeous wall hanging! (And so nice to have it almost finished with Christmas still 5 months away!) To find out how to enter to win a fat quarter bundle of the Home for the Holidays collection, visit Julie's blog.


If you missed the other tutorials from the Christmas in the July blog hop, click on the links below:
Day 1: Ho-Ho-Ho, Let It Snow advent calendar tutorial, click here.
Day 2: Christmas Spectacular table runner tutorial, click here.  
Day 3: Snowfolk Mantel quilt tutorial, click here.
Day 4: Peppermint Twist pillow tutorial, click here.

And...don't forget to head over to our Facebook page and enter a recipe in our Christmas cookie exchange--we'll be compiling all the entries into a pdf recipe book to share!
Love It? Share It! Facebook Twitter Google Pinterest Email