Wednesday, February 28, 2018

Feels like Spring: Life in Full Bloom


We're featuring a second quilt showcasing Nancy Halvorsen's Bree collection today. This quilt, designed by Nancy herself, is featured in the March/April issue of McCall's Quilting. The quilt, called "Live Life in Full," is certainly full of whimsical charm! 
Read below to find out what Nancy has to say about her quilt. Read below to learn what Nancy has to say about her quilt.


"Life in Full Bloom" designed by Nancy Halvorsen
and machine quilted by Catherine Timmons;
featured in McCall's Quilting March/April 2018

Can you tell us about the quilt’s message?
I knew this issue would come out in spring, so I was trying to think of something to do with flowers and spring time. I love to come up with positive uplifting messages. I thought “Live life in full bloom” would be a fun, happy idea that I could mix in with the flower blocks.

The flower blocks go well with the style of the text.
I actually designed this block years ago and reworked it for this quilt, adding the white centers to the petals. The white keeps it bright and fresh without detracting from the center block.
I gave the flowers a scrappy look because I love to give things texture—it’s more interesting than just using one fabric. I tried to use as many prints as possible because they’re so fun together.

Photos: McCall's Quilting

Did you have fun making the letters?
Yes! I wanted the letters to look like a garden—lots of different colors. The second “O” in bloom is a flower with a stem. I’ve been doing that type of thing for years—I love to take letters in a word and turn them into what the word is talking about.

What do you like best about this quilt?
I love how bright and cheerful and uplifting it is. To me, it’s a perfect lead-in to spring. Spring always makes me feel happy after slogging through winter.

Can you tell us about the machine quilting?
Catherine Timmons is is so awesome. She does all of my quilting for me. She does the cutest things. Sometimes I will give her direction but this time I just said “do your beautifulness.” And she did.


Click here to see Nancy's entire Bree collection.

Click here to see more of Nancy's work.
Click here to purchase the digital pattern.
Click here to find McCall's Quilting magazine.

Love It? Share It! Facebook Twitter Google Pinterest Email

Tuesday, February 27, 2018

Feels like Spring: Pinwheels & Rails

We're helping usher in spring with a couple bright and cheerful quilts this week!
First ups is the Pinwheels & Rails quilt designed by Melanie Greseth and Joanie Holton of Tailormade by Design, featured in Quilter's World magazine. They used a curated palette of prints from Nancy Halvorsen's Bree collection to create Pinwheels & Rails, a quilt that absolutely "sings spring." We asked Joanie to talk about the quilt design.

"Pinwheels & Rails" designed by Tailormade by Design
and machine quilted by Naomi Polzin;
featured in the Spring 2018 issue of Quilter's World magazine

How did you choose this more limited palette from Nancy’s collection?
We chose the pastel palette purposefully. Nancy’s pastels aren’t baby pastels—they’re still vibrant, and we wanted to highlight that. For the rail fence blocks, we chose four prints—light to dark—from each of four colors.

Tell us about the two different styles of rail fence rows.
Traditionally, a rail fence design is stacked to create a zig zag effect. We didn’t want that to distract from the pinwheels and applique rows, so we added a neutral lattice to separate some of the blocks.

The pinwheel blocks add playfulness to your design.
We alternated placement of the stronger and lighter colors in the pinwheel blocks to add variety. We also used half blocks on each end. Instead of having everything so symmetrical, the half blocks throw in a little twist. People are afraid of half blocks and they don’t need to be!
  
Photos: Quilter's World

Your flower appliques are adorable!
Thanks! We wanted a simple applique in a few different sizes that had the feel of the fabric line. These petals are accessible for all quilters—easy to do—but also cute.

With so many fun prints to choose from, how did you pick the border fabric?
Choosing that was fun. It was actually a challenge—deciding how we wanted the quilt to feel. We tried blue, and orange, but the green did the best job of framing the quilt center without overpowering the rest of the design.

What do you like best about the quilt?
What I ended up liking best is how it came together. It’s a soft quilt, but it’s not a baby quilt. The colors are saturated. It’s really lovely. It really sings spring.


Click here to see Nancy's entire Bree collection.
Click here to find Quilter's World magazine.

Love It? Share It! Facebook Twitter Google Pinterest Email

Monday, February 26, 2018

AP&Q Podcast with Pat Sloan!

Make sure you tune in to the American Patchwork & Quilting Podcast hosted by Pat Sloan. Today you'll hear her talking with two of our Benartex designers: Jackie Robinson and Amanda Murphy. Tune in at 4 pm EST! 


Click here to listen to the podcast.

Love It? Share It! Facebook Twitter Google Pinterest Email

Friday, February 23, 2018

Cat-I-Tude Virtual Trunk Show

Welcome to our virtual trunk show! You've seen Ann Lauer's Cat-I-Tude collection, and today she's sharing some of the quilts she has designed using these fun prints. Don't miss the free quilt pattern at the bottom of this post! 

"Aristocrats"
I'm really excited with how the panel came out, and this quilt design (see two options below) shows it off beautifully! This wall quilt features the panel with a pieced border. 

Adding a second pieced border (and a few appliqued cats!) increases it into a lap-size quilt. 
Click here to find the pattern and kit.


"What's for Dinner"
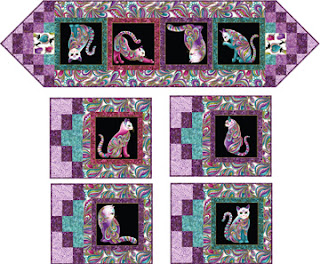
This second runner and placemat set (you saw Dinner in Style here) uses the cat panel blocks with a little bit of easy piecing to finish them off. 

Click here to find the pattern and kit.

"Afternoon Delight"
This is one of my most popular patterns, and I love how it works with the cat blocks! You can piece this in an afternoon with fast flying geese units. 
Click here to find the pattern and kit.


"Radiance"
This two-block design is easier than it looks! The stars and chains create wonderful frames for the cats.
Click here to find the pattern and kit.

"Color Me Happy"
This quilt uses just the coordinates from the collection. It's wonderful for showing off a focal print in the center squares. 


"Cool Cats"
This is the free quilt pattern available on Benartex's website. Delicately pieced blocks alternate with cats in hexagons--fun to make and fun to look at!
Click here to download the free quilt pattern.


Click here to see Ann's entire Cat-I-Tude fabric collection.
Missed our original post with Ann's interview about Cat-I-Tude? Click here to find it. 
Click here to visit Ann's website and find her Cat-I-Tude quilt patterns and kits.


Love It? Share It! Facebook Twitter Google Pinterest Email

Wednesday, February 21, 2018

Sunflower Sparkle

We're paws-ing (get it? ha ha...) our Cat-I-Tude focus for this week to share another quilt made by Ann, using her Here Comes the sun fabric. Starring Sunflowers is featured in the January/February 2018 issue of Love of Quilting magazine, and is also featured in the PBS Love of Quilting TV Series 3100 (check your local PBS station for listings).

"Starring Sunflowers" designed and quilted by Ann Lauer; pieced by Lou Thompson;
featured in Fons & Porter's Love of Quilting January/February 2018 issue.

 Ann walked us through her quilt design: 

Tell us about the pieced quilt center.
One of the things that makes this quilt interesting is the way four blocks come together and look like a larger block. You can’t tell what the block unit is at first glance. It’s all done with combinations of simple units—half-square triangles and triangles. It makes an involved-looking block.

The border treatment in this quilt is so interesting!
It’s not a typical border treatment, is it? Nine-patch units on point and setting triangles create a border that flows from the cream quilt center background to the teal dappled texture print. Strips of those two prints around the nine-patches provide breathing space as well. The nine-patches create a delicate look—the edges almost disappear into the next border. 


Why did you choose to use sunflower fabric only in the outer border?
The coordinate prints used in the quilt center have so much movement and interest, and I wanted to focus on them. Sunflowers, and splotches of partial sunflowers cut up to fit in the design, would interrupt the design. I thought these coordinates were pretty and worked well together.

And the final touch, the outer sunflower stripe border?
All the beauty in a stripe like that really shines in a wide border. I designed this print so you can cut four stripes of border across the width of the fabric. These sunflowers are actually prettier than those you’d see in nature, thanks to some artistic license. This border gives the sunflowers an opportunity to sparkle.

What do you like best about the quilt?
I like the combination of three things: the center piecing that looks involved but isn’t, paired with the delicate nine-patch border, and then the sunflowers adding weight along the outside edge.

What about fans of purple?
I also mocked up this quilt using the purple colorway! You can see it below, and I have a kit available for it on my website. 


Click here to read more about Ann's Here Comes the Sun collection.
Click here to purchase the pattern and here to purchase the kit. 
Click here to purchase the kit from Ann in either the purple or teal colorway.
Click here to find Love of Quilting magazine. 


Love It? Share It! Facebook Twitter Google Pinterest Email

Tuesday, February 20, 2018

Technique Tuesday: Piecing a Perfect Bargello


Hi! Ann Lauer here for a Technique Tuesday post using my new Cat-I-Tude fabric collection. 

I love to make bargello quilts. They have so much movement in the design, and on top of that, they're fun to piece. Today I'm going to show you the technique I use to assemble this type of quilt. It make assembly easier and more accurate. 

"Dinner in Style" bargello placemat pattern

When I make bargello quilts, I like to use Creative Grid Flannel in my quilt sandwich. This 2" cotton grid fabric has “surface tension” built in to keep your pre-cut fabric pieces in place when doing your quilt layouts. In our case, we'll be layering batting over it, and it will hold the batting in place. The grid lines help to ensure that the strips are laid straight and that the stitch lines are straight as well. 


Here's how I do it, using my Dinner in Style placemat set pattern as an example: 

Step 1: Choose your backing fabric. I chose Aristocats on black. This is a nice backing fabric because the placemats can even be turned over with this fun fabric on the back.  


Step 2: Position the backing fabric right side down, Creative Grid Flannel wrong side up and the batting on top. I prefer to use a thin batting such as Hobbs Thermore, which is bonded on both sides so it's easy to sew on. I like the combined weight of flannel and the thin Hobbs Thermore batting in table top projects. Note: The lines on the flannel are dark and you don’t want them to show through the lightest fabric that you are using. Therefore, I layer it wrong side up and place it under the batting.  You can see the lines through the batting well enough to keep the segments straight as you sew.  There are other grid products available and if you use one that isn’t printed too darkly, you may want to layer it on top of the batting.

Notice how you can see the lines showing through batting when you layer the batting piece on top of the Creative Grid Flannel.


Step 3: Following your quilt pattern, cut your fabric strips and sew into a tube. Press all your seams in one direction. 


Step 4: Use the grid to lay the first segment along a left hand vertical line and the top of the segment along a top horizontal line.  Follow the instructions and as you stitch each segment, open it up and check to be sure that the cut edge is staying parallel to a vertical grid line and that the seams within the segments are staying parallel with the horizontal grid lines.  Directions are included in my pattern on how to correct any areas that begin to bow.  By using this technique, all of the stitching will be straight and the bargello will be stabilized which will make it easy to fuse the cats onto the placemats.  


Step 5: Here's a view of the first five segments laid on the backing/grid/batting sandwich. These strips are tubes that have been opened on the designated seam so they lay flat. 


Step 6: When all the strips have been stitched in place, you will have made one large quilt-as-you-go section that you will cut into fourths to yield four placemats. Each placemat will be somewhat different, but they all go together beautifully.

Here is what the finished and bound placemats look like, complete with fussy-cut cat appliques: 


Click here to see Ann's entire Cat-I-Tude fabric collection.
Missed our original post with Ann's interview about Cat-I-Tude? Click here to find it. 
Click here to find the Dinner in Style kit and pattern.
Click here to find Creative Grid Flannel. 

Love It? Share It! Facebook Twitter Google Pinterest Email

Monday, February 19, 2018

Meow! Cat-I-Tude is Here!

You don't have to be a cat lover to fall in love with Ann Lauer's Cat-I-Tude fabrics! 
(Although we're sure anyone with a feline friend is already smitten!)

Cat-I-Tude debuted at Fall Quilt Market, and the fabric is now available in shops. 

Ann's cats aren't cute fuzzy little furballs--they're sophisticated porcelain-looking cats with elegance and style, created in a vibrant palette of jewel-toned purples, aquas pinks and greens that pop against both black and white backgrounds! 

If cats aren't for you, the line also includes a paisley, heart prints, and a variety of machine quilting inspired blenders. Wonderfully rich colors with gorgeous shaded depth in the designs! 


We asked Ann to tell us about the Cat-I-Tude collection: 


Why did you choose cats as a theme for a fabric collection?
They’re such a beautiful and recognizable shape. I’ve never had a cat, but I do like their shape and movement. They’re so artistic and fluid.


You “decorated” these cats—no fur!
Yes! I think of these cats as being hand-painted porcelain. I didn’t want them to look cutesy or cartoony. The swirls and paisleys you see on them (and in other prints in the collection) are similar to long arm quilting designs.


Tell us about the panel.
I’m really excited about how this panel turned out. Each of the cats is a nice size, and they’re surrounded by a 1” feather border. If you cut ¼” outside of that, you have a 10” square block. With no frame, the cat will fit in an 8” square block. It’s designed to be used in a variety of sizes. The paisley print is on the top and bottom of the border. If you add strips of the paisley print to the sides, you’ll have an instant quilt. The panel comes on both black and white backgrounds.


What do you think really sets this fabric line apart?
The shading creates a luminescent look, laced with just the right touch of metallic gold. Everything—the hearts, the cats, the beads—is shaded to create depth. I also love how the jewel tones look with the gold on the cats—it just enhances that porcelain feeling.

Can you share some of your favorite prints?
The cat print features the same cats from the panel, made smaller. They have all the detail of the larger cats. Several of my patterns have them cut out and used as applique.


The hearts are a machine quilting motif. They come with and without cats. I love the cats climbing over the hearts!


The tonals: Feather Frolic is in beautiful teal, red, and purple—the darkest coordinate values—and again, a machine quilting motif. The medium value is the Triangular Motion print, and the lights are the Beaded Swirl print, which also comes in a multi-color version.


The all-over Paisley Style matches the panel. It has plenty of swoops and swirls, and a lot of shaded depth.  


psst! There's a coordinate Cat-I-Tude embroidery collection, too! Click here to see it.

Click here to see Ann's entire Cat-I-Tude collection. 
Click here for a look at the patterns Ann has designed using Cat-I-Tude. 
(We'll be taking you on a virtual trunk show later this week!)


Love It? Share It! Facebook Twitter Google Pinterest Email