Showing posts with label hexagons. Show all posts

Tuesday, January 9, 2018

Technique Tuesday: Transforming 10x10s into Hexagons!


It's Technique Tuesday here on the blog! Debby Kratovil from
Debby Kratovil Quilts will show you how to turn a stack of
10x10s into an easy (yes, we said easy!) hexagon quilt.


Here's Debby!
Are you looking for a creative way to use a stack of 10" squares? 

Benartex sent me this beautiful Essence of Pearl 10x10 pack in the Purple colorway. I asked for a companion fabric to go with these,
1 yard of the light lavender Tossed Sprigs.


Essence of Pearl 10" Squares

I was aiming for hexagons (surprise, huh?)  Hexagons are wider than they are high, so I cut 2-1/2" strips from each of the 10" squares. This gives me 7-1/2" x 10" rectangles to work with for my next steps.
2-1/2" strips cut off each square
There were 42 squares in the pack, so I ended up with 42 strips 2-1/2" x 10". Trust me: I will use these later on. Nothing is EVER wasted in my quilting (even if I have no clue where I'm going!) You can see the Purple Tossed Sprigs fabric that I'm going to use to tie all this together.
Beautiful strips cut from the Essence of Pearl Purple pack

I'm going to cut hexagons from each of the squares. I used my Creative Grids 60 degree ruler to do this (this will NOT work with rulers that have a pointy tip; only those that simplify the cutting and have a blunted tip).

My 7-1/2" hexagon will finish to 7". Half of 7" is 3-1/2". I fold my 7-1/2" x 10" strip with the fold at the BOTTOM, align the 3-1/2" line on the ruler with the top cut edges as shown, and then slice on both sides of the ruler. GASP! Really?

Cutting my hexagons

I can tell you don't believe me. Sigh! Take a look, ok?

Perfect hexagon with remaining (and usable) triangles


I didn't use the 6 lightest fabrics, so I ended up with 36 hexagons (not all shown here):

Hexagons cut from the 10" squares

Now, what was my plan? First, I need triangles to set with the hexagons. These will enable me to sew straight seams (ie, no y-seams). Take a look:

I cut 4" strips. Why? These will finish to 3-1/2" (which is half the finished height of the hexagons). Flip flop the ruler up and down to get the needed triangles. The end patch I will use on the quilt rows. It is called a 30 degree triangle.

4" strips cut into triangles
 Triangles are joined in this manner:
Joining triangles to the hexagons
 Join the triangles to the hexagons as shown.
Join triangles to opposing ends of the hexagons
An end hexagon uses one of the 30 degree triangles at the far left. Notice that my seams will be diagonal, yet straight, when I join the hexagons into a horizontal row!

Partial horizontal row

 More triangles and hexagons. Notice the right hexagon, which will be the right end of my row. It also will have a 30 degree "straightening" triangle.
Another row

 Let's see the rows. It's always a good idea to lay out your hexagons to see where you want them to appear in the quilt. Then, identify the rows and then join the triangles (as in the pic above).

I decided to have rows of 5 hexagons alternate with rows of 4. Those large 30 degree triangles are cut from 11" strips (7" plus 3-1/2" plus 1/2" seams = 11")

11" strip is folded, wrong sides together. You are cutting mirror image triangles (one for each side of a row).

Side setting triangles
 Mirror image triangles.
Large 30 degree triangles
And here are my first 3 rows.

Three horizontal rows
Row 1 is sewn as follows:
Row 1 sewing

Row 2 is sewn as follows. It is then sewn to another Row 1 with the large 30 degree triangle.

Rows 2 & 3

Then they get repeated again, twice more.

Now, let's see the whole quilt center. It measures 40" wide and 50" high:
Essence of Pearl quilt center: 40" x 50"

Remember those large triangle pieces leftover from cutting the hexagons? I had a plan. I put them together with some of that light background fabric and created a traditional Whirling Hexagon.

These are the 30 degree triangles leftover from the hexagon cutting:

Each set has a left and right side angle

And here's my first Whirling Hexagon block (also called Spinning Star):

Spinning Star/Whirling Hexagon

And just for a variation, I can straighten up the sides using another pair of the triangles:

Spinning Star with side triangles
Hope you enjoyed seeing how easy it is to cut whole hexagons from a stack of 10" squares. I think I will use a single piece of border fabric in order to cut down on all that stitching!

Click here to see the entire Essence of Pearl collection.

Love It? Share It! Facebook Twitter Google Pinterest Email

Tuesday, December 5, 2017

Technique Tuesday: Hexagons, Diamonds and More with Festive Season 2!

Today Debby Kratovil of Debby Kratovil Quilts is back with us for Technique Tuesday. She is sharing what she's done with Jackie Robinson's collection called A Festive Season. Debby returns to her hexagons for this table topper.

Tell us about this, Debby.


I received a bundle of many of the prints, and what I was most excited about were the vertical panels of cardinals! I had plans to make a strippy quilt and use these birds. But, even after cutting dozens of half hexagons and piecing several vertical strips, I walked away and started something else!


Vertical border print from Festive Season

 These are the half hexagons I cut, but then moved on to another idea!


Half hexagons cut from most of the prints

 Here are the fabrics that I began with.


Fabrics from Festive Season

I decided to make an upsized block using Katja Marek's New Hexagon calendar, the November 25 block. I can rotary cut any patch based on the 60 degree grid and this is what I did.


The New Hexagon Perpetual Calendar

Here is the block as it appears in the calendar:
November 25 block from Katja Marek's perpetual calendar
Notice that there are 3 shapes in the block: a triangle, a diamond and a jewel. These have 60 degree angles. Easy to cut. Let me show you how!

Have you ever noticed the diagonal lines on your rulers? These are MAGIC! I use the 60 degree lines all the time. I cut 3" strips of this gorgeous gold print, sliced off the selvedge edge with a 60 degree angle by placing the ruler's 60 degree line at the bottom of the strip. Then I measured 3" over from the cut edge and cut perfect 3" diamonds.
3" strips cut into 3" equilateral diamonds

 These are the 4 diamonds which will become my jewels.


Four diamonds about to become jewels

I can make a perfect jewel by knowing what size the diamond will finish to (2-1/2"). Half of that is 1-1/4". I take my Creative Grids 60 degree ruler and line it up as shown and cut off a 1-1/4" triangle (discard). A perfect jewel! I cut four of these

Cutting a perfect jewel patch

Now for the black diamonds (the same size as the gold ones above):


Black diamonds cut from 3" strips

And the small red triangles FINISH to 1-1/4", so I cut those from a 1-3/4" strip:


Red triangles cut from a 1-3/4" strip using a 60 degree ruler

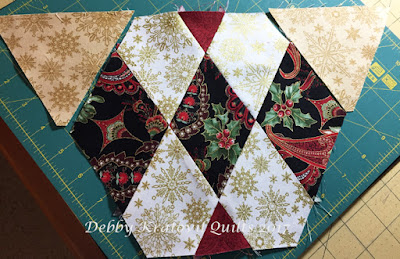
Let's see them lined up together! They will be sewn along those two diagonal lines.


  • Left side: sew the red triangle, gold jewel and black diamond into a row. Press seams
  • Center: Sew the two jewels to the black diamond.
  • Right side: sew the black diamond, gold jewel and bottom red triangle together.


Festive Season block patches ready to be sewn

To make my table topper, I made 6 of these blocks. They will finish to 7-1/2". I wanted a center hexagon and decided to fussy cut one of the cardinals from another print in the collection.


Fussy cutting the cardinal using a freezer paper template window.

I interfaced the hexagon shape and he's now ready to add to the center. In order to make the six pieced blocks fit together (without y-seams), I new needed to cut setting triangles to go on both sides of the top of each block. Here is what I mean:


Sew two beige 60 degree triangles to top two sides of 3 blocks. Cut from 4-1/4" strips

Because the hexagon block finishes to 7-1/2", my triangles will finish to half that: 3-3/4". So, they are cut from 4-1/4" strips.
Sew two red 60 degree triangles to top two sides of 3 blocks. Cut from 4-1/4" strips

And let's see the six blocks sewn into a "circle" with the fussy cut cardinal in the center.

No y-seams, honest! Sew 3 blocks (two with beige triangles and one with red) into a large half-hexagon for the top. Sew 3 blocks (two with red triangles and one with beige) into a large half-hexagon for the bottom. Now sew both together (there will be a very big hole in the middle!)
Six pieced blocks sewn into a ring and then the interfaced cardinal is machine appliqued onto the center

I added an inner and outer border to this and machine quilted it on my HandiQuilter Sweet 16 and here she is.
Festive Season table topper: 31" x 36"

In between working on this, I made several other hexagon blocks. Allow me!


Double Twisted Hexagon

I call this Christmas Hexagon Star.


Christmas Hexagon Star from Katja's Hexagon calendar

And one last block using hexagons! This is in her calendar on the date of November 27


Center hexagon, four half-hexagons, two diamonds and two triangles!

Whew! I think I'm tired. But I had such a fabulous time playing with A Festive Season. I hope you were inspired and will look at your rulers in a new light. They can do some pretty magical things.
Love It? Share It! Facebook Twitter Google Pinterest Email

Wednesday, October 19, 2016

Mug Rug Blog Hop: Day 2

This week we're hosting the Mug Rug Blog Hop!
In celebration of fall, a season filled with mugs of apple cider, tea, and even hot cocoa, we have four different bloggers sharing a mug rug design they've created with one of our new fabric lines. 
BYOM (bring your own mug), but we'll provide the mug rug inspiration, as well as fabric giveaways! 

Day 2 features Debby of Debby Kratovil Quilts with the Wings collection for Contempo. Debby works with one of her favorite shapes, the hexagon, to make a sweet mug rug with a fussy-cut bird silhouette. 

Here's Debby:
The colors in this Wings Collection by Jennifer Young really captured my attention. The deep aqua with the browns and taupes are a perfect complement to the sweet birds in the main print. What do you think? I was given 5 fat quarters and then it was up to me to create a mug rug for this blog hop.
Wings Collection by Jennifer Young
I was reminded of a free pattern by Pam Rocco at the Quilter's Newsletter web site for a coffee mug quilt. But, it seemed quite GIANT at a staggering 16". Way too much fabric for a mug rug. I scratched that idea (for these fabrics) and put my thinking cap on.

16" free coffee mug block by Pam Rocco
I was now nervous because I had used a good bit of that gorgeous aqua print. Did I have enough to carry on? Of course! I turned to my trusty pattern, the Twisted Hexagon. I would fussy cut the bird print for the center. That meant I had to make a freezer paper template so I could center the motif before cutting. I did just that.

You can see my technique for cutting a whole hexagon with a standard 60 degree triangle HERE, which was a Technique Tuesday blog post on Sew in Love with Fabric. I was cutting 6-1/2" hexagons using the Head of the Class Collection.


6-1/2" (height) freezer paper hexagon
Then I selected two fabrics for the half-hexagons (cut from 3-1/2" strips). I cut 3 of each fabric. Then it was time to DO THE TWIST!


One whole hexagon and six half-hexagons
You may think that there will be a y-seam in there somewhere. Don't worry - everything is straight-seam sewing. Do you remember how to make a "partial seam" from your garment sewing days? Well, I did and that's exactly how I constructed the first seam. This way I leave room for adding the last patch. Stay with me now.

We are sewing the six half-hexagon patches around the center in a log cabin technique.


First patch with a partial seam
Once the first patch is pressed open, the next patch is easily joined:


Joining the second patch
And all the way around until the last one:


Last half-hexagon joined. Now to finish the first seam!
We twisted our way all around that little birdie!
And how does this look finished? I machine quilted it on my HandiQuilter Sweet 16 and it was done in a flash. I also sewed my binding on by machine - from the back to the front and used a serpentine stitch on my Bernina 1230 (oldie but goodie machine) to secure it. Love this little mug rug! It is 12" high and about 13" wide.


Mug Rug using the Wings Collection by Jennifer Young
Thanks Debby! 

To be entered for a chance to win a fat quarter bundle of Wings, visit Debby's Blog and leave her a note about this collection or the Twisted Hexagon block (or technique). Contest ends Saturday, October 22nd at 11:59 pm EST. 


Make sure to catch all of the tutorials in our Mug Rug Blog Hop!
Tuesday: Chris from made by ChrissieD featuring Sewing Room
Wednesday: Debby from Debby Kratovil Quilts featuring Wings
Friday: Alison from Little Bunny Quilts featuring Kitchen Love

Love It? Share It! Facebook Twitter Google Pinterest Email

Saturday, May 14, 2016

Bali Blog Hop: Day 6

It's Saturday! Welcome to the last day of our Bali Blog Hop. We hope you've enjoyed all the block tutorials we've featured this week. Up today is Debby Kratovil with a lesson in ruler use that you'll enjoy! Debby always likes to say that she lets the fabrics tell her what they would like to become. Whether they whisper to her or send text messages to her cell phone - she trusts what they say! Check out her tutorial on how to make hexagon flower blocks and then head over to her blog for a chance to win a bundle of Rio and Dolce fat quarters. Let's join her as she tells us how the  Rio and Dolce Collections of batiks guided her.


Batiks from the Dolce and Rio Collections by Benartex

Hello, blog readers! 

Here are the five colors I chose for my project from the lovely Dolce and Rio collections. 
Five fabrics for Debby's flowers

I am still enamored with hexagon shaped blocks and patches. The most recent is the jewel (some call it a gem). I discovered how to cut it using a standard acrylic ruler with 60 degree lines and a 60 degree multi sized triangle ruler. For a finished 6" high jewel, I cut 4-1/2" wide strips. Then I cut the selvedge off on the left side at a 60 degree angle as shown below. I measured 4-1/2" from that edge and cut again. I was able to get three of these diamonds from each 4-1/2" x 22" strip (remember, I'm working with fat quarters).

Cutting 60 degree diamonds

I did this for each of the four bright batiks. The black and white will be my background fabric.
4-1/2" 60 degree diamonds

Then, to make the jewel, I needed to cut a 2" triangle off of one pointed end. Why 2"? Because the diamond will finish to 4". Other than that, I just know it works, ok?

Cutting a 2" triangle from one end of each diamond

Jewels and cut away triangles (which I don't use in this project)

I then cut 2-1/2" triangles from my black and white batik. These are cut using a multi-sized 60 degree ruler which I bet is in your sewing studio!

2-1/2" high 60 degree triangles

Here's is how these patches work together:
Sew a small triangle to each short side of all the colored jewels

And then what? I used 6 of the units above to make my daffodil block.
Sew 3 jewel/triangle units together into a large half-hexagon; repeat

I pressed the triangles away from the yellow fabric (toward the black batik). All other seams were pressed open.

Here is my "Daffodil" block, which finishes to 12" high.

Daffodil Block #1
And then I sewed a block using two each of the other 3 colors:
Tri-colored Block #2
And then I sewed one last block, also using two each of the other 3 colors, but this time I put each color together and if you use your imagination, you might see hearts!
Three Hearts Block #3

I hope you enjoyed seeing how versatile your acrylic rulers can be. No need to buy single size templates for these shapes!

For a chance to win a fat quarter bundle of the Dolce and Rio fabrics we're featuring in this blog hop, head over to Debby's blog. Let her know which of the 3 blocks you like (#1, 2, or 3).


Click here to see the entire Rio collection.
Click here to see the entire Dolce collection. 

Stop back each day this week to catch all of the tutorials!
Monday: Chris @ made by ChrissieD
Tuesday: Stephanie @ Stitched Together Studios
Wednesday: Benartex Blog Design Team
Thursday: Kirsten @ KD Quilts
Friday: Alison @ Little Bunny Quilts
Saturday: Debby @ Debby Kratovil Quilts
Love It? Share It! Facebook Twitter Google Pinterest Email