Thursday, January 31, 2019

Valentine Tute Round-Up

If seeing our new Valentine's-themed Cherish collection has put hearts in your eyes, we've got some quilty inspiration for you! Here's a round-up of some of our favorite valentine tutorials. Enjoy!

The Oh Fudge table runner using improv applique


Oh Fudge Love Letters by Debby Kratovil


Oh Fudge Sweet Treats runner (this would be sooo cute in the Cherish prints!)


Heart Pillows (not only decorative, but also useful for loved ones who have had breast cancer surgery)


Click here to see the entire Cherish collection.
Love It? Share It! Facebook Twitter Google Pinterest Email

Tuesday, January 29, 2019

Valentine Crush: Cherish

Valentine's Day is coming up! Share your love year round with our Cherish collection from Kanvas. These heart-themed prints are packed with affection and enhanced with metallic gold. Use them for your favorite valentine!


Stitch a cuddly lap quilt full of love with our Hearts A Plenty free quilt pattern.
Click here to download the free quilt pattern.

Click here to see the entire Cherish collection.
Love It? Share It! Facebook Twitter Google Pinterest Email

Thursday, January 24, 2019

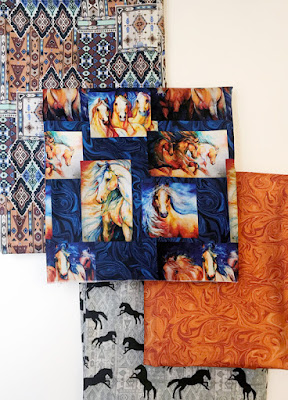
Horse Lovers: Born to Run!

Our new Born to Run collection was designed with horse lovers in mind. These majestic beauties are painted with exquisite detail--you can almost hear the hooves pounding! 

The panel features five horse images ready to be cut out and included in a quilt (see our free pattern below), pillow, or tote bag. 

The horse portraits show up again in an allover print--fussy-cut specific sections, or cut larger pieces for a layered look. 

Add in horse silhouette prints, a cool barn wood stripe, and rich jewel-tone textures that create a wild west feel and all compliment the main horse designs. 


 Don't forget the stripe! Perfect for a quilt border. 


Need a horse-themed quilt? Try Heidi Pridemore's One Horse Town pattern. It's available as a free download on our website. 
Click here to download the free quilt pattern.

Click here to see the entire Born to Run collection.
Click here to download the free quilt pattern.

Love It? Share It! Facebook Twitter Google Pinterest Email

Tuesday, January 22, 2019

NEW Modern by the Yard

We're excited to share the newest issue of Modern by the Yard, our modern quilting e-zine. Inside, you'll find plenty of inspiration--four projects, free quilt patterns, a new fabric gallery, and more.


Remember, you can click on the marked links throughout the issue (underlined in orange), and you can even download the pdf and save it to your computer. (To download, look for the downward pointing arrow in the upper right corner of your browser page.)

Here's a sneak peek at what you'll find inside: 


Three designers off you their modern versions of the classic Log Cabin block:


Color-iffic by Sherry Shish featuring Color Sphere


Pillow Artistry by Rachel Rossi featuring By Hand


Find the Rainbow In the Storm by Stephanie Sheridan featuring Moon Shadow


Your Happy Place by Trinia Braughton featuring My Happy Place


Click on the blue button above to see the rest!

Missed an issue?
Click here to find them all.

Love It? Share It! Facebook Twitter Google Pinterest Email

Friday, January 18, 2019

Warp & Weft Virtual Trunk Show

We've got a real treat for you today: A virtual trunk show of Weeks Ringle and Bill Kerr's projects made using their Warp & Weft fabrics. They've created five projects, and they're all conveniently featured in the Warp & Weft publication. They've also shared a free quilt pattern (see Tube Socks below).


Plaid Happy
47" x 76"
This quilt uses the gray and white plaid in the background of the blocks. That one check just transforms the rest of the quilt. 
Click here to purchase the publication containing the Plaid Happy pattern
and here to purchase the kit. 


Plain Spoken
51" x 77"
This quilt mixes the yarn dyes with prints from Printology. They play well together! You don't have to have equal amounts of every fabric, but you do need good contrast among the prints and yarn dyes so the pieces don't blend into each other. 
Click here to purchase the publication containing the Plain Spoken pattern
and here to purchase the kit.


Triple Play
50" x 72"
For this quilt, we chose a low-contrast palette of yarn dyes and Printology fabrics--the "worker bee" tonal fabrics. The pieced sections are made using improvisational piecing techniques, which you can cut wonky or straight. 
Click here to purchase the publication containing the Triple Play pattern
and here to purchase the kit.


Fringe Benefits
24" square pillow or wall hanging
These squares are appliqued on, and then stitched down with a 1/4" seam allowance. Then we pulled a few threads out to fray the edges for a textured look. 
Click here to purchase the publication containing the Fringe Benefits pattern.

Tube Socks
47" x 78"
When we decided to develop modern quilts, our first rule of thumb was not to use traditional 19th century patterns--we wanted to use motifs from our modern lifestyle. Tube socks--like our daughter's soccer socks--definitely fit into that category. They made their heyday in the 80s, but they've made a comeback too. This was a fun quilt to design and puts a smile on our faces whenever we see it. 
Click here to download the free quilt pattern.
Want to see more Warp & Weft fun? 
Click here to read an interview with Weeks and Bill about their new collection. 
Click here to see the entire Warp & Weft collection.
Visit Weeks and Bill's website
Click here to read Debby Kratovil's Technique Tuesday post.
Click here to see the Around the Block topper tutorial.
Click here to see the Pillow Duo tutorial.
Love It? Share It! Facebook Twitter Google Pinterest Email

Thursday, January 17, 2019

Warp & Weft Pillow Duo Tutorial

The Warp & Weft collection is calling your name--what will you make? Today we're sharing two pillow tutorials to brighten up your couch. The pillow patterns lean traditional, but the palette and prints of Warp & Weft give these pillows a modern feel.


Pillow #1

Materials:
1/4 yard red plaid
1/3 yard each gold check and green stripe 
1/4 yard off-white solid
3/4 yard navy check
18" square pillow form


Cutting
From the red plaid: 
(8) 3-1/2" squares

From the gold check: 
(2) 7" squares


From the green stripe: 
(2) 7" squares

From the navy check: 
(2) 15" x 18-1/2" pieces for backing
(1) 3-1/2" square
(2) 2" x 18-1/2" strips
(2) 2" x 15-1/2" strips

From the off-white solid:
(32) 2" squares


Make the Pillow:
Step 1: Draw a diagonal line on the wrong side of (4) 2" off-white squares. Position (2) marked squares on (1) 3-1/2" red plaid square as shown. 

Step 2: Stitch on the drawn lines. 

Step 3: Trim seam allowances to 1/4" and press open. 

Step 4: Position the remaining (2) marked squares as shown, stitch on the lines, trim seam allowance to 1/4", and press open.

Step 5: Trim to measure 3-1/2" square. Make a total of (8) units. 

Step 6: Sew the units together in pairs. Make (4) pairs. 

Step 7: Draw a diagonal line on the wrong side of (1) 7" gold check square. Layer right sides together with (1) 7" green stripe square. 

Step 8: Stitch 1/4" on either side of the drawn line. Cut apart on the line and press units open. Trim each HST unit to measure 6-1/2" square. 


Step 9: Lay out (4) HST units, (4) pairs from Step 6, and (1) 3-1/2" navy check square as shown. Position 2" x 15-1/2" navy check strips to the sides and 2" x 18-1/2" navy check strips to the top and bottom. 


Step 10: Sew the units into rows and join the rows to make the pillow center. Add the navy check strips to border the center. 

Step 11: Layer the pillow top on (1) 20" square of batting. Quilt as desired and trim to measure 18-1/2" square. 

Step 12: Fold a long edge of (1) 15" x 18-1/2" navy check piece over 1/2" and press. Fold over another 1/2" and press. Topstitch to secure the finished edge of the backing piece. Make (2). 
Step 13: Layer a backing piece right sides together with the quilted pillow top. layer the second backing piece on top, overlapping the first piece in the middle. Pin in place and stitch around the edges using a 1/4" seam allowance. 

Step 13: Turn the pillow cover right side out and insert the pillow form. 


Pillow #2


Materials:

1/4 yard from each of (9) yarn dye fabrics*
1/3 yard off-white solid*
5/8 yard green plaid
18" square pillow form

Cutting: 
From each of (9) yarn dye fabrics:
(2) 4" squares

From the off-white solid:
(18) 4" squares

From the green plaid: 
(2) 15" x 18-1/2" pieces for backing


*Note: We used the leftover triangles from the roof units of the Around the Block topper. They're already paired with off-white triangles, so they're ready to go! If you use these 16 pairs of triangles, you only need (10) 4" woven squares --(2) each of (5) different fabrics--and (10) 4" off-white squares.

Make the Pillow:
Step 1: If you're using the leftover triangle pairs from yesterday's tutorial, stitch each pair along the long edge, using a 1/4" seam allowance. Press open and trim to 3-1/2" square. 


Step 2: Draw a diagonal line on the wrong side of each 4" off-white square. Pair it with a 4" yarn dye square and create half-square triangles like in step 8 above. Trim to measure 3-1/2" square. 


Step 3: Make a total of (36) 3-1/2" white/plaid HST units. 
Step 4: Lay out the HSTs into (6) rows of (6) units each. 

Step 5: Sew the units into rows and join the rows to complete the pillow top. 

Step 6: Finish the pillow following steps 11-13 above.


Love the Warp & Weft fabrics? Leave a comment below letting us know if you prefer stripes or plaids for a chance to win a fat quarter bundle of 8-10 of these prints. Giveaway ends January 19th at 11:59 pm EST. 

Want to see more Warp & Weft fun? 

Click here to read an interview with Weeks and Bill about their new collection. 
Click here to see the entire Warp & Weft collection.
Visit Weeks and Bill's website
Click here to read Debby Kratovil's Technique Tuesday post.
Click here to see the Around the Block topper tutorial.
Love It? Share It! Facebook Twitter Google Pinterest Email

Wednesday, January 16, 2019

Warp & Weft Around the Block Tutorial

It's time for more Warp & Weft inspiration! Today we're sharing a tutorial using these yarn dye fabrics. Cozy woven prints are perfect for classic house blocks, but the bright colors of the Warp & Weft collection create a table topper with a modern feel that pops against a soft white background. 


Materials:
1 fat quarter each 8 yarn dye plaids and stripes
1/2 yard large gray/white check
1 yard off-white solid
1-1/8 yards backing fabric
40" square of batting

Cutting:
From each of the lime green plaid and dark blue stripe:
(2) 6-1/2" x 9-1/2" pieces

From each of the magenta plaid and orange plaid:
(2) 6-1/2" squares

From each of the gold check, purple stripe, pink plaid and turquoise stripe:
(2) 4-1/2" x 8-1/2" pieces

From the large gray/white check:
(1) 3-1/2" square
(4) 2-1/4" x WOF strips for binding

From the off-white solid:
(16) 4-1/2" squares
(4) 3-1/2" x 8-1/2" pieces
(4) 2-1/2" x WOF strips
(8) 1-1/2" x 9-1/2" pieces
(8) 1-1/2" x 6-1/2" pieces


Make the Blocks:
Tall House
Step 1: Sew 1-1/2" x 9-1/2" off-white strips to opposite sides of (1) 6-1/2" x 9-1/2" green plaid piece to make a house unit.


Step 2: Draw a diagonal line on the wrong side of (2) 4-1/2" off-white squares. Position a marked square on the left end of (1) 4-1/2" x 8-1/2" purple stripe piece.

Sew on the drawn line and trim seam allowance to 1/4". 

Press open. Repeat on the opposite end with the second marked square to make a roof unit. 


Step 3: Sew the roof unit to the top of the house unit from Step 1 to make a tall house block measuring 8-1/2" x 13-1/2". 

Step 4: Make a second green plaid/purple stripe tall house block. In the same way, make (2) pink plaid/blue stripe tall house blocks. 


Short House Block
Step 5: Sew 1-1/2" x 6-1/2" off-white strips to opposite sides of (1) 6-1/2" magenta plaid square to make a house unit. 

Step 6: Make a roof unit using (1) 4-1/2" x 8-1/2" gold check piece and (2) 4-1/2" off-white squares. Sew together (1) house unit, (1) roof unit, and (1) 3-1/2" x 8-1/2" off-white piece to make a short house block measuring 6-1/2" x 9-1/2".


Step 7: Make a second gold check/magenta plaid short house block and (2) orange plaid/turquoise stripe short house blocks. 


Step 8: Sew blocks together in pairs as shown. Make (2) of each combination. 


Step 9: Attach the paired block units to the 3-1/2" gray/white check center square using partial seam piecing techniques. Begin by sewing the square to the upper right corner of a paired block unit as shown below, stopping 1/4" before the side edge. 


Step 10: Press open and add the next paired block unit as shown. 

Continue, adding the third paired block unit as shown. 

Add the last paired block unit, completing the partial seam from Step 9.


Step 11: Trim (2) 2-1/2" x WOF off-white strips to measure 29-1/2" long. Sew to the sides of the quilt center. Trim (2) 2-1/2" x WOF off-white strips to measure 33-1/2" long. Sew to the top and bottom of the quilt. 

Step 12: Layer the backing right side down, batting, and quilt top right side up. Baste the layers together, quilt as desired, and trim backing and batting even with the quilt top. Use the (4) 2-1/4" x WOF gray/white plaid strips to bind the quilt. 


Love the texture in these yarn dye fabrics! 


Isn't the large plaid a fun binding?!

Love the Warp & Weft fabrics? Leave a comment below letting us know which is your favorite for a chance to win a fat quarter bundle of 8-10 of these prints. Giveaway ends January 18th at 11:59 pm EST. 

Want to see more Warp & Weft fun? 
Click here to read an interview with Weeks and Bill about their new collection. 
Click here to see the entire Warp & Weft collection.
Visit Weeks and Bill's website
Click here to read Debby Kratovil's Technique Tuesday post.
Love It? Share It! Facebook Twitter Google Pinterest Email