Showing posts with label Debby Kratovil. Show all posts

Tuesday, January 15, 2019

Technique Tuesday: Warp & Weft Hourglass Blocks

Today Debby Kratovil from Debby Kratovil Quilts is sharing a Technique Tuesday post using Modern Quilt Studio's Warp & Weft fabrics. See how she uses these fun, bright yarn dyes in ai quick-to-cut and quick-to sew quilt! 

Here's Debby:
Hello! I'm excited to be featuring Warp and Weft by Weeks Ringle and Bill Kerr of Modern Quilt Studio. These fabrics are not your ordinary cottons that are surface dyed, but are wovens with colored threads. As soon as I saw them I knew just what I'd like to stitch with them. My tried and true "Yikes! Those Stripes" pattern is a go-to anytime there are fabrics such as these in my studio.

First, the fabrics. I separated out the clear colors (many brights) from the grays. I have plans for those grays - on another day.

Crayon colors from the Warp and Weft Collection

And I added the red plaid to the grays and darker blues:

Grays and blues with a single red from the Warp and Weft Collection

One thing I did notice about these fabrics is how soft to the touch they are! They have a lovely "hand," which means they feel good in my hand!

Now let's see what I did. I first paired the colors as I thought I'd like to see them in each block. My plan is to make Hourglass Blocks using my quick piecing method, which I first published in Quilt Magazine about 25 years ago!

Six sets of paired colors 

I cut 2-3/4" strips of each fabric and stitched a 1/4" seam. I offset one strip by about 2-1/4" because I'm going to cut some triangles in the next photo. Offsetting gives me one more cut when I reach the end. This pattern also works well with 2-1/2" strips. You'll see!
Two 2-3/4" strips, offset by 2-1/4"

Press toward one of the colors (doesn't matter) and then we start to cut. The cuts are 45 degree angles.
Cutting with an Omnigrid ruler
 Flip flop the ruler and cut the second wedge.

Two pieced wedges cut

You may not have this type of ruler. You can use your standard 6 x 12 ruler and align the 45 degree line at the bottom as shown below. Trim off the side.
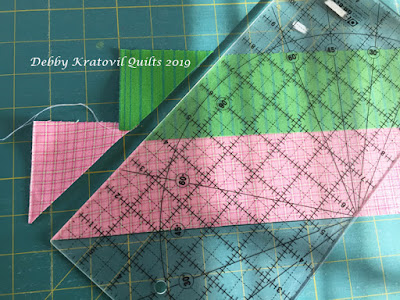
Trim left side as shown. 45 degree line is running along the bottom edge of fabric strip

Then flip flop the ruler and cut the right side of the pieced triangle. Again, you are using the 45 degree line as your guide.

Flip flop the ruler and cut other side of triangle

You should be able to get 8 pieced triangles from each strip set. Here are four together, getting ready to make an Hourglass Block. I will get two Hourglass blocks from each strip set.

Hourglass Block parts
Stitch pairs together as shown

And the last seams?
Sets of blocks with their last seam sewn

I was able to get 12 Hourglass Blocks from the fabric pairs. I only cut one 2-3/4" strip from each fabric. I don't want a small quilt, so I'm planning on making another 12 (or 13) blocks so I can have a good sized quilt center. These blocks will finish to about 8-1/2" (maybe 8-3/4"). Here are my 12 blocks:

12 Hourglass Blocks using Warp and Weft

Thanks Debby! 

Head over to Debby's blog to read more and to enter to win a fat quarter bundle of 8-10 Warp & Weft fabrics for yourself! 

Stop by each day this week for more yarn dye project inspiration! 
Click here to read an interview with Weeks and Bill about their new collection. 
Click here to see the entire Warp & Weft collection.
Visit Weeks and Bill's website
Love It? Share It! Facebook Twitter Google Pinterest Email

Tuesday, August 21, 2018

Free Motion Fantasy Hop: Day 1

What would you make with Amanda Murphy's Free Motion Fantasy fabrics? We have five designers this week who will be showing you how they used these fun, colorful prints. Up first is Debby Kratovil from Debby Kratovil Quilts with a Technique Tuesday post. Today's technique: paper piecing! 


Debby says, "I love bright colors and these new fabrics by Amanda Murphy, Free Motion Fantasy, are right up my alley!" 


For her Technique Tuesday post, she's showing how to use these prints to make a scrappy version of her Circle of Geese pattern. Head over to Debby's blog to see how she creates her quilt (we love how those geese are looking here!) and enter for a chance to win a fat quarter bundle of Free Motion Fantasy for yourself. 


Click here to see the entire Free Motion Fantasy collection. 
Click here to visit Amanda's website.

Follow along with our Free Motion Fantasy features
Monday: 
Introducing Free Motion Fantasy

Tuesday: 

Technique Tuesday with Debby from Debby Kratovil Quilts

Wednesday: 

Jayne from Twiggy and Opal; @twiggyandopal
Laura from Slice of Pi Quilts; @sliceofpiquilts

Thursday: 

Sandra from MMM Quilts @mmmquilts
Lisa from Color My World @lisaerin1121

Friday:

Amanda's Virtual Trunk Show
Love It? Share It! Facebook Twitter Google Pinterest Email

Tuesday, August 14, 2018

Debby Kratovil's Technique Tuesday: Using a Border Stripe

It's Technique Tuesday! Debby Kratovil from Debby Kratovil Quilts is here today to show us an idea for using the border stripe from Ann Lauer's Midnight Poppies collection. (Hint: it's a great focal sashing strip!) 

Here's Debby!

Lovely, lovely fabrics: Midnight Poppies

When Benartex invited me to design with them, I was sure I could come up with something. I was concentrating on that large border print. There is a black stripe on either side of it (shown in second picture) and I thought I could use one of my rulers to slice it up.


My approach is always simple: Make the fabric do all the work! 
I'll walk you through my design process.

When the fabrics arrived I was back to square one because my original plan wasn't going to work. Here are the fabrics I chose. I ended up not using the large poppy green and purple floral on the right. This will be incorporated on the back of the quilt.

Midnight Poppies with a selection of 7 coordinates

OK, Debby. Now what?

I always consult my own patterns and designs and figure out a way to rework them. Oh, yes. And I consult the "voices in my head" to see what vibes they are getting from the voices from the fabric. This is true; I'm not making this up! 


Here is my second plan, but I didn't have enough fabric of each print to get an even number of squares for symmetry. Dang! But I did know that I wanted to cut the four sections of border print and use them as vertical and horizontal sashings!


Midnight Poppies Draft 2

So, here is what I did - Plan 3! This is just the concept--I tweaked the design a bit, and you will see that scale of the prints makes the actual quilt turn out differently.

Midnight Poppies Off Center Log Cabin

First the steps:
1. Cut four 8-1/2" squares of 622-60 White Floral and one 8-3/4" square (for center unit).
2. Cut 3-1/2" strips of supporting fabrics to begin building my Off Center Log Cabin blocks (4 of them)
3. Row 1: One (5427-44 Green) 3-1/2" x 8-1/2" and one green 3-1/2" x 11-1/2" strip. Stitch as shown.

Start of Off Center Log Cabin
4. Continue adding strips, cutting for EACH block, the following:
  • Row 2 (5425-40 Sage Green): One 3-1/2" x 11-1/2" and one 3-1/2" x 14-1/2"
  • Row 3 (5424-44 Mosaic Petals Green/Purple): One 3-1/2" x 14-1/2" and one 3-1/2" x 17-1/2"
  • Row 4 (5425-09 Daisy Petals White): One 3-1/2" x 17-1/2" and one 3-1/2" x 20-1/2"
  • Row 5 - I was short on fabric and so used two: One 3-1/2" x 20-1/2" strip 5427-44 Green and one 3-1/2" x 23-1/2" strip 5426-50 (Criss Cross Dot Blue/Green)
Here's one block:
One Off Center Log Cabin: 23-1/2" x 23-1/2"

5. Make two blocks and join with a trimmed border strip (measures 8-3/4" wide including seam allowances). Here is the trimming of the border print. I allowed the LENGTH of 29" to stay until the very end.

Trim each side of the border print, allowing for 1/4" seams

6. Two blocks joined:
Two blocks joined and then border print trimmed to 23-1/2" to match the blocks.

7. Make two more blocks, but be careful of where you stitch the strips. Uh oh!

My Uh, Oh Block. Gotta remove that renegade white strip!

8. Add the 8-3/4" floral square to two remaining border strips:
Add center square to remaining two border strips
9. Join blocks and wide sashing strips; measure and trim the sashings at the very end.

10. Here is my 54" x 54" quilt top hanging in the breeze on my deck after a summer rain!

Midnight Poppies Off Center Log Cabin: 54" x 54"
Follow the cutting instructions as listed above. Here is the supply list for making the quilt as shown here. Backing and batting needs to be at least 3-4" larger around all sides for quilting.


Thanks, Debby, for showing us a great idea for using Ann's border stripe and those gorgeous poppy prints!
Click here to see Ann's entire Midnight Poppies collection.
Love It? Share It! Facebook Twitter Google Pinterest Email

Tuesday, April 24, 2018

Technique Tuesday with Debby Kratovil: On the Front Porch

Well, not exactly ON the Front Porch. The name of the fabric line is Front Porch by Cherry Guidry. We asked Debby Kratovil of Debby Kratovil Quilts to come up with some quick and simple projects using this collection and the companion panel. First let's see the fabrics.
Front Porch by Cherry Guidry for Benartex
Here's Debby:
I was asked to make something with the main panel. Ooohh! I love a challenge. As you can see, it has various squares and rectangles. The center was calling to me: Make me a pillow! The four little squares are a perfect size for mug rugs; I saw journals with real paper on the inside. And I even thought that I could make two good sized bookmarks with those tall, skinny rectangles.

Front Porch panel: 23" x 42"
Now, let's see how I did it.

BOOKMARKS were made by cutting out the flower panels. I left a little bit of the white background fabric on to give me some trimming room. I then transferred fusible webbing to the wrong side and then ironed each one to card stock. I used my Fiscar specialty scissors with a curved blade to cut around the outside, as you can see. Easy. Quick. Not too big for most books


Next, I pulled out my Tri-Recs tool and cut half-rectangles to tilt those four little squares. It's good to audition the triangles to make sure they are in the right position (ask me why I say that . . .)

Added 1/4" to small flower square and cut slightly oversized half-rectangles
As you can see, sometimes you sew the wrong triangles to the wrong side! Time to rip out!


Here are my set of four mug rugs. Of course, I added batting and backing. Left an opening for turning and then top stitched it closed. Very cute, don't you think?!

4 Mug Rugs using Front Porch
I didn't have the time to make a pillow with that center design with those inviting chairs under that awning, but let me show you how I made my two art journals!

I cut out two adjoining rectangles, planning on the pinwheels print to be my front cover (the book is finished in this shot).

Two adjoining rectangles will be the front and back covers for my journal

I cut a piece of contrasting fruit salad print for the inside pocket. It is the same size as the two panel piece above (with seams, of course). Fold in half, wrong sides together. This is now pocket height.
I cut the pocket fabric the same size as the rectangles and folded it in half

Now, align it with the inside green honeycomb print (the same size as the journal cover) with a piece of batting wedged between. Pin.

Align folded pocket fabric with inside lining

Place journal front piece right side down on the pocket and pin.

Align parts and pin

Stitch 1/4" seam around, leaving about 6" open for turning. You can see my opening right under the "s" in "Quilts" below.

Stitched with opening for turning

 Trim the four corners to reduce bulk:
Trimming four corners


I turned the journal right side out and stitched around the outside about 1/8" from edge. I took 7 sheets of 8.5" x 14" paper, trimmed it to fit the inside (took 1" off both horizontal and vertical), centered it and stitched right down the middle!

Paper added to inside!

And let's see the pocket!

Journal with pocket for a pen

Here is a picture of two rectangles joined by a small piece of that blue floral print from the top and bottom of the panel. The book is finished.

Two rectangles joined by the blue floral print. I wanted the Lemonade stand to be the front

And the inside of this journal with one of those bookmarks!

Inside of 2nd journal with a handy bookmark!

Now I bet you won't look at panels the same anymore, will you? I can't wait to gift these to my grandsons' teachers. This sunny group is quick and easy, don't you think?

Love It? Share It! Facebook Twitter Google Pinterest Email

Tuesday, January 9, 2018

Technique Tuesday: Transforming 10x10s into Hexagons!


It's Technique Tuesday here on the blog! Debby Kratovil from
Debby Kratovil Quilts will show you how to turn a stack of
10x10s into an easy (yes, we said easy!) hexagon quilt.


Here's Debby!
Are you looking for a creative way to use a stack of 10" squares? 

Benartex sent me this beautiful Essence of Pearl 10x10 pack in the Purple colorway. I asked for a companion fabric to go with these,
1 yard of the light lavender Tossed Sprigs.


Essence of Pearl 10" Squares

I was aiming for hexagons (surprise, huh?)  Hexagons are wider than they are high, so I cut 2-1/2" strips from each of the 10" squares. This gives me 7-1/2" x 10" rectangles to work with for my next steps.
2-1/2" strips cut off each square
There were 42 squares in the pack, so I ended up with 42 strips 2-1/2" x 10". Trust me: I will use these later on. Nothing is EVER wasted in my quilting (even if I have no clue where I'm going!) You can see the Purple Tossed Sprigs fabric that I'm going to use to tie all this together.
Beautiful strips cut from the Essence of Pearl Purple pack

I'm going to cut hexagons from each of the squares. I used my Creative Grids 60 degree ruler to do this (this will NOT work with rulers that have a pointy tip; only those that simplify the cutting and have a blunted tip).

My 7-1/2" hexagon will finish to 7". Half of 7" is 3-1/2". I fold my 7-1/2" x 10" strip with the fold at the BOTTOM, align the 3-1/2" line on the ruler with the top cut edges as shown, and then slice on both sides of the ruler. GASP! Really?

Cutting my hexagons

I can tell you don't believe me. Sigh! Take a look, ok?

Perfect hexagon with remaining (and usable) triangles


I didn't use the 6 lightest fabrics, so I ended up with 36 hexagons (not all shown here):

Hexagons cut from the 10" squares

Now, what was my plan? First, I need triangles to set with the hexagons. These will enable me to sew straight seams (ie, no y-seams). Take a look:

I cut 4" strips. Why? These will finish to 3-1/2" (which is half the finished height of the hexagons). Flip flop the ruler up and down to get the needed triangles. The end patch I will use on the quilt rows. It is called a 30 degree triangle.

4" strips cut into triangles
 Triangles are joined in this manner:
Joining triangles to the hexagons
 Join the triangles to the hexagons as shown.
Join triangles to opposing ends of the hexagons
An end hexagon uses one of the 30 degree triangles at the far left. Notice that my seams will be diagonal, yet straight, when I join the hexagons into a horizontal row!

Partial horizontal row

 More triangles and hexagons. Notice the right hexagon, which will be the right end of my row. It also will have a 30 degree "straightening" triangle.
Another row

 Let's see the rows. It's always a good idea to lay out your hexagons to see where you want them to appear in the quilt. Then, identify the rows and then join the triangles (as in the pic above).

I decided to have rows of 5 hexagons alternate with rows of 4. Those large 30 degree triangles are cut from 11" strips (7" plus 3-1/2" plus 1/2" seams = 11")

11" strip is folded, wrong sides together. You are cutting mirror image triangles (one for each side of a row).

Side setting triangles
 Mirror image triangles.
Large 30 degree triangles
And here are my first 3 rows.

Three horizontal rows
Row 1 is sewn as follows:
Row 1 sewing

Row 2 is sewn as follows. It is then sewn to another Row 1 with the large 30 degree triangle.

Rows 2 & 3

Then they get repeated again, twice more.

Now, let's see the whole quilt center. It measures 40" wide and 50" high:
Essence of Pearl quilt center: 40" x 50"

Remember those large triangle pieces leftover from cutting the hexagons? I had a plan. I put them together with some of that light background fabric and created a traditional Whirling Hexagon.

These are the 30 degree triangles leftover from the hexagon cutting:

Each set has a left and right side angle

And here's my first Whirling Hexagon block (also called Spinning Star):

Spinning Star/Whirling Hexagon

And just for a variation, I can straighten up the sides using another pair of the triangles:

Spinning Star with side triangles
Hope you enjoyed seeing how easy it is to cut whole hexagons from a stack of 10" squares. I think I will use a single piece of border fabric in order to cut down on all that stitching!

Click here to see the entire Essence of Pearl collection.

Love It? Share It! Facebook Twitter Google Pinterest Email