Showing posts with label Moon Flower. Show all posts

Friday, April 7, 2017

Quilt Along Recap

Happy Thursday! 
Back in February, we hosted the Everyone's A Star Quilt Along, where three quilters demonstrated how to make three different star blocks (using three different fabric lines!) and assemble them into a lap quilt. We hope you enjoyed following along as we stitched, and maybe even started your own version of the quilt!


Click here to find all the Quilt Along posts.

We also offered a prize opportunity to anyone who pieced a version of the quilt along quilt using Benartex, Kanvas, or Contempo fabric. We're excited to show you one of our sample quilts that has been finished, as well as two winners who stitched (and finished) their own versions using our fabrics.

First up, Stephanie Sheridan's Everyone's A Star quilt, made using the Liberty Garden prints. 

Linda Leathersich quilted this, stitching in the ditch around the stars to help them pop, and then adding curly swirls in the sashing and a super fun and modern straight line border design. 

Next, our winners:
Carolann created her quilt using Fernwood and Palm Court prints in a lovely aqua version:

And Janice, who used bright Fleurish stripes, mixed with black and white: 

Beautiful job, ladies! Thanks for sewing along with us! 

You can still quilt along with us! Click here to find all the Quilt Along posts and get started.
Love It? Share It! Facebook Twitter Google Pinterest Email

Thursday, March 2, 2017

Everyone's a Star Quilt Along: Week 5

It's assembly week for our Everyone's a Star Quilt Along! If you've been following along and have all twelve blocks made, today we'll show you how to put your blocks, sashing and borders together.

I'm Lisa, and I'm back today to talk about assembling your quilt using my Zentastic version. Once your blocks are complete, you'll need to prepare your sashing strips, sashing squares and borders.

Cutting:
From the Rings Gray Sky:
(17) 2-1/2" x 12-1/2" pieces (for inner sashing)

From the Whiskers Gray/White:
(14) 2-1/2" x 12-1/2" pieces (for outer sashing)
**Note--in my quilt this is a directional fabric. I decided that I cared about directionality, so I cut six pieces in one direction, and eight pieces in the opposite direction. If you do this, you'll want to cut the pieces that run parallel to the selvedge first.**

From the Whiskers Hot Pink:

(20) 2-1/2" squares (for sashing squares)

From the Rings Black:
(7) 4-1/2" x 42" strips (for outer border)
**Note--depending on the pattern on your fabric, you may want to fussy cut the rows to be identical, like I did. This allows the ring design to match up from strip to strip.**

We're only showing a finished quilt top today, so we won't address binding, but you'll need (6) 2-1/4" x 42" strips for binding when the time comes. I'm planning to use the Whiskers Hot Pink for binding.

Assembly:
Step 1: Lay out the 12 blocks, 17 inner sashing pieces, 20 sashing squares, and 14 our sashing pieces into rows as shown.

Step 2: The traditional way to assemble a quilt like this is to sew the blocks and vertical sashing pieces into block rows and the horizontal sashing pieces and sashing squares into sashing rows (like Debby does on her blog). You can do that; however, I'm going to show you a different method today. I thought it went more quickly, and I think my seams matched up better. But either way works!

Step 3: Basically what we're going to do is sew the adjacent sashing pieces and squares to each quilt block, and then join these larger framed blocks together. So for the top row, I started with the inner sashing pieces, laying it out like this:
 I joined the right hand sashing to each block, and then sewed a sashing square to each horizontal sashing piece. I then joined this unit to the bottom of the block. Of course, you'll still have an additional outer sashing piece to add.

Step 4: I continued by doing the same for the top sashing row pieces:

Step 5: Sewed those to the block tops:

Step 6: And then joined the three block/sashing units to complete a totally sashed row. 

Step 7: I did the same thing for row 2. And so on...

Step 8: And then I joined all the rows to complete the quilt center.


Step 9: Join the (7) 4-1/2" x 42" Rings Black strips short ends together into a long strip. Cut two 58-1/2" lengths and two 52-1/2" lengths. Sew the longer strips to the sides of the quilt and the shorter strips to the top and bottom. Your quilt top is done! 


Here's Stephanie's quilt top, made from 
Liberty Garden
Head over to her blog to learn more about it.  


Here's Debby's quilt top, made using Moon Flower
Head over to her blog to learn more about it.

**********************************************************

There's still time to follow our quilt along and win a prize! 

Which version will you make? Or will you use another Benartex, Kanvas, or Contempo line to create our Everyone's a Star quilt? Share your progress by e-mailing your pictures to us at BenartexQAL2017@gmail.com – we will post them on Facebook and Instagram throughout the Quilt Along. We are looking forward to quilting with you!


Find our earlier posts here:
Week 1 - Fabric requirements and cutting information
Week 2 - Star block #1
Week 3 - Star block #2
Week 4 - Star block #3


**PRIZE ALERT** 
Email us a photo of your finished Everyone's a Star quilt top made with any Benartex/Kanvas/Contempo fabric collection for a chance to win a bundle of fat quarters! (Bonus entry if your quilt is quilted and bound as well!)
Email your photo by Thursday, April 6, 2017 to be entered in the drawing. 
Love It? Share It! Facebook Twitter Google Pinterest Email

Thursday, February 23, 2017

Everyone's a Star Quilt Along: Week 4

Hi! Debby here with Week #3 Block in the "Everyone's a Star Quilt Along."

I chose the beautiful Moon Flower collection. I'll just quote the description from the Benartex website because it says what I'd say anyway!

"Red, black, and cream make a bold statement in this beautiful Asian inspired collection! From the large circle prints to the flowing “Oshi Stems”, Moon Flower is a design masterpiece, destined to make quilts to be treasured for years to come."

Let's see the fabrics again, OK?


Moon Flower by Kanvas Studios for Benartex Fabrics
 And another view:
Aren't these yummy?
It was so difficult to choose just 4 fabrics for my block, but somehow I did!
Four fabrics for my block
Now, onto the parts!
Parts for one Moon Flower block
But, wait! How did I get there? Here's a chart for cutting one block:


Now let's see some steps. First, instead of cutting all those D squares (2-1/2"), I cut one 2-1/2" strip of each fabric, stitched them together, and then cut 8 two-square units as shown below. Then, these are sewn into four 4-Patch units.


Quick piecing and cutting the corner 4 Patch units
I eliminated the funky shaped template of that B shape in the diagram by using an easy method. I cut four red and four black rectangles 2-1/2" x 4-1/2". I also cut 8 light squares 2-1/2" x 2-1/2". I drew a diagonal line on each as shown. I will SEW on this line, but note how I have them aligned.
Two rectangles (red and black) with light squares attached
 Stitch along the drawn line; trim 1/4" away from stitched line (discard the waste triangles).
Stitch on drawn line
 Press triangles as shown. Make four sets of these for each block (I made 4 blocks for this quilt).
Press triangles
Now, let's see the rows:
Three horizontal rows of my block
And the finished block:
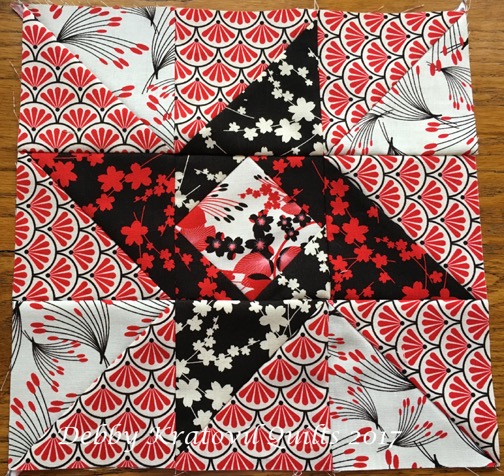
Moon Flower Block, Week 3 Quilt Along


Here's Stephanie's Star Block #3, made using Liberty Garden.
Head over to her blog to learn more about it.


Here's Lisa's Star Block #3, made from Zentastic
Head over to her blog to learn more about it. 

Come back Thursday, March 2nd to see how to assemble the quilt!

**********************************************************

Join us to make this quilt in just 5 weeks! 

Which version will you make? Or will you use another Benartex, Kanvas, or Contempo line to create our Everyone's a Star quilt? Share your progress by e-mailing your pictures to us at BenartexQAL2017@gmail.com – we will post them on Facebook and Instagram throughout the Quilt Along. We are looking forward to quilting with you!


**PRIZE ALERT** 
Email us a photo of your finished Everyone's a Star quilt top made with any Benartex/Kanvas/Contempo fabric collection for a chance to win a box of Fossil Fern fat quarters! (Bonus entry if your quilt is quilted and bound as well!)
Email your photo by Thursday, April 6, 2017 to be entered in the drawing. 

Love It? Share It! Facebook Twitter Google Pinterest Email

Thursday, February 16, 2017

Everyone's a Star Quilt Along: Week 3

Hi everyone – Stephanie here! I really love star blocks – they are so versatile and fun to make! And the Liberty Garden fabric line … how can you go wrong with shades of blue and green?

Getting Started:
When I first looked at the pattern and the fabrics, I decided to go totally traditional – it appeased my “matchy matchy” sensibilities. I am making all of the blocks using the same 4 fabrics, and all 4 of each block exactly the same. I hope you enjoy my “traditional” interpretation of “Everyone’s A Star”.
Cutting (to make 4 blocks):
(4) 4-1/2” squares of Focal fabric (Liberty Garden blue)
(16) 4-1/2” squares of Small floral (Libby Jade)
(4) 5-1/4” squares of Light Geometric (Liberty Geo Turquoise)
(8) 5” squares of Dark floral (Garden Gates Jade)
(4) 5-1/4” squares of Medium tonal (Libby’s Lace Green)

Ok – you ready? Step one … because we are going to be cutting and sewing on the bias, I like to lightly starch and press my squares (the Light, Medium and Dark listed above). This helps to reduce stretch along the bias side when sewing. Got that done? Great … time to cut and sew!
Take your 5-1/4” squares (light and medium) and cut them twice on the diagonal – giving you 4 quarter square triangles (QST). Take your 5” squares (dark) and cut them once on the diagonal – giving you 2 half square triangles (HST). 


Sew (1) light QST and (1) medium QST together and press. 


Next up – sew (1) dark HST to light/medium QSTs (the way I do this is to gently fold the dark HST in half, find the middle and place a pin there. Open up HST and line up seam from light/medium piece. Pin together and sew). 


Press, then use a ruler to square up block to 4-1/2” (I like to use a 4-1/2” square ruler that has the center marked with a circle and a 45-degree angle line – makes it super easy to line up and trim!)  


Make (4) for each block – so (16) total! Bonus block – if you sew 4 of them together as shown – you get a great 8” finish pinwheel block … but don’t do that with these, you need them for the next step!

Layout your focal square, your small floral squares and your pieced squares as shown, sew into rows, then sew rows together to complete Block 2! Square them up to 12-1/2” and make 4. 


Here's Debby's Star Block #2, made using Moon Flower
Head over to her blog to learn more about it.


 Here's Lisa's Star Block #2, made from Zentastic
Head over to her blog to learn more about it. 


Come back Thursday, February 23rd for the tutorial to create Block #3!

**********************************************************

Join us to make this quilt in just 5 weeks! 

Which version will you make? Or will you use another Benartex, Kanvas, or Contempo line to create our Everyone's a Star quilt? Share your progress by e-mailing your pictures to us at BenartexQAL2017@gmail.com – we will post them on Facebook and Instagram throughout the Quilt Along. We are looking forward to quilting with you!
Here's a peek at the week 1 blocks Janice M. made, using Fleurish:


Nice job, Janice!

**PRIZE ALERT** 
Email us a photo of your finished Everyone's a Star quilt top made with any Benartex/Kanvas/Contempo fabric collection for a chance to win a box of Fossil Fern fat quarters! (Bonus entry if your quilt is quilted and bound as well!)
Email your photo by Thursday, April 6, 2017 to be entered in the drawing. 


Love It? Share It! Facebook Twitter Google Pinterest Email

Thursday, February 9, 2017

Everyone's a Star Quilt Along: Week 2

Welcome back to the Everyone's a Star Quilt Along! 
Today, we'll be making Star Block #1. 
I'm Lisa and I'll be sharing the tutorial for this block using the Zentastic collection.

Let's get started!
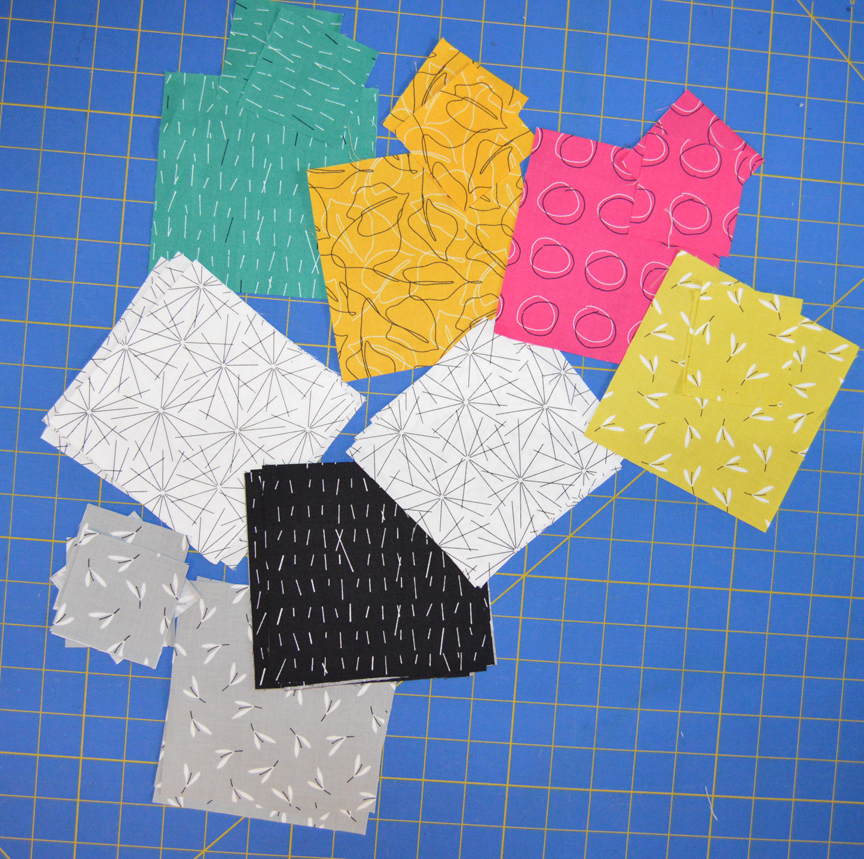
When I began playing around with the Zentastic fabrics for this quilt along, I decided to create a scrappier version of this quilt, partly because there were so many great colors and I couldn't narrow down my choices! I decided to use the constants of the same white, black and gray prints, and then add in a different bright print in each block.


My tutorial shows the block made with the Marigold Squiggle, but at the end you'll see I actually have four different colored blocks, and this is reflected in the cutting.


Cutting:
(to make four blocks)
From the Sparkles White/Black:
Eight 5" squares
Four 4-1/2" squares

From the Petals Gray/White:
Four 5" squares
Eight 2-1/2" squares

From the Whiskers Black/White:
Twelve 5" squares

From each of the Marigold, Hot Pink, Blue/Green and Citron:
One 5" square
Two 2-1/2" squares
My cut pieces


Making the Block:
Step 1: Draw a diagonal line on the wrong side of four 5" black squares. Note: The black print I chose is directional, and so these directions show how to work with that so the print runs the same direction throughout the block. If your fabric is not directional, or you don't care if the print runs the same direction throughout the block, just draw your diagonal lines and hop ahead to step 2. 

To deal with directional fabric, draw the diagonal line from upper left to lower right on two squares with the dashes running vertically. Draw the diagonal line from upper left to lower right on the other two squares with the dashes running horizontally. Pair up one vertical dash square with a white square and one with a Marigold square. Pair up the horizontal dash squares with the gray square and the second white square. (Or just make yours match the photo below!)

Step 2: Sew 1/4" on either side of the marked line for each pair. Cut apart on the marked line, and press open. 

Step 3: Square each unit to measure 4-1/2" square. This is what your HSTs will look like: 

Step 4: Draw a diagonal line on the wrong side of the two 2-1/2" gray squares and two 2-1/2" Marigold squares. Position the marked gray squares on the 4-1/2" white square as shown. 

Step 5: Stitch on the lines, trim seam allowance to 1/4" and press open. 

Step 6: Position the Marigold squares on the remaining corners. 

Step 7: Stitch, trim and press. Here's what your center square will look like:

Step 8: Lay out the eight HSTs and the center square. Pay close attention to orientation of the HSTs. If you're concerned with fabric print directionality, keep an eye out for that too. 

Step 9: Sew the units together into rows. Press the seams in the first and third rows in the same direction. Press the seams in the middle row in the opposite direction.


Step 10: Sew the rows together to complete the block. Repeat to make three additional blocks. 

Congratulations! You have 33.33% of your quilt along blocks finished! 

Here's Stephanie's Star Block #1, made from Liberty Garden
Head over to her blog to learn more about it. 

Here's Debby's Star Block #1, made using Moon Flower
Head over to her blog to learn more about it.


Come back Thursday, February 16th for the tutorial to create Block #2!

**********************************************************

Join us to make this quilt in just 5 weeks! 

Which version will you make? Or will you use another Benartex, Kanvas, or Contempo line to create our Everyone's a Star quilt? Share your progress by e-mailing your pictures to us at BenartexQAL2017@gmail.com – we will post them on Facebook and Instagram throughout the Quilt Along. We are looking forward to quilting with you!


**PRIZE ALERT** 
Email us a photo of your finished Everyone's a Star quilt top made with any Benartex/Kanvas/Contempo fabric collection for a chance to win a box of Fossil Fern fat quarters! (Bonus entry if your quilt is quilted and bound as well!)
Email your photo by Thursday, April 6, 2017 to be entered in the drawing. 


Love It? Share It! Facebook Twitter Google Pinterest Email