The Christmas countdown has begun! This week we'll be sharing five holiday-themed tutorials to add to that festive feeling.
Today Debby Kratovil is here playing with the Mistletoe collection. Wait until you see what she does with this adorable panel! You'll never buy Christmas cards again. Enjoy her tutorial (don't miss the link to make a cute child's vest as a bonus!) and then head over to her blog to enter to win a holiday fabric bundle.
Here's Debby!
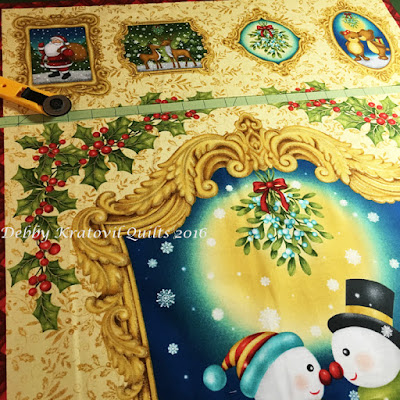
I love fabric panels. They capture so much within a large expanse of material, but when I received the Mistletoe collection I realized I couldn't do anything other than make another quilt. Or could I? I really didn't want to make one more quilt to add to the zillions I have here. Hmmmmm. I put my thinking cap on and the wheels were spinning. First, let me show you the group of fabrics I was given - don't you just love that stripe?! |
| Mistletoe Fabrics by Benartex |
 |
| The 24" x 42" panel that said "ONLY A QUILT" to me |
 |
| I sliced the top and bottom from the large panel |
 |
| Small panels, finishing strips, card stock |
 |
| Oh, we're so happy! We're going to make a little girl happy! |
 |
| Add a little batting and we are ready to go! |
My almost 3 year old granddaughter loves to draw and color. She will enjoy having some Christmas scenes on one side and a blank slate on the other. Maybe she can use these for her own holiday cards for her pre-school teachers or Sunday School teacher.
But, first I must add some double sided tape to keep the layers from shifting. Yes, I will be sewing these layers on using my sewing machine!
 |
| Double sided tape keeps the batting from shifting |
 |
| Stitched and trimmed |
 |
| 7 happy scenes on postcard sizes (about 5" x 7" cardstock) |
 |
| One fat quarter with large motifs |
 |
| Placement of vest front |
Let's see the vest:
 |
| Front vest; green inside back lining and cream inside front lining |
 |
| Back of vest |
You can see the steps for making the vest here: Firefighters Rock. Make sure you look at the steps because it results in having NO raw edges showing and is a very creative approach to how the seams are worked. I love this technique!
Find the pattern here: Kids' Vest
For a chance to win a bundle of one of our holiday collections, head over to Debby's blog.
Make sure to catch all of the tutorials on our Deck The Halls Blog Hop!
Monday 12/5: Chris from made by ChrissieD
Tuesday 12/6: Paula Nadelstern
Wednesday 12/7: Debby from Debby Kratovil Quilts
Thursday 12/8: Alison from Little Bunny Quilts
Friday 12/9: Benartex blog design team
p.s. Looking for more holiday inspiration? Click here to check out the tutorials featured in our Christmas in July blog hop.


Very clever and much better than a quilt! ;-)
ReplyDeleteThanks Debby great info and pretty fabric. Cork@pa.RR com
ReplyDeleteSuch a great idea. Debby always comes up with the best ideas. Thank you. So cute.
ReplyDeleteAwesome idea!
ReplyDeleteI love Debby's way of thinking. I would never have thought of this.
ReplyDeleteNEAT PROJECT! THANKS FOR SHARING!
ReplyDeletemsstitcher1214@gmail.com
These ideas are brilliant! I started following Debbie after being introduced to her on one of your blog posts and really am delighted with all of her ideas and tutorials! This is a magnificent fabric bundle to do these type of projects with! Thank you so much for sharing and have a fantastic creative day!
ReplyDeleteYour ideas are always great. Appreciate you sharing.
ReplyDelete-10 in SW MT this a.m.. Stay warm
Love these ideas. Sometimes panels are so hard to use.
ReplyDeleteCute!
ReplyDeleteShe is a smart Lady! Love the vest.
ReplyDeleteOoooh, grammy! you are gonna have one happy granddaughter. Can't wait to see what you do with the kissy-kissy snowpeople.
ReplyDeleteWhat a cute vest and creative way to use a panel. Debby comes up with some great ideas!
ReplyDeleteThis is so great,Thanks
ReplyDeleteLove those postcards...what a clever idea...and that vest...cute as can be...I also Pinned this so I can find some panel fabric to make some of Debbys postcards.......
ReplyDeleteGreat idea!! I love it!!
ReplyDeleteOh how I love snowmen!!♡
ReplyDeleteAwesome ideas and I agree, that stripe is a keeper (well, yes, it needs to be used eventually, but it's really neat).
ReplyDeleteSuch a great idea to make a little one happy!
ReplyDeleteYou are so talented. thanks
ReplyDeletecute designs. I always feel I have to cut up these panels. I hate the look of them straight way. more interesting to frame them, angle them etc.,
ReplyDeleteWonderful projects.
ReplyDeleteSuch cute designs. I loved how you used a panel to make cards and a vest. I love the strip fabric too. Thanks for the ideas using a panel.
ReplyDeleteOh, wow, what great projects. I love both ideas. Someone just gifted me two snowmen panels. I will have to think about whether they would work this way. Thank you for enlarging the box I think inside.
ReplyDelete