The Christmas countdown has begun! This week we'll be sharing five holiday-themed tutorials to add to that festive feeling.
Our hop begins with Chris from made by ChrissieD. She fussy cut Amanda Murphy's Sparkle collection to make a Dresden Plate Table Topper. We hope you enjoy her tutorial below (plenty of tips for making this sweet project!). Head over to Chris' blog to find out how you can win a fat quarter bundle of one of our holiday lines--the perfect early holiday gift!)
Here's Chris:
Hi everyone, it's hard to believe we're already five days into December and the Holiday season. I'm delighted to be back here on the Benartex Sew in Love {with Fabric} blog again and introducing Day 1 of the Benartex Deck The Halls Blog Hop.
Hi everyone, it's hard to believe we're already five days into December and the Holiday season. I'm delighted to be back here on the Benartex Sew in Love {with Fabric} blog again and introducing Day 1 of the Benartex Deck The Halls Blog Hop.
Many of you will already know me, but in case this is our first meeting, I'm Chris Dodsley of made by ChrissieD, a sewing teacher in Manhattan and VP of the NYC Metro Modern Quilters Guild, blogging about my textile crafts and travel adventures. I love to share my tips, tutorials and projects on my made by ChrissieD blog, twice monthly newsletter and various social media sites including Facebook, Instagram, Pinterest and Twitter .
Today I'm working with the Sparkle fabric collection by Amanda Murphy of Amanda Murphy Design. There are 16 fabrics in the collection - snowflakes, wreaths and ornaments as well as small and stripe prints in wonderful colours. All fabrics in the collection are 100% cotton.
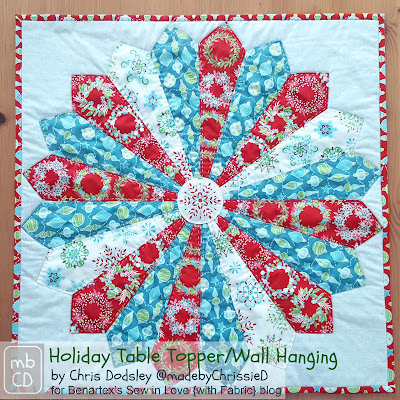
I chose these five prints from the collection to make my Holiday Table Topper
Holiday Table Topper / Wall Hanging Tute
and once I finished it I realised it also makes a great Holiday Wall Hanging.
Whatever way you decide to use it - here is my tute.
Holiday Table Topper / Wall Hanging Tute
approx 24" square
Materials + Cutting Instructions
Benartex Sparkle colours + codes are in italics.
fabric quantities given allow for 13-1/4" length Dresden Blades to be fussy cut with the narrow end extended until the diagonal sides converge into a point, as I have done, but this isn't essential
(8) red blades - 3/8 yard (wreaths red 10052-10)
(8) turquoise blades - 3/8 yard (ornaments turq 10053-84)
(4) white blades - 3/8 yard (snowflakes white/multi 10051-09)
(1) 25" x 25" quilt top - 3/4 yard (dot geo white/turq 10055-84)
(1) 25" x 25" quilt back - I've pieced together left-over sections of the other fabrics
(1) 25" x 25" Insul-Bright OR batting
(1) 106" length of your choice width of binding - approx 1/4 yard (ornaments red 10053-10)
Your choice of thread for machine sewing and hand quilting
spray baste or basting pins
You'll also need a Dresden Blade template.
This Dresden plate has 20 blades so you'll need an 18 degree template (20 x 18 degrees=360degrees) that is long enough to cut a blade at 10-7/8"
- or you can extend the lines of a shorter blade yourself with a ruler.
You can purchase an acrylic template or you can draw your own using the instructions over on my blog.
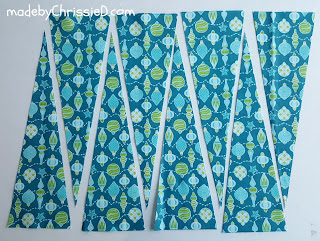
Let's start by taking a look at how I've cut my blades. You'll see I've not left the blades blunt at the end as is normal with a Dresden Plate, instead, I've continued them to a point and the vertical length is 13-1/4". If you want to leave your ends blunt then your vertical length will be 10-7/8".
On the left you'll see I've fussy cut the wreaths so they're centred down the blade and on the right you can see how I've extended the narrow end of the blade to a point - I've left the original blade end line visible through the blue snowflake so you can see what I mean
Piecing Instructions
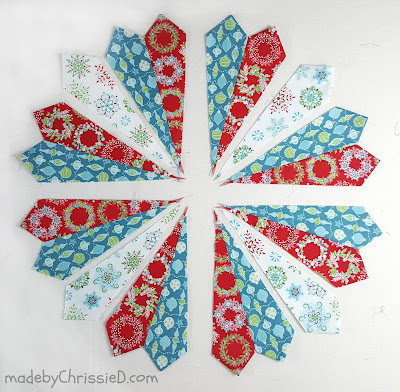
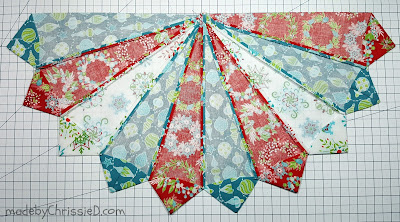
Lay out Dresden blades as shown below.
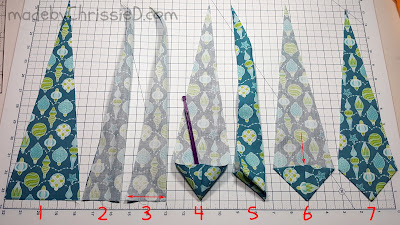
Now work through the 7-stage process shown below to create your finished blade points:
1 - Take one blade and layout as shown;
2 - fold the blade in half down its length and right sides together;
3 - sew a 1/4" seam along the short bottom edge of the folded blade (the red line);
4 - turn your fabric right side out and tease that point right out;
5 - fold the blade in half down its length with wrong sides together to create a centre fold line;
6 - line the sewn blade seam up with the centre fold line and press; and
7 - turn over and press again.
You've made a Dresden Blade! Continue until you've made 20!!!
Lay your blades back in the circle design shown above and separate slightly into quarter circles - five blades in each quarter
Join each set of five blades following the 5-step process below:
1 - take two blades;
2 - place the two blades right sides together;
3 - using a 1/4" seam sew the 2 blades together starting at the wide end and sewing into the centre - this ensures the outside edge of your Dresden Plate lines up (the purple line). Double check you're sewing the correct blade edges together to keep the design in order;
4 - Press the seam open on the wrong side; and then
5 press the seam open on the right side.
These five blades form a quarter Dresden Plate.
Trim the long ends from the centre corner of your quarter Dresden Plate to create a perfect right angle.
Create four quarter Dresden Plates.
Sew the quarters together and to create the halves.
And finally sew the halves together into the whole.
For this final stage, match the wide ends of the blades and also the centre seam as perfectly as you can. I used lots of pins to prevent movement.
Press all seams open.
Turn to the right side and press the seams open again - the centre, where all the seams meet will need pressing hard as there is a lot of bulk there. Open out the seams as best you can and press - it is possible to reduce the bulk quite significantly. If you left your blades blunt and didn't extend them to points then your centre section will be a hole and there won't be any bulk. The outside diameter is approximately 23-1/2"
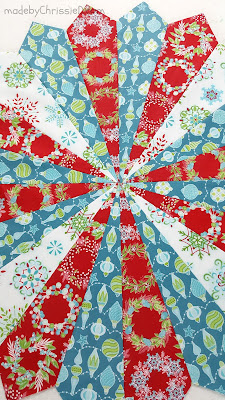
This is how the centre of your Dresden will look on the right side and on the wrong side with all the seams pressed open.
Making Your Quilt Sandwich
Lay out your Insul-Bright or batting and lightly spray baste the back of your 25" quilt top. It's equally possible to baste with pins also just not quite as quick and easy :D
Lay the back of your quilt top down on top of the Insul-Bright. The Insul-Bright can be any side up. Don't be put off by the size of my Insul-Bright in the photo below, you can just about see that my fabric is cut smaller and I cut the Insul-Bright down after basting the two layers together.
Spray baste back of Dresden plate
and attach to the Quilt Top placing the wrong side of the Dresden Plate onto the right side of the quilt top, be sure to centre your Dresden Plate. If you're not happy with your placement you can lift it and reposition, the spray baste is very forgiving.
You might want to mark the centre of your quilt top then place a pin through the centre of your Dresden Plate and match the two together. I used the pattern lines on the quilt top fabric to line up each end of the Dresden Plate.
Sew around edges of the quilt top using 1/8"-1/4" stitch to hold quilt top to Insul-Bright (blue lines).
Quilting
Now we're at the stage where you have to make choices:
1: If your Dresden Plate has a hole in the centre OR if it doesn't have a hole in the centre but you suddenly decide you want to add a turned edge circle to the centre after all (you guessed it, that's exactly what I did when I spotted the perfect snowflake to fussy cut for the middle) then now's the time to add it using your favourite turned edge applique method. I have a tute showing you how I do it here on my blog.
2: If your Dresden Plate doesn't have a hole in the centre you can move on to hand quilting your blades as I have. If you'd like some help keeping your hand sewn lines perfectly straight I have a tute here on my blog. If you want your hand quilted stitches to be visible on the back of your quilt then follow my Hand Quilting Only instructions below OR if you don't want your hand quilting to be visible on the back then follow my Hand and Machine Quilting instructions below.
3: If you don't fancy hand quilting, you can move straight on to machine quilting your sandwich following my Machine Quilting Only instructions below.
Hand Quilting Only
Before starting to hand quilt your Dresden Plate you'll need to spray baste the back of your Insul-Bright and attach your quilt backing. Now hand quilt 1/8" inside the edge of each Dresden Blade and the centre circle too, if you've added one. This will hold everything securely in place. Any additional quilting is up to you.
Hand and Machine Quilting
Hand quilt 1/8" inside the edge of each Dresden Blade and the centre circle, if you've added one. When you've completed your hand quilting you'll spray baste the back of your Insul-Bright and attach your quilt backing. Now machine stitch in the ditch around the edge of each Dresden Blade and around the appliqued centre circle too if you've added one. This will hold all layers securely in place. Any additional quilting is up to you.
 |
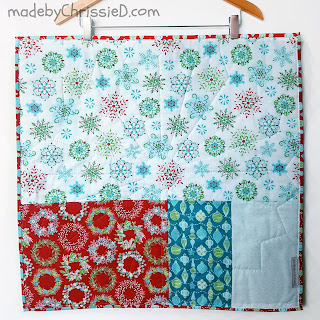
| Basted Quilt Back |
Machine Quilting Only
If you are heading straight to machine quilting you'll need to spray baste the back of your Insul-Bright and attach your quilt backing. Now stitch 1/8" inside the edge of each Dresden Blade and around the appliqued centre circle too if you've added one. This will hold everything securely in place. Any additional quilting is up to you.
You can just about see my machine quilted lines on the back of my piece in the photo above.
Finishing Your Quilt
for all quilting methods
When you've finished quilting, machine baste around the edge of the quilt, square up and trim at approx 24".
Now bind the quilt using your preferred method.
I've used double fold 2-1/4" straight grain binding, machine sewn to the quilt top with a 3/8" seam, then handsewn to back. This means the binding is narrow on the back than on the front.
The Finished Holiday Table Topper / Wall Hanging
HOLIDAY TABLE TOPPER / WALL HANGING TUTE
I hope you've enjoyed my day on the Deck The Halls Blog Hop and want to make your own Holiday Table Topper or Wall Hanging! Head over now to my made by ChrissieD blog for a chance to win a fat quarter bundle of holiday-themed fabric and I'll be sharing more photos of the finished project with you and all those tutes I promised you too. Looking forward to meeting you there! Chris :D
Make sure to catch all of the tutorials on our Deck The Halls Blog Hop!
Monday 12/5: Chris from made by ChrissieD
Tuesday 12/6: Paula Nadelstern
Wednesday 12/7: Debby from Debby Kratovil Quilts
Thursday 12/8: Alison from Little Bunny Quilts
Friday 12/9: Benartex blog design team
p.s. Looking for more holiday inspiration? Click here to check out the tutorials featured in our Christmas in July blog hop.














That is beautiful. I love the center circle idea too.
ReplyDeleteVery pretty! Great tutorial!
ReplyDeleteJust gorgeous! I am adding this mini Dresden to my list, so pinning it for reference!
ReplyDeleteSO NEAT!LIKE TO DO THIS FOR A PAIR OF BED PILLOWS! THANKS FOR SHARING! msstitcher1214@gmail.com
ReplyDeleteThank you for sponsoring this blog hop. I always get such great ideas from the different tutorials. And the fabric is always to die for!!
ReplyDeleteI have always loved Dresden's and the many ways that designers put them together. Plus, each bundle of fabric brings a new brilliance to their appeal. I thoroughly enjoyed this splendid tutorial and will definitely be making several for gifts this year! Thank you so much for having the blog hop and for choosing Chris as one of the designers; she did a fantastic tutorial as always!
ReplyDeleteBeautiful.
ReplyDeleteGorgeous! Love all the tips on making this...thanks for the tut!
ReplyDeleteWow, spectacular.Thanks for sharing tips!!
ReplyDeleteBeautiful - would go on my wall as I would be so upset if something soiled it on the table.
ReplyDeleteMaking a Dresden Plate is on my list for 2017! This is a beautiful example of one that I'm like to make and is an excellent tutorial too! Thanks Chrissie!
ReplyDeleteGreat block. Especially love the extra touch of the snowflake in the middle. Thanks for the sewing tips also.
ReplyDeleteReally beautiful Dresden Plate. I love the fussy cutting center. Very cool. All the fabrics used for this are VERY pretty.
ReplyDeleteVery cheery. Well written instructions, and someone has decided Dresden plates have a center!
ReplyDeleteHow fun and bright and festive! Love the center snowflake!
ReplyDelete