
What does Valentine's Day mean to you?
Chocolate and red roses?
Chocolate and red roses?
Candy conversation hearts?
A romantic dinner?
Girls' night?
We can tell you what it means to us...fun heart and chocolate-themed fabric!
(Well, okay...actual chocolate is a close second...)
We're starting out this Valentine's week with a few fun tutorials (and of course, a chance to win some fabric!)

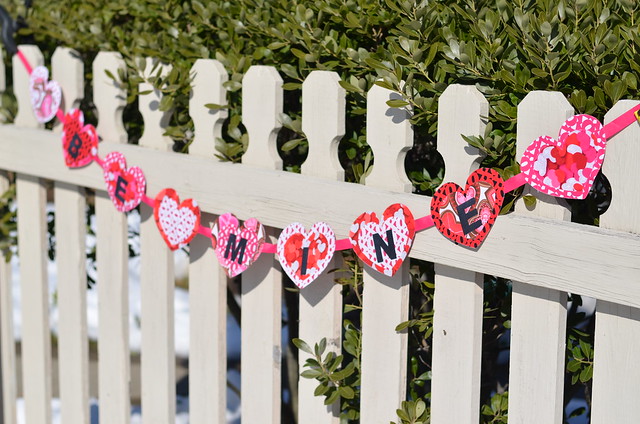
Today Jessica from SewCraftyJess is here, sharing a tutorial for making heart garland using Kanvas' Love Is All Around collection.
Hello! My name is Jessica and I blog over at SewCraftyJess. I have been sewing and quilting for almost 5 years now and really enjoy every opportunity I can grab to escape to my sewing room and play with fabric! I am so excited to be here today sharing a quick and easy bunting to help decorate your space for Valentine's Day.

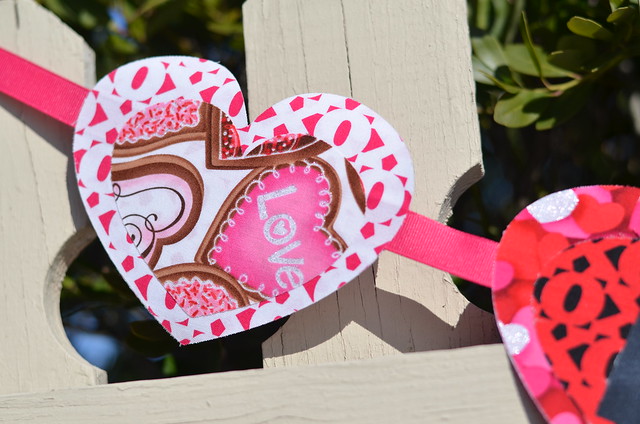
When Benartex asked if I would be interested in recreating my original version of this tutorial in Valentine's themed fabric, I of course jumped at the chance and chose a few prints from the Love is All Around line. These fabrics really are beautiful in person, and the extra sparkle detailed in some of the prints add just the right amount of whimsy to make this banner pop.
Read below for full details to make this banner, including a few tweaks that makes this version no-sew! Check out the bolded No-Sew Tips throughout the tutorial to make this no-sew version.
Be Mine Valentine Garland Tutorial
You Will Need:
(18) appx. 5" square fabric scraps
(9) appx. 4" square fabric scraps
4" x 12" fabric for letters
Double Stick fusible web (I used Steam a Seam lite)
bias tape or ribbon measuring 67" long
Water Soluble fabric marker

1. Begin by printing out the Be Mine Template and the Heart Template (found here and here).
2. Cut out one of the larger hearts from the heart template. We will use this as a template to trace onto the wrong side of (9) of our 5" fabric squares.
**Tip: I found it helpful to spray starch my fabric squares before tracing the hearts, as it helped to keep my fabric from bunching while tracing**

3. Cut out all 9 hearts you traced onto your fabric squares, set aside.

4. Next, trace the smaller heart template onto your fusible web (Steam a Seam) 9 times. You will note that there is on side of the steam a seam that pulls away quite easily, and one side of the Steam a Seam that is harder to pull off. Trace your hearts onto the side that is hard to pull away.

5. Loosely cut around each heart you just traced on to the fusible web.

6. Peel away the easy to remove paper side from your fusible web hearts from step 5. (Your heart tracing should still be visible) Fuse according to the fusible web manufacturers directions on to the wrong side of one 4" fabric square. Repeat with (8) remaining 4" fabric squares/fusible web hearts)

7. Cut along the heart outline You should now have (9) smaller hearts that are backed with fusible web and the paper-y covering. Set aside.
8. Using the Be Mine Template, turn the template over, so the letters are backwards, and trace the outline of each letter using a dark fine point marker (Sharpie) or dark colored pen.

9. Trace the backwards letters onto the fusible web, as you traced the small hearts in step 4.

10. As in step 6, peel away the easy to remove paper side of your fusible web. Fuse to wrong side of the 4" x 12" fabric you are using for the letters.

11. Cut out the letters along the outline visible on the fusible web.

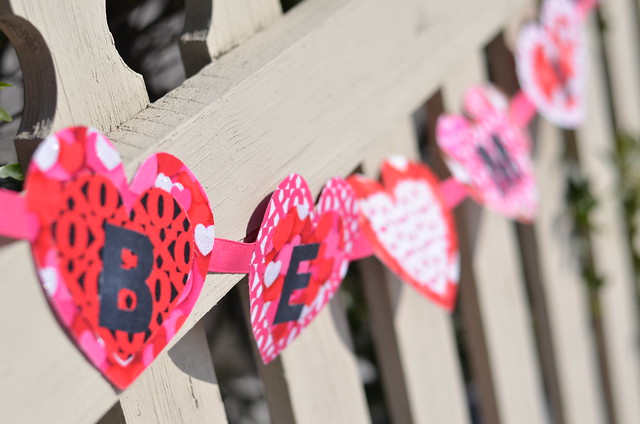
12. Now comes the fun part, use your large hearts from step 3, your smaller hearts from step 7, and your BE MINE letters from step 11, remove the harder-to-remove paper backing from your fusible web to expose the sticky side of the smaller hearts and letters, and arrange in the following manner:

13. Once you are happy with the arrangement, press with your iron to fuse together. Set aside. **Note, you will have 3 large heart/small hearts that do not have a letter.

14. Repeat steps 4-7 with the large heart on the Heart template, to form 9 large hearts backed with fusible web. These hearts will be the garland backs. Set aside.
15. If you are using bias tape, you will want to fold in the short raw edges 1/2" to prevent fraying, and stitch along the short edges, and open folded long edge. No-Sew Tip: If you are using ribbon, skip this step.


16. Take your bias tape/ribbon, and starting at the left short edge, measure 6" and make a small mark with your water soluble pen. Continue to make 9 total marks every 6".

17. Place a large heart with fusible web backing from step 14 right side down (fabric side down, fusible web side up--remove paper covering to expose sticky web), and then lay the bias tape on top of the sticky side of the heart, with the mark you made on the bias tape in step 16 aligning with the left edge of the heart, like so:

18. Take one of your assembled large/small hearts assembled in steps 12 and 13, and align on top of your heart backing from step 17, sandwiching the bias tape in between the two hearts, press to fuse together.

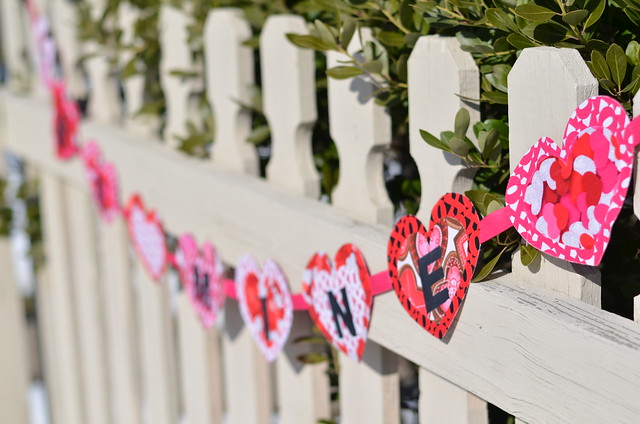
19. Repeat this process with the 8 remaining hearts, aligning the left edge of each heart with the marking on your bias tape/ribbon. Be sure to arrange your hearts in order, spelling BE MINE.
20. Once all 9 hearts are fused to the bias tape, edge stitch around the border of each large heart to secure to the bias tape. You could choose to stitch around the smaller hearts and letters also, but as this is a decoration, and won't be washed, I chose not to. No Sew Tip: As long as this will be handled with care, this final top stitching step can be skipped!
21. Stand back and admire your new Be Mine Valentine Garland!
Thanks again for having me, I hope this little tutorial will help bring a little Valentine's cheer to your home!
Thanks Jess! Head over to Jess' blog to find out how you can win a fat quarter bundle of the sweet Love Is All Around collection.
Don't miss our other Valentine's themed tutorials!
Love It? Share It!


That is so cute.
ReplyDeleteI haven't made a banner in a very long time - this is very cute!
ReplyDeleteWe have a Birthday Banner but I think that a Valentine's Banner would be super cute too!! Just to remind those to remember that it is a special day, and some of us like to have a surprise treat... like chocolate!! hehehe
ReplyDelete
ReplyDeleteAdd some kids, cupcakes and red juice, and you've got a PARTY!
Sweet project. Thanks.
ReplyDeleteLooks like fun to make, great tutorial. b.j.day68@gmail.com
ReplyDeleteGorgeous!
ReplyDeleteSO NEAT-THANKS FOR SHARING!
ReplyDeletemsstitcher1214@gmail.com
So cute and fun.Thanks for the tuto!
ReplyDeleteWondering why you have to have some kind of weird ID to comment on Jess' blog to win ? I have email only. Here a few other options are open. I wanted to comment to enter to win a packet of fabric but can't.
ReplyDeleteCute!
ReplyDeleteThat is sooo cute!
ReplyDeleteRosemary B here
ReplyDeleteThis is really cute!
I love this! Thank you!
ReplyDeleteI like this project, thanks for the giveaway
ReplyDeleteCute!
ReplyDelete