It's the middle of July...the sun is shining...flowers are blooming...
So of course it's the perfect time to start planning for Christmas!
We've shared all of our holiday fabric collections, and now we're moving on to the blog hop! Over the next four days, we'll be sharing tutorials using our fabrics. If you like what you see, the fabrics are available in stores now, so you can get started on your favorite featured project now and be done before the holiday rush begins!
Crank up the air conditioning, pull out your wool hat, and enjoy our Christmas in July series!
Today Debby from Debby Kratovil Quilts is here sharing a gorgeous star quilt she made using Amanda Murphy's Nordic Holiday collection. Enjoy the tutorial and visit Debby's blog for a chance to win fabric.
Here's Debby:
Q: Why did you choose this collection?
A. Amanda Murphy has done it again! Nordic Holiday is refreshing, modern and appeals to just about any quilter. Snowflakes, reindeer, bears and a non-traditional holiday color palette combine to inspire all sorts of patterns. Yes, there's red and green. But look at that blue and gray!
Amanda includes a lovely reindeer in her collection.
I have a similar one I designed in 2004.
I initially was going to bring out my Merry, Merry patterns from 2006. I shared this appliquéd reindeer on my blog last year as a free pattern. What? You missed that? Click here for that quilt pattern (with a Christmas tree, angel and other blocks).
Q. Can we see the fabrics?
A. Nordic Holiday swatches in the swatch book:
And here is the set of fabrics that Benartex sent. It didn't take long for me to decide on a pattern.
Q. And what did the fabrics say to you? (We know you wait for them to talk to you before cutting!)
A. I did cut out a large hexagon double star (which I will show at a later time), but then decided that I couldn't offer the pattern here because it's a new workshop I teach. (The fabrics forgot about that, so I had to remind them that I needed a pattern I could share.) Plan B was my "go to" very BIG Lone Star. When I say BIG, I mean 29"!
Q. Can we see the steps? And is it easy?
A. Of course, I'll show the steps. And easy is my middle name!
I call this easy because I took out all the y-seams traditionally associated with a Lone Star quilt.
I selected two fabrics with good contrast for my star center. I cut two 3-1/2" x wof strips of each. Offset the red one 3" as shown here and sewed with 1/4" seam, pressing toward the red print (#1885-10). Using the 45 degree line on my ruler, I lined it up with the seam as shown below. Slice off the side. The blue print is #1883-08.
 |
| Seam and slice at 45 degree angle on left side |
Cut 3-1/2" wedges as shown. You are measuring from the CUT edge. Do NOT use the lines on your cutting mat for this. It's all in relation to your ruler.
 |
| Cut 3-1/2" Two-Patch 45 degree wedges |
Place the red diamonds at the pointed ends
 |
| Two wedges become a Diamond 4-Patch |
Sew together and press seam open.
 |
| Diamond 4-Patch, seam pressed open. |
Make 8 of these units
 |
| Make 8 Diamond 4-Patch units |
Now we cut the setting triangles, large and small. Remember, there are no y-seams! I selected the wonderful gray scroll print: #1883-13.
Cut four 6-3/4" squares and four 9-5/8" squares. Recut each into two triangles each. You will now have 8 small and 8 large triangles.
 |
| Large and small setting triangles |
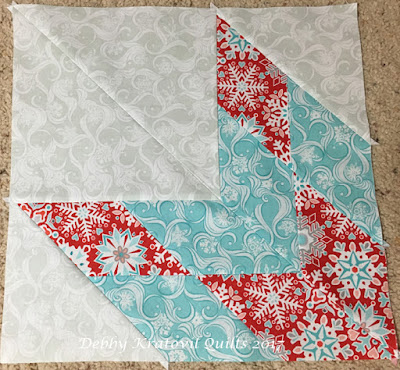
It's important to audition your triangle placement before you sew. It's easy to get things mixed up. Sew the small triangle on first. Press toward the triangle. Then add the large triangle (which is slightly oversized). Again, press toward the triangle.
 |
| Make 4 of these units |
Make 4 units that are the mirror image of the above unit. This is how they will look when sewn together.
 |
| These are mirror images of each other |
Use your long ruler and the 45 degree line to help you slice off the excess large triangle. I also like to align the ruler markings for inches along one or more seam line. Sewing diagonal seams can be tricky!
 |
| Slicing excess fabric |
Now, place the two units together and sew with 1/4" seam; press seam open. Make four.
 |
| Make 4 of these units |
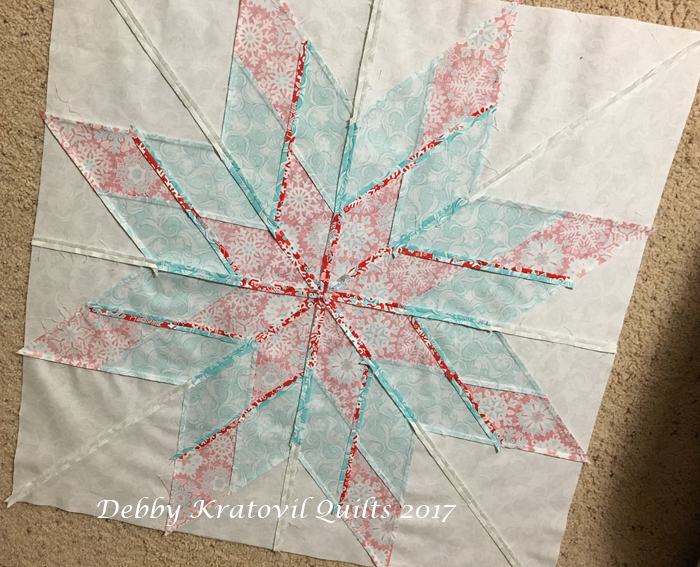
And what does it look like with all those seams pressed? Here is the 29" star from the back.
 |
| Seams pressed open make for a very flat quilt center |
Now for the borders. I wanted to use the reindeer print, but I only had enough for 2 borders (without chopping off parts of the reindeer!) So, I took that awesome red snowflake print and used that for the sides. Who says your borders have to match?
I also wanted to introduce a green (which is in the reindeer print, #1880-10). The green is the same pattern as the blue and gray already used: #1883-14). Inner border was cut 1-1/2". Outer reindeer print was cut (VERY CAREFULLY) at 6-1/2". The snowflake print only allowed me to cut two 5-3/4" strips. Again, who says your quilt's borders have to be the same size?!
Here she is: Holiday Star, 41-1/2" x 43"
 |
| Holiday Star: 41-1/2" x 43" |
Thanks, Debby!
Head over to Debby's blog for a chance to win a bundle of Nordic Holiday.
Follow along with our Christmas in July Blog Hop!
Saturday: Winter Story Wall Hanging by Benartex blog design team


