Showing posts with label Burlap. Show all posts

Friday, March 4, 2016

A new look for twine

Raise your hand if you have a ball of twine in a kitchen drawer. Most of us do, and most of us don't give it a second thought. While useful, twine is fairly boring. 
Until today. Dover Hill Studio's new Divine Twine collection turns this handy rope product into a thing of beauty. Twine outlines flowers, medallions, paisleys, swirls, and more in this rich, masculine-colored collection. Who knew twine could be so attractive?! 


Here's a closer look at the medallion print--these medallions can be fussy-cut into 6-1/2" squares--perfect for adding intricate detail to a quilt block. 


Divine Twine has two free quilt patterns. The first pairs the prints with coordinating Burlap colors to create a quilt made of contrasting shades. 

"Garden Courtyard" 
designed by Stephanie Sheridan and Linda Leathersich of Stitched Together Studios
Click here to download the free quilt pattern.

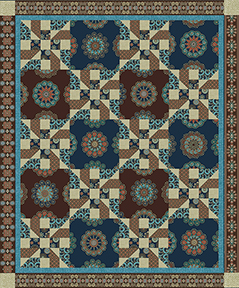
The second uses fussy-cut medallion blocks alternating with a secondary pieced block with a nautical feel. 

"Porthole Medallion" 
designed by Janet Page Kessler
Click here to download the free quilt pattern.

Click here to see the entire Divine Twine collection and download the free quilt patterns.

p.s. If you haven't seen our new Modern by the Yard e-zine, read more about it and download it here.
p.p.s. Next week we'll be starting our annual March Madness quilt bracket! Be sure to stop by and nominate your favorite free quilt pattern from our website.
Love It? Share It! Facebook Twitter Google Pinterest Email

Thursday, July 16, 2015

Christmas in July: Homespun Holiday

We're kicking off Christmas in July here at Sew in Love with Fabric! This week we'll be showcasing our new holiday collections, and next week we'll be hosting a blog hop of holiday-themed tutorials.

Today we're showing Homespun Holiday:

Homespun Holiday by Bristol Bay Studio evokes that nostalgic holiday charm with a cozy, home-by-the-hearth feel. Maybe it's the burlap look? (BTW, these prints coordinate well with the Burlap collection.) These neutral prints don't scream "Christmas," but they still set the mood!

Down-Home Holiday pattern by Tailormade by Design


Click here to see the entire Homespun Holiday collection.
Click here to download the free quilt (and runner) pattern.

Love It? Share It! Facebook Twitter Google Pinterest Email

Monday, December 29, 2014

Holiday Week Tute: 70s with a Modern Twist!

The week between the holidays often seems to be a week in limbo...some people are at work, some aren't, some are traveling and most are simply biding their time until New Year's Eve for another chance to celebrate. 

We thought we'd help this limbo week pass more quickly with a quick and easy tutorial--the Manly Quilt from Penny of Sew Take a Hike. She embraced her inner 70s child and gave it a modern twist to create a simple patchwork tied 
quilt with men in mind, using a few prints from Bellissimo, all 24 colors of Burlap, and the plaid taupe from Paintbox/Shadows.


Here's a peek at her quilt, all cozy in the snow:

And a larger peek:

Head over to Penny's blog to find the entire tutorial and enter a giveaway to win some of these fabrics for yourself!
Thanks Penny!
Love It? Share It! Facebook Twitter Google Pinterest Email

Friday, October 3, 2014

Feels Like Fall Blog Hop: Day 3

Welcome to Day 3 of our Feels Like Fall blog hop! Today we're moving to the kitchen, an ideal destination for autumn accents. Melissa from My Fabric Relish is here sharing how she replaced some well-used oven mitts with new handmade ones. As a nod to fall, these kitchen helpers sport a squirrel and his nut, and are made using the modern Daily Zen and Burlap prints. 


Fall is in the air! FINALLY! Here, in Texas, the true marks of fall are lows in the 60s and the State Fair of Texas opens its doors. I enjoy both of these things immensely! You also know it's fall because you have a hankering to bake lots of goodies, especially things with pumpkin. Lots of pumpkin. I love baking pumpkin bread and pecan pies during fall holidays and for anyone that bakes, you know having a good set of oven mitts is crucial! I have a pair that I received when I went off to college and they have always been my favorite, first ones I reach for, pair. Last Christmas, I finally got around to making a pattern from my beloved mitts and so excited to share it with you today!
When Benartex asked if I would like to share a Fall-inspired tutorial, I said absolutely and my oven mitts were perfect! It was easy to choose my fabrics for my project: Daily Zen and Burlap. Both these lines have beautiful saturated tones, prints with leaves and quills that just screams FALL, but still keeping it modern. I just had to applique my favorite woodland creature, a squirrel friend with his nut on them, too!
Before we get started, I am providing a convenient printable pattern with instructions and templates for you to print out. You can download them here! Enjoy!

 Fabric Requirements:
  • 3 FQs - Front/Back Panels and pockets 
  • Scraps for appliques
  • Binding - 3/8 yard (cut on bias for total of 80") 
  • Insul Bright by Warm and Natural - 3/4 yard 
Cuts:
  • Outside Panels - Cut (2) 14 x 20
  • Pockets - Cut (2) 6 1/2 x 13 " 
  • Binding - 2 1/2" x 41" bias binding PER mitt
  • Insul Bright - cut (2) 14 x 20 
Instructions:
  • Make Front/Back Panel Quilt Sandwich - Take the two outside panels and make a quilt sandwich with two layers of Insul Bright in the center. I like to use two layers of Insul Bright because for me one layer isnt enough. You could also use one layer of Insul Bright and then one or two layers of batting.  Be sure right sides are facing out. I recommend spray basting lightly or basting with large basting pins. Quilt as desired.If you would like to make more than one set, then make a quilt sandwich using the uncut FQs. Sorry I don't have pictures of steps 1,2, and 4. I accidently deleted them had some technical difficulties. 
  • Take the two pocket panels and fold in half, creating a 6 1/2" square. If you wish, you can add batting to the middle and also quilt. 
  • If you wish to add applique to your mitts, you will do that now. See How to Applique in 5 Steps (below). I like to applique after quilting, but feel free to do this before step 1.
  •  Place the pocket on the bottom half of the mitt with raw edges lined with the raw edges and the fold in the center of the mitt.
  • Mark each corner with template provided (page 3) and trim all four corners on both mitts including the pockets.
  • Apply the bias binding taking care around the curve edges. Optional - Add a tab using extra bias tape by folding the raw sides in, press, and stitch down open side. Attach before stitching the back of the binding down. Hint: After applying the binding to the front, trim the raw side of the mitt creating a narrow binding on the front and then stitched the binding down from the back.
How to raw-edge applique:
    • Trace the applique pattern on the paper (not waxy) side of the freezer paper.
    • Fuse woven interfacing (I like to use SF 1O1) to the wrong size of fabric you wish to applique.
    • Press the freezer paper onto right side of fabric that you wish to applique. Cut around the outline of the traced image.
    • Applique to project as desired. I like to use a washable glue stick to keep my applique pieces tacked down. Stitch your applique as desired.I like to use a straight stitch, zig-zag, or blanket stitches.
    Voila!
    They might be really stiff at first, but become more pliable once you start using them. 
    In case you were curious about my beloved oven mitts, I took a picture of them for ya! 
    (see, they are pretty gross and kind of smell like stale food)

    Thanks so much for checking out my oven mitts and I sure hope you give them a try! Be sure to come visit me at my blog, My Fabric Relish or follow me on bloglovin! 
     
    image


    Thanks Melissa! What fun for the kitchen! Head over to Melissa's blog and enter to win a fat quarter bundle of Daily Zen--use it to make these fun oven mitts or something else!

    This is the third of six autumn and/or Halloween themed tutorials coming your way, from Wednesday, October 1 through Wednesday, October 8. Be sure to check out all six and enter for a chance to win a fun fall fabric bundle!

    Here's the line-up:
    Day 1Kelly from My Quilt Infatuation featuring the Harvest Song collection
    Day 2Christina from Sometimes Crafter featuring the Spooktacular collection
    Day 3: Melissa from My Fabric Relish featuring the Daily Zen collection
    Day 4: Benartex blog design team featuring the Fall Festival collection
    Day 5: Debby from Debby Kratovil Quilts featuring the Spooktacular collection
    Day 6: Erin from Why Not Sew featuring the Indian Summer collection
    Love It? Share It! Facebook Twitter Google Pinterest Email

    Wednesday, August 27, 2014

    Blenders Blog Hop Day 2: Burlap Wallet


    Welcome to Day 2 of our Blenders Blog Hop! Today Caila from CailaMade will show you how to make an easy fold over wallet using the Burlap fabrics. Great texture for a wallet, and we love the colors she chose! Check out her tutorial and then find out how you can win a bundle of Burlap fabrics for yourself at the bottom of this post!


    DSC09336 (1)

    Hello Benartex readers! I'm Caila from the sewing blog, CailaMade, here to show you how to sew this awesome boy's wallet! My oldest son is about to start 2nd grade, and he needed somewhere to keep his (occasional) lunch money, so I whipped up this wallet and gave him a beginning-of-the-year gift that made him the happiest kid on the playground. Read on for the full instructions! If you'd like to see more of my sewing tutorials, and my new girls' dress pattern (The Desert Rose), head on over and check out my blog. I'd love to see you there!
    DSC09401 
    Materials Needed 
     I used the following Benartex Burlap cotton prints for this wallet. I love the visual texture on these fabrics! They give the appearance of burlap but are printed on soft quilting cotton. They are both manly and modern, with just enough of a casual feel to compliment this beachy wallet.
    • Outer fabric: Burlap Charcoal
    • Lining fabric: Burlap Harbor Blue
    • Card pocket fabric: Burlap Espresso
    • Pellon 808 Craft-fuse (but any mid-to-heavy weight fusible interfacing will work).
    Cutting Instructions
    • For the outer fabric cut one piece: 9 ¾” wide by 8” tall
    • For the lining fabric cut one piece: 9 ¾” wide by 7 ¾” tall
    • For the card pockets cut four pieces: 4 ¾” by 4 ¾”
    • Cut one piece of interfacing: 4” wide by 9 ¾” tall (if using a less sturdy fabric for the outside, such as corduroy, you might want to cut two pieces of interfacing so you can interface the whole piece of corduroy.)
    DSC09363


    Let's get started, shall we? 
    Step One: cut the pieces You should have one outer piece, one lining, and four pockets. Fold the lining in half so that the wrong sides are facing. You should now have a rectangle measuring 9 ¾” by 4” with a folded top edge and a raw bottom edge. Stitch along the top edge, approximately 1/16" from the fold (not pictured).
    DSC09494
      Step Two: prepare the card pockets. Pull out your four card pockets of the same size (4 ¾” by 4 ¾”).
      DSC09948
    Pick two squares for top pockets, and two for bottom pockets. (I’m sorry about the sudden change in fabric. The pockets below were used in my second wallet and I had improved the process by that point). To make the bottom pockets, fold the fabric in half with right sides together and press. Using a ¼” seam allowance, sew along the RIGHT side of one pocket and the LEFT side of the other. Turn the pocket right side out and press. Topstitch along the top folded edge as close to the fold as possible (topstitching not pictured).
      DSC09952DSC09953 DSC09957
     To make the top pockets, fold the pockets in half right sides together and press. Using a ¼” seam allowance, stitch along the RIGHT side and bottom of one and the LEFT side and bottom of the other.
      DSC09966
     Clip the corners and turn pockets right side out. Use a dull object like a pencil or chop sticks to push out the corners. Press well.
      DSC09968 DSC09970 DSC09971 DSC09973
     Now topstitch along the top edge, as close to the edge as possible. DSC09975
     You should now have four pockets prepared for the wallet, all topstitched. Set aside for later. 
    Step Three: prepare the outer piece (Note: If you'd like to add a strip of contrasting fabric to the front of your wallet as shown in the headline photos, do the following. Cut a strip of fabric 9 3/4" long by 1" wide. Pin the strip along the center of the bottom half of the outer fabric. Handsew along the top and bottom edges. Pull gently on some fibers from the raw edge to create a frayed look. Continue through the instructions to complete the wallet.) Now let's interface, shall we? Follow the manufacturer's instructions to add interfacing to the bottom half of the WRONG side of the outer fabric. (If you are choosing to interface the whole piece, cut another piece of interfacing the same size and apply it to the top half of the wrong side of the interfacing. Having a small gap between the two pieces of interfacing will make the outer piece easier to fold.) DSC09519
     Fold the outer fabric over the interfacing so the wrong sides are facing. Press the fold so it is nice and crisp.
      DSC09522
      Below are all the pieces you should have prepared so far. Please note, none of these have been stitched together yet. Outer wallet, lining, and four pockets (all topstitched along the top folded edge): DSC09532b
    Open up your lining for the following steps.


    Step Four: add the pockets to the lining Place the top pockets ¾” below the top of the lining and line up their raw sides with the raw sides of the lining. There should be an approximately 1/2" gap between the pockets on the lining. Make sure the raw edge is facing out and not toward the middle of the wallet. Open the lining, then pin your top pocket pieces in place. With the lining open, stitch the bottom only of the top pocket to the lining, using a 1/8" seam allowance (not pictured).

    DSC09539
     Now place the additional two pockets below the top edge of the attached pockets by 3/4" and pin.
    DSC09554
     Stitch around both sides of all pockets and the bottom of each lower pocket, with a 1/8" seam allowance. This is what you should have so far: DSC09563 DSC09559
    Step Five: assemble the wallet Place your outer fabric on the table so the side which has been interfaced is on top. Place the lining on top of this piece with the pockets facing down. The interfaced side of the outer fabric should be facing the pockets of your lining piece. Pin these together along the sides and bottom.
      DSC09570
     Stitch the outer edge (sides and bottom ONLY) with a 3/8” seam allowance. DSC09571
     Trim the seam allowance down to 1/8” and carefully clip the corners. Make sure not to clip through any stitches.
      DSC09576
     Turn the wallet right side out and press well. The corners may need some extra pressing in order to lie flat.
      DSC09579 DSC09584
     Topstitch around the sides and bottom of the wallet about 1/8” or 1/16” from the edge. The topstitching will be most visible from the outside of the wallet, so I suggest topstitching with the outside facing up. You’re done!
      DSC09590DSC09595DSC09660
    That was fun, huh? I love making these wallets! They make great gifts for the little men (or ladies) in your life.
      boys-wallet-tutorial
     Thanks so much for reading today. If you enjoyed this tutorial, please share with your friends and family! I'd also LOVE to see what you make with these instructions. Head over to my CailaMade Inspired Sewing group on Facebook to share your creations and say hi. I'd love to "meet" you there. And don't forget to stop by my sewing blog, CailaMade, for more tutorials, pattern reviews, and pictures of my darling kiddos. Have a great day and happy sewing!

    Thanks Caila! Would you like to win a fat quarter bundle of the Burlap line?  It’s easy!  Simply sign up to follow our blog and leave a comment on this post letting us know that you did.  For a second chance to win, follow Benartex’s Sew Interesting page on Facebook and leave another comment here letting us know you did.  The giveaway is open through Sunday, August 31 at 11:59 pm EST and the winner’s name will be randomly selected and announced here next week!

    Be sure to check out the other tutorials we'll be featuring all week long! Blenders Blog Hop:Tuesday 8/26: Christina from Sometimes Crafter featuring Burlap
    Wednesday 8/27Caila from Caila Made featuring Burlap
    Thursday 8/28: Benartex Blog Design Team featuring Blush
    Friday 8/29: Nikki from The Girl Who Quilts featuring Fleurish
    Love It? Share It! Facebook Twitter Google Pinterest Email