
It's the middle of July...the sun is shining...flowers are blooming...
So of course it's the perfect time to start planning for Christmas!
We've shared all of our holiday fabric collections, and now we're moving on to the blog hop! Over the next four days, we'll be sharing tutorials using our fabrics. If you like what you see, the fabrics are available in stores now, so you can get started on your favorite featured project now and be done before the holiday rush begins!
Crank up the air conditioning, pull out your wool hat, and enjoy our Christmas in July series!

Today Lisa from Love to Color My World is sharing a tutorial for whimsical Christmas placemats using Cherry Guidry's Mulberry Lane collection.
The placemat features larger pieces of two focal prints, plus a paper pieced wonky Christmas tree. Enjoy the tutorial and keep reading to find out how you can win a bundle of Mulberry Lane for yourself!

Here's Lisa:
There's so much detail in these prints that I wanted to show off large pieces in the placemat design. I also chose to make a wonky Christmas tree using paper piecing because I felt it echoed the whimsy of the fabrics. I love these fabrics!
Materials:
(to make 4 placemats)
1/2 yard aqua tonal
1/3 yard lime print
1/3 yard green print
5/8 yard red dot
1/2 yard street stripe*
5/8 yard circle print*
7/8 yard backing fabric*
(4) 2" squares of fusible web
(4) 14" x 20" batting pieces
*directional fabric; refer to project photos while cutting
Cutting:
From the aqua tonal:
(2) 4-1/2" x 42" strips (for paper piecing)
(2) 1-1/2" x 42" strips; cut into (4) 1-1/2" x 6-1/2" pieces and (8) 1-1/2" x 3" pieces
From the lime print:
(2) 4-1/2" x 42" strips (for paper piecing)
From the green print:
(2) 4-1/2" x 42" strips (for paper piecing)
From the red dot:
(6) 2-1/4" x 42" strips (for binding)
(1) 1-1/2" x 42" strips; cut into (4) 1-1/2" squares
(3) 1-1/4" x 42" strips; cut into (8) 1-1/4" x 12-1/2" lengths (for flange)
Reserve remainder for applique
From the street stripe:
(1) 12-1/2" x 42" strip; cut into (4) 4-1/2" x 12-1/2" pieces so stripe runs horizontally
From the circle print:
(2) 8-1/2" x 42" strips; cut into (4) 8-1/2" x 12-1/2" pieces so circles run horizontally
From the backing fabric:
(2) 14" x 42" strips; cut into (4) 14" x 20" pieces
Make the Placemats:
Note: Click here to download the paper piecing and applique patterns. This tutorial assumes basic knowledge of paper piecing. Use the strips listed in the cutting directions for paper piecing.
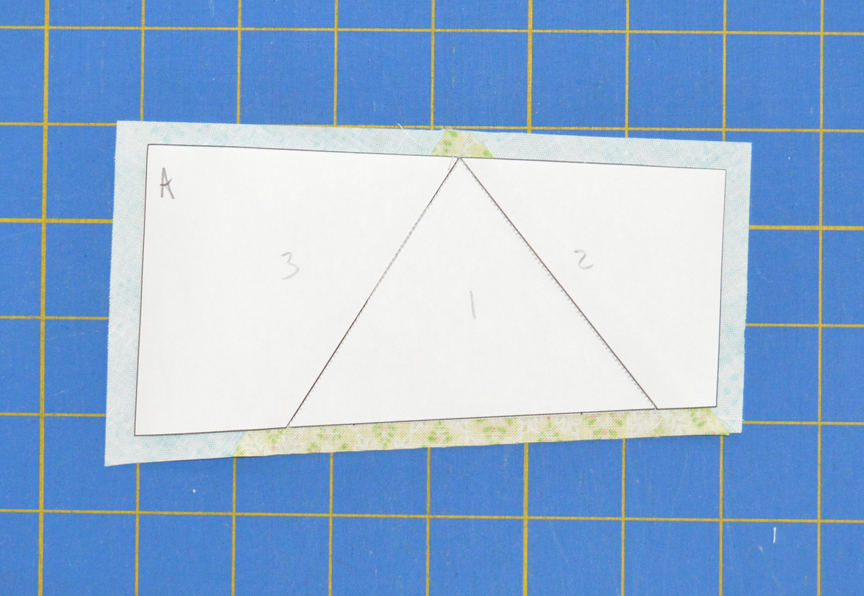
1. Cut apart the paper piecing patterns into four separate pieces: A, B, C, and D. Note: When you're paper piecing, make sure the fabric extends at least 1/4" beyond each paper pattern on all sides. You'll need 1/4" on each side for the seam allowance as you assemble the tree unit.

2. Paper piece the A section, using the lime print for piece #1 and aqua for the #2 and #3 pieces. Trim sides of section A to 1/4" past the edge of the paper (for seam allowance).
3. Repeat with sections B, C and D. Sew the units together in alphabetical order, matching raw edges. Remove the paper.

Here's what your tree should look like:

4. Sew 1-1/2" x 3" aqua tonal pieces to opposite sides of a 1-1/4" red dot square to make the tree base. Sew the base to the bottom of the tree and sew a 1-1/2" x 6-1/2" aqua tonal piece to the top. Your tree unit should measure 6-1/2" x 12-1/2".

5. Press (2) 1-1/4" x 12-1/2" red dot strip wrong sides together lengthwise to create (2) flange pieces. Lay a folded strip on a circle print piece as shown, matching raw edges. Pin to secure.

6. Sew a 4-1/2" x 12-1/2" street stripe piece to the bottom edge of the circle print piece, securing the flange at the same time. Press flange up.

7. Position the second flange along the left edge of the pieced unit with raw edges matching and pin in place.

8. Sew the tree unit to the left side and press the flange away from the tree.

9. Layer a backing piece right side down, batting piece, and placemat right side up. Quilt as desired.

10. Trace the star shape onto the paper side of fusible web. Fuse onto red dot fabric and cut out along the drawn line. Fuse the star to the top of the tree. Blanket stitch to secure.

11. Trim the quilted piece even with the placemat top. Your placemat should measure approximately 18-1/2" across by 12-1/2" tall.

12. Repeat steps 1-11 to make a total of (4) placemats.
13. Sew the 2-1/4" x 42" red dot strips short ends together into one long strip. Bind the placemats with these strips and enjoy!

For a chance to win a fat quarter bundle of Mulberry Lane fabrics, head over to Lisa's blog.
Follow along with our Christmas in July Blog Hop!
Wednesday: Mulberry Lane Placemats by Lisa Ruble
Thursday: Nordic Holiday Star Quilt by Debby Kratovil
Friday: A Moose for Christmas Pillow by Cynthia Brunz
Saturday: Winter Story Wall Hanging by Benartex blog design team
Love It? Share It!


A paper mache manger and Christ Child that I won in 1st grade 50 yrs ago! (Mickey Louth on fb...contact me there if necessary)
ReplyDeleteThose are fun holiday fabrics. Great tutorial too.
ReplyDeleteSuch a fun placemat! The texture of your quilting really shows off the fabric and design. I love the wonkiness of the tree...great work!
ReplyDeleteThese are adorable and look easy too, that is always a plus
ReplyDeleteReally pretty! I love the quilting on these.
ReplyDeletethis is s great idea for a place mat
ReplyDeletequilting dash lady at Comcast dot net
NEAT! THANKS FOR SHARING!
ReplyDeleteI like the Christmas tree.
ReplyDeleteCute placemat, and great quilting!
ReplyDeletecute! thanks for the tutorial.
ReplyDeleteSuper sweet placemat!! Thanks for sharing the tutorial!
ReplyDeleteI love this mug rugged tytyty for sharing...thus us a great idea blog hop...happyness04431@yahoo.com
ReplyDeleteI love the wonky Christmas tree with its red star.Bev
ReplyDeleteVery cute!!!
ReplyDeleteThanks for the great tutorial.
ReplyDeleteGreat tutorial, thanks so much.
ReplyDeleteThe kids on my Christmas list would love this!
ReplyDelete