Showing posts with label Mulberry Lane. Show all posts

Friday, December 8, 2017

Free Pattern Friday: Holiday Edition!

Today's post offers a recap of all of the free quilt patterns available on our website that correspond with our holiday fabric collections. Download your favorites and ask for the fabric at your local quilt shop. 

Nordic Holiday by Amanda Murphy
Amanda designed a free quilt pattern using Nordic Holiday, Candy Dish.
Click here to find out how to download it.

Click here to see the entire Nordic Holiday collection.
Click here to learn more about Amanda's Nordic Holiday collection and see Amanda's available quilt patterns.


Florentine Christmas
Find two free quilt patterns on our website using Florentine Christmas: 
"Secret Santa," featuring wrapped packages with applique bows
Click here to download the free quilt pattern.

"Buon Natale," simple half-square triangles packed with punch
Click here to download the free quilt pattern.

Click here to see the entire Florentine Christmas collection.


A Moose for Christmas by Cheryl Haynes
Use Cheryl's panel (and coordinates) in a variety of free quilt patterns! 
Merry Moosemas! designed by Heidi Pridemore, features pieced borders around the panel.

Click here to download the free quilt pattern.

Follow Cheryl's directions to turn the various panel pieces into table runners, pillows, and card holders. 
Click here to download the free quilt pattern.


Cheryl has an additional free pattern on her website--a classic patchwork square quilt that allows the fabric to shine. Click here to find it. 

Click here to see the entire fabric collection.
Click here to learn more about A Moose for Christmas.


Winter Story
Download our free quilt pattern featuring Winter Story, "Winter Cardinals."
Click here to download the free quilt pattern.

Click here to see the entire Winter Story collection.
Click here to learn more about Winter Story.


Mulberry Lane by Cherry Guidry
We have a free quilt pattern available on our website, Snowy Village, using the panel from Cherry's collection. 
Click here to download the free pattern.

Click here to see the entire Mulberry Lane collection.
Click here to learn more about Mulberry Lane and see Cherry's available quilt patterns.


A Festive Season by Jackie Robinson
Our website features a few free quilt patterns using Jackie's collection.
First, Festive Cardinals & Ornaments by Heidi Pridemore (you choose which panel and border print to use!) 
Click here to download the free quilt pattern.

Festive Runners by Jackie Robinson (again, you choose which panel to use!). Pattern includes table runner, queen-size bed runner, and placemats. 
Click here to download the free quilt pattern.

Click here to see the entire A Festive Season collection.
Click here to learn more about the collection and see Jackie's additional quilt patterns.


Merry Little Christmas by Holly Helgeson
Looking for a free quilt pattern? Try "Christmas Windows," which features the panel surrounded by patchwork borders. It's available as a free download on our website. 
Click here to download the free quilt pattern.

Click here to see the entire Merry Little Christmas collection.
Click here to learn more about the collection.


Winter Games by Amanda Murphy
Amanda designed a free quilt pattern using her Winter Games pattern. This quilt, called Skating Rink, is a log cabin variation featuring fussy-cut athlete appliques from the collection. The pattern is available as a free download from Amanda's website

Click here to find out how to download Amanda's free quilt pattern.
Click here to learn more about the collection and click here to see Amanda's additional quilt patterns.


We hope this holiday recap week has helped get you in a festive spirit! 
Happy Holidays!

Don't miss our other Christmas-themed posts this week! 
Technique Tuesday with Debby Kratovil: Hexagons with Festive Season

Love It? Share It! Facebook Twitter Google Pinterest Email

Monday, December 4, 2017

Ready for the Holidays? 4 Tutorials for You

It's beginning to look a lot like Christmas...

We're here to help you get into the holiday spirit! This week we'll be featuring our holiday prints along with tutorials, free patterns, inspiration, and a few magazine features. Even if you don't have time to sew these projects for this year, you can make your to-do list for next year and get a head start! 


Mulberry Lane Placemat, featuring Cherry' Guidry's Mulberry Lane collection
Click here to find the tutorial.


Holiday Star quilt by Debby Kratovil, featuring Amanda Murphy's Nordic Holiday collection
Click here to find the tutorial.

Moose Panel Pillow by Cynthia Brunz, featuring A Moose for Christmas collection by Cheryl Haynes
Click here to read Cynthia's post.

Winter Joy Door Banner featuring the Winter Story collection
Click here to find the tutorial.

Let It Snow Christmas Card by Cherry Guidry
Click here to find the tutorial.


Stop by tomorrow for a Technique Tuesday post by Debby Kratovil using Jackie Robinson's A Festive Season collection.
Love It? Share It! Facebook Twitter Google Pinterest Email

Wednesday, July 26, 2017

Christmas in July: Blog Hop Day 1

 It's the middle of July...the sun is shining...flowers are blooming...
So of course it's the perfect time to start planning for Christmas! 

We've shared all of our holiday fabric collections, and now we're moving on to the blog hop! Over the next four days, we'll be sharing tutorials using our fabrics. If you like what you see, the fabrics are available in stores now, so you can get started on your favorite featured project now and be done before the holiday rush begins! 

Crank up the air conditioning, pull out your wool hat, and enjoy our Christmas in July series!


Today Lisa from Love to Color My World is sharing a tutorial for whimsical Christmas placemats using Cherry Guidry's Mulberry Lane collection. 

The placemat features larger pieces of two focal prints, plus a paper pieced wonky Christmas tree. Enjoy the tutorial and keep reading to find out how you can win a bundle of Mulberry Lane for yourself! 


Here's Lisa:
There's so much detail in these prints that I wanted to show off large pieces in the placemat design. I also chose to make a wonky Christmas tree using paper piecing because I felt it echoed the whimsy of the fabrics. I love these fabrics!

Materials:
(to make 4 placemats)
1/2 yard aqua tonal
1/3 yard lime print
1/3 yard green print
5/8 yard red dot
1/2 yard street stripe*
5/8 yard circle print*
7/8 yard backing fabric*
(4) 2" squares of fusible web
(4) 14" x 20" batting pieces

*directional fabric; refer to project photos while cutting

Cutting:
From the aqua tonal:
(2) 4-1/2" x 42" strips (for paper piecing)
(2) 1-1/2" x 42" strips; cut into (4) 1-1/2" x 6-1/2" pieces and (8) 1-1/2" x 3" pieces

From the lime print:
(2) 4-1/2" x 42" strips (for paper piecing)

From the green print:
(2) 4-1/2" x 42" strips (for paper piecing)

From the red dot:
(6) 2-1/4" x 42" strips (for binding)
(1) 1-1/2" x 42" strips; cut into (4) 1-1/2" squares
(3) 1-1/4" x 42" strips; cut into (8) 1-1/4" x 12-1/2" lengths (for flange)
Reserve remainder for applique

From the street stripe:
(1) 12-1/2" x 42" strip; cut into (4) 4-1/2" x 12-1/2" pieces so stripe runs horizontally

From the circle print:
(2) 8-1/2" x 42" strips; cut into (4) 8-1/2" x 12-1/2" pieces so circles run horizontally

From the backing fabric:
(2) 14" x 42" strips; cut into (4) 14" x 20" pieces

Make the Placemats:
Note: Click here to download the paper piecing and applique patterns. This tutorial assumes basic knowledge of paper piecing. Use the strips listed in the cutting directions for paper piecing.
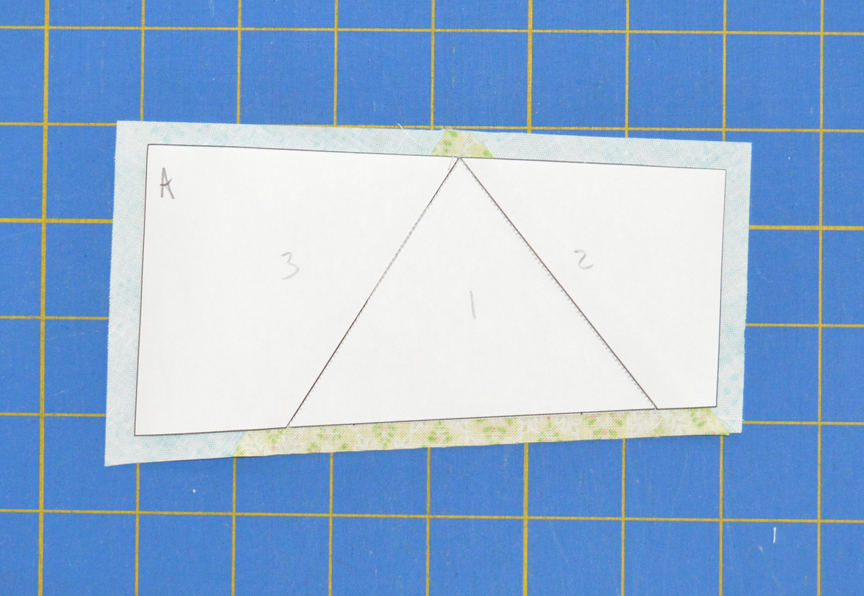
1. Cut apart the paper piecing patterns into four separate pieces: A, B, C, and D. Note: When you're paper piecing, make sure the fabric extends at least 1/4" beyond each paper pattern on all sides. You'll need 1/4" on each side for the seam allowance as you assemble the tree unit. 


2. Paper piece the A section, using the lime print for piece #1 and aqua for the #2 and #3 pieces.  Trim sides of section A to 1/4" past the edge of the paper (for seam allowance). 


3. Repeat with sections B, C and D. Sew the units together in alphabetical order, matching raw edges. Remove the paper. 

Here's what your tree should look like: 

4. Sew 1-1/2" x 3" aqua tonal pieces to opposite sides of a 1-1/4" red dot square to make the tree base. Sew the base to the bottom of the tree and sew a 1-1/2" x 6-1/2" aqua tonal piece to the top. Your tree unit should measure 6-1/2" x 12-1/2". 

5. Press (2) 1-1/4" x 12-1/2" red dot strip wrong sides together lengthwise to create (2) flange pieces. Lay a folded strip on a circle print piece as shown, matching raw edges. Pin to secure. 


6. Sew a 4-1/2" x 12-1/2" street stripe piece to the bottom edge of the circle print piece, securing the flange at the same time. Press flange up.

7. Position the second flange along the left edge of the pieced unit with raw edges matching and pin in place. 

8. Sew the tree unit to the left side and press the flange away from the tree. 

9. Layer a backing piece right side down, batting piece, and placemat right side up. Quilt as desired. 

10. Trace the star shape onto the paper side of fusible web. Fuse onto red dot fabric and cut out along the drawn line. Fuse the star to the top of the tree. Blanket stitch to secure. 

11. Trim the quilted piece even with the placemat top. Your placemat should measure approximately 18-1/2" across by 12-1/2" tall. 

12. Repeat steps 1-11 to make a total of (4) placemats.
13. Sew the 2-1/4" x 42" red dot strips short ends together into one long strip. Bind the placemats with these strips and enjoy! 

For a chance to win a fat quarter bundle of Mulberry Lane fabrics, head over to Lisa's blog

Follow along with our Christmas in July Blog Hop!
Wednesday: Mulberry Lane Placemats by Lisa Ruble
Thursday: Nordic Holiday Star Quilt by Debby Kratovil
Friday: A Moose for Christmas Pillow by Cynthia Brunz
Saturday: Winter Story Wall Hanging by Benartex blog design team
Love It? Share It! Facebook Twitter Google Pinterest Email

Friday, July 21, 2017

Christmas in July: Mulberry Lane

 It's the middle of July...the sun is shining...flowers are blooming...
So of course it's the perfect time to start planning for Christmas! 

Over the next two weeks, we'll be sharing all things winter holiday related with you. The fabrics are available in stores now, so you can get started on your favorite reindeer, snowflake, or Christmas tree quilt pattern now and be done before the holiday rush begins! 

Crank up the air conditioning, pull out your wool hat, and enjoy our Christmas in July series!
Take a trip to Mulberry Lane today, Cherry Guidry's new holiday collection. These scenic fabrics are so adorable that you'll want to move right in! We asked Cherry to tell us about Mulberry Lane. 


What inspired the Mulberry Lane collection?
When my children were young, we lived in a town with a quaint little street called Mulberry Lane. These homes were decked out to the max for the holidays, and it was one of our favorite roads to visit around Christmas.

Tell us about a few of your favorite prints.
There’s the little street scene with all the cars. I love the street, the movement going on, and all the snowflakes.


I also love the holiday fun print—it has the little bubbles with scenes in them.


I really love what happened with the blenders in this collection. There are six different colors, and they works so well for applique. Plus, these can stretch into the entire winter season, not just Christmas.


How did you come up with your palette?
Of course we had to bring the aqua back—I started with a deeper turquoise that you see in the snowflakes. There’s also a darker blue in here. I love the non traditional holiday colors, but I still wanted to include red and green. I love the way the lime works with the bright red.

Can you talk about the patterns you’ve designed using Mulberry Lane?
First there’s the Mulberry Lane quilt, a good sized throw. It’s all applique; blown up versions of the houses, cars and scenes in the fabric. I especially love the little row of cars at the bottom. All my patterns are available with SVG files, so if anyone wants to cut the applique pieces that way, they can.


Snow Crystal—I love stylized shapes, and this snowflake is no exception. It could be Christmas-y, but depending on the palette, it can work all through the winter. I love the open space ready for fabulous free motion quilting.


With Winter Star, I wanted to include more piecing. In the center of each block is an appliqued snowflake. There are two sizes—one bed-sized, and the other more of a throw.
I have the vintage ornament quilt along on we all sew.


I’m also doing a quilt along on Bernina’s Blog, We All Sew. It’s called the Vintage Ornament Quilt. The idea came from playing with an Irish Chain design. I wanted to see how I could include applique in with some type of simple chain. I have four more blocks to post (one each month), so there’s plenty of time to join in. At the end, I’ll talk about how to quilt it.

Thanks, Cherry! Cherry has offered to give away three free patterns (Mulberry Lane, Snow Crystal, and Winter Star). For a chance to win one of these patterns, leave a comment below letting us know which fabric you like best in her collection and why. Giveaway open through Monday, July 24th at 11:50 pm EDT. 

We also have a free quilt pattern available on our website, Snowy Village, using the panel from Cherry's collection. 
Click here to download the free pattern.

Click here to see the entire Mulberry Lane collection.
Click here to find the free quilt pattern. 
Click here to visit Cherry's website, and find her patterns and blog. 
Love It? Share It! Facebook Twitter Google Pinterest Email