

Welcome to Day 1 of our Blenders Blog Hop here at Sew in Love with Fabric! Today Christina from Sometimes Crafter is here, sharing how she used the Burlap fabrics to create some simple hoop frame art. You can try her designs or use the idea and choose your own pictorial art. We know you'll enjoy Christina's tutorial! After you've read it through, be sure to head over to her blog to find out how you can enter to win a fat quarter bundle of Burlap for yourself.
Here's Christina:
Summer always finds me spending more time outdoors than in. August especially keeps me on my toes. The blackberry vines and various weeds make it impossible to take even a day off from yard work. Perhaps that is why I look forward to fall before summer is even over. Summertime crafting is all about quick and satisfying projects, and hoop art is the perfect craft to fill my need to create.

Blender fabrics, like the Burlap line I'll be working with in this tutorial, are perfect to use on any themed project, any time of year. The color and creativity of blender fabrics takes the pressure out of pairing prints. The Burlap collection has great texture and colors and works for so many projects, as you'll see in this post.

For today's project i’ll be walking you through the steps of making this pictorial scene. You could easily make any scene you want, and are limited only by your imagination. I kept it simple, and did not complicate the scene with too many details. Simplicity is the key to this project. This is meant to be an "organic" project, so work with it as you go without rigid expectations.

For this project you will need some very simple supplies - fabric (a larger piece for your background and smaller sizes for your scene), scissors (small embroidery scissors help with smaller detail cuts), embroidery hoop (any size you like), embroidery floss and a needle with a large enough eye for the floss, and a darning (or free motion quilting) foot for your sewing machine. I showed the Heat & Bond fusible interfacing, but this is actually optional. For this project I did not use it, but in a later project I share, I did. You will need to make the determination as to whether you feel more comfortable using it, or would like to try it without. Other items needed, and not shown, are a sewing machine and steam iron.

Begin by placing your background fabric into your hoop. I used a fat quarter for this, as well as a 7” hoop. Begin by laying the inside piece of your embroidery hoop under the fabric, being sure to leave yourself fabric on all sides. You do not want to line this up on the very edge of your fabric, as you will need the excess to finish off the piece at the end. Place the outer section of your hoop over the inner ring, on the top side of the fabric and press around the inner hoop until they are seated together. Twist the hoop screw to tighten the two pieces together. Use your scissors to cut the excess fabric from the two sides of the hoop, as shown, being sure to leave extra. Leaving about 2-3” should do the trick. More is always better.

Next, cut out pieces from the fabrics you will be using for your scene. Just rough cuts are needed here. The pieces need to be easy to work with when creating your final shapes.
Note: If you will be using the Heat & Bond fusible interfacing, now would be the time to iron that onto the back of your fabric pieces.

Cut your fabric pieces from the last step into shapes for your scene. From my green rectangle I cut a gentle curve along the top to act as a grassy hill. From the rectangles for the houses I cut smaller sizes and gave them simple triangle roofs and even got a little more detailed on the grey house, giving it an overhanging roof line. Put something interesting in the sky, a cloud or sun or even a bird or airplane. I cut all of my shapes freehand with the scissors, but you could easily draw on the back of the fabrics with a water soluble marker before cutting (or the Heat & Bond paper if you are using that). The back of the burlap blender fabric is white and easy to draw on.
As you cut your pieces, lay them onto your hoop to make sure the scale works well with the hoop size. After everything is in place, I suggest taking a photo so you remember where everything was placed in your scene, as the pieces will be moved for sewing down in the following steps. Keep things simple at this point, don't worry about smaller details, those can be added later as you get a feel for your piece.

Set aside your fabric for the scene you are creating, and remove your hoop from the background fabric. You will notice your fabric has a crease where the hoop was tightened around it. This will aid in the placement of your fabric from the scene you just created, so don’t iron it out.

Working at your sewing machine, begin sewing down your pieces using your darning/free motion quilting foot if you have one, being sure to drop down your feed dogs on your machine. Start by stitching down the grass. Stay close to the upper edge and go from side to side. Take it slow and don't worry about evenly spaced stitches. This is not a precise stitch, and you will cringe as you sew, but you'll never notice how off it can become in spots. With practice you will become much happier with your stitching. I choose to use white thread 1) because it blends, and 2) because I was too lazy to change the thread on my machine. Using black can be a great way to outline each of the pieces, so use whatever color you are most comfortable with.
After stitching down the grass, I began sewing down the houses, one at a time. First I sewed down the light grey house, then I slightly overlapped the dark grey on to that and stitched around all the edges and finally I added the purple house, overlapping it with the dark grey. After the houses were all sewn down, I added the cloud into the sky.
Since I was not using the fusible interfacing, I had to be sure to go slow when stitching around everything so as not to get ripples in my fabric as I sewed. No matter how hard you try, the fabric will still bubble up a little in the middle, but that will be fixed with a hot iron and a few blasts of steam later.
When I finished stitching down the grass, houses and clouds, it was still missing something, so I added a red chimney to the purple house and a tan door to the light grey house. Now it was perfect. Take it to your ironing board and give it a good press with lots of steam. Be sure to press down, and not iron.

Once again, place the piece into your hoop, doing your best to line it up where it was before, leaving the same amount of excess fabric hanging out all around the piece. After the piece is in the tightened hoop, give it a gentle tug all around the edges to really pull it tight into the hoop, and then try turning the screw just a few more times.

Now that it’s back in the hoop, we are going to finish off the piece, gathering the back side for a finished look, as well as a piece that will lay flat on the wall. Cut around the excess fabric, rounding off any square corners. Be sure you still have a few inches left around the piece. You only want to round off any square corners.

Cut a long piece of embroidery floss, enough that it will go all the way around your hoop plus a few inches. Thread your needle with the floss (I used all the strands) and place a knot at one end. Working from the backside of your hoop, insert your needle into the fabric so the knot will be facing you, but hidden inside the hoop when done.

Stitch all around the piece with a long basting stitch until you are back at the beginning. Create one or two stitches more beyond the starting knot.

Pull your thread tight until the piece gathers in on itself. Keep it as tight as you can and secure it with another knot. I generally find it easiest to just make a few securing stitches in the fabric and then I knot it for extra security, making sure the knot is on the inside of the gathering so it’s not seen from the back of the piece. Clip away your excess thread.

Flipping the piece over, so the front is facing up, gently push the outer hoop down a bit so the fabric piece is raised slightly above. Not only does it give the piece a nice, finished look, it pulls it just a little tighter within the hoop, and it helps it to lay flat against the wall when hung as it recesses the gathered fabric inside of that outer hoop just a bit.
And that’s it! Pretty simple, right? I made this and several more hoop projects in one day. They go together quickly and satisfy my need for a little creativity with not much time. They are great for decorating a space, as well as giving as gifts. Especially with the holidays just around the corner, there are so many projects you could make with hoops, in just this fashion, to compliment your holiday decor.
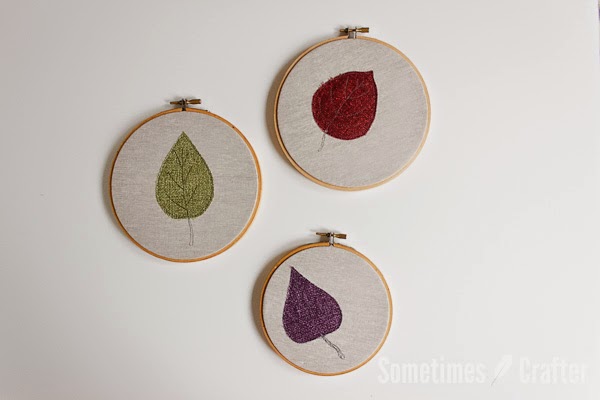
With fall on the way, I made a nice grouping of leaves to hang on the walls in my living room. I love to decorate for fall and Halloween, and especially love to incorporate handmade items. I cut these leaves from a rectangle folded in half, starting with a large curve at the bottom and working up to a point at the top. Once unfolded I had unique leaves from each of the fabrics.
For these I didn't want the thread to blend, so I switched out to a darker color and stitched around the leaves as well as gave them veins and stems. I kept them pretty simple, but they would be equally as nice with a little swirlie wind stitched in there, or a beautiful fall saying.

For awhile I've had the idea of a little potted cactus appliqued in a hoop, and decided this was a perfect time to make it. The burlap blender fabrics were perfect for such a tiny piece. This hoop measures 4”, so as you can imagine those pieces are very tiny. For this project I went ahead and used the Heat & Bond. I could not have stitched over these without them moving had I not adhered them in place first. Not only did I outline stitch around each of the cacti, but I also gave them little pokie spikes, just like you'd see on a real
cactus.
cactus.
I had a great time working with the Burlap blender fabrics. The Burlap collection not only offers a great textural element to my projects, but they are so soft to the touch. There are so many projects i'm looking forward to making with them!
Thanks Christina!
Be sure to head over to Christina's blog to find out how you can enter to win a fat quarter bundle of Burlap prints. And stop back here every day this week for a new tutorial featuring our Blenders fabrics!
Blenders Blog Hop:
Tuesday 8/26: Christina from Sometimes Crafter featuring Burlap
Wednesday 8/27: Caila from Caila Made featuring Burlap
Thursday 8/28: Benartex Blog Design Team featuring Blush
Friday 8/29: Nikki from The Girl Who Quilts featuring Fleurish
Love It? Share It!


I see so many possibilities with these. I do like the little hoop projects - something I need to try.
ReplyDeleteLooks lovely! Great idea!
ReplyDeleteI love the leaves!!
ReplyDeleteI have never tried hoop projects before. You have shown us how and this helps us understand as well as learning. Thank you for sharing your instructions with all of us.
ReplyDeleteSandi Timmons
sandit1@sbcglobal.net
Lovely project, Christina. Thanks for the great tutorial.
ReplyDeleteSomething about these fabrics make my fingers want to reach out and touch. Hmmm...
ReplyDeletereal cute
ReplyDeleteVery interesting and so many possibilities.
ReplyDeleteFunny, hoop projects were popular back in the 70's and 80's. Interesting they are coming back again. Cute projects you have here.
ReplyDeleteGorgeous projects and great idea.
ReplyDeleteBeautiful hoops! I had never seen this kind of burlap, the colourscare incredible. Thank you.
ReplyDeleteGreat tutorial, & fabrics!
ReplyDeleteWhat a clever & cooool project!!! Can sure do quite an assortment of styles & all.....inspiring for sure!! :)
ReplyDeleteWhat a cute project! And great fabric! I follow your blog via Bloglovin.
ReplyDeleteI follow Sew Interesting on Facebook. Thanks for the chance to win!
ReplyDelete