Tuesday, May 23, 2017

Spring Quilt Market Booth Tour - Day 1

We're back from Spring Quilt Market with plenty to show! We'll be splitting the photos into three days of posts. Today you'll see the booth displays and new collections from Nancy Halvorsen, Rose Ann Cook, and Cheryl Haynes. 

First up, Nancy Halvorsen's display, featuring her bright new collection, Bree

Nancy showing her calendar quilt, which features a different applique block and word for each month. The quilt is featured in her new book.

A closer look at the quilt: 

It feels like summer at this fresh patio set, with cushions covered in Bree fabric and a cute hourglass block quilt top. 

A closer look at the quilt: 

Nancy's blocks can be used individually, as well, such as for a pillow.

Adorable themed banners and small wall hangings for each month: 

We're thrilled to see your new collection, Nancy! We've missed you!

A few more quilts made using the Bree collection (both are available as free patterns on our website).

Click here for a sneak peek at the entire collection, available in shops this summer. 


Next, Rose Ann Cook, with her new collection Modern Antiques.


Rose Ann's collection was inspired by the antique quilt she's holding here. 

A gorgeous classic quilt design with twelve different blocks, made from Modern Antiques.


Simple half-square triangles pack a punch in Rose Ann’s “Cracker Jack” quilt.  “Churn Dash Candy” is folded in front.  The quilt to the right with the fanned top (Hidden Shoo Fly) is available as a free quilt pattern on our website.  These three quilts are SISTERS Quilts, meaning that each one can be made from one half of one fat quarter bundle (plus backgrounds, sashing and borders. Rose Ann introduced her line of SISTERS Quilt Patterns at the show.

Star blocks in a table runner
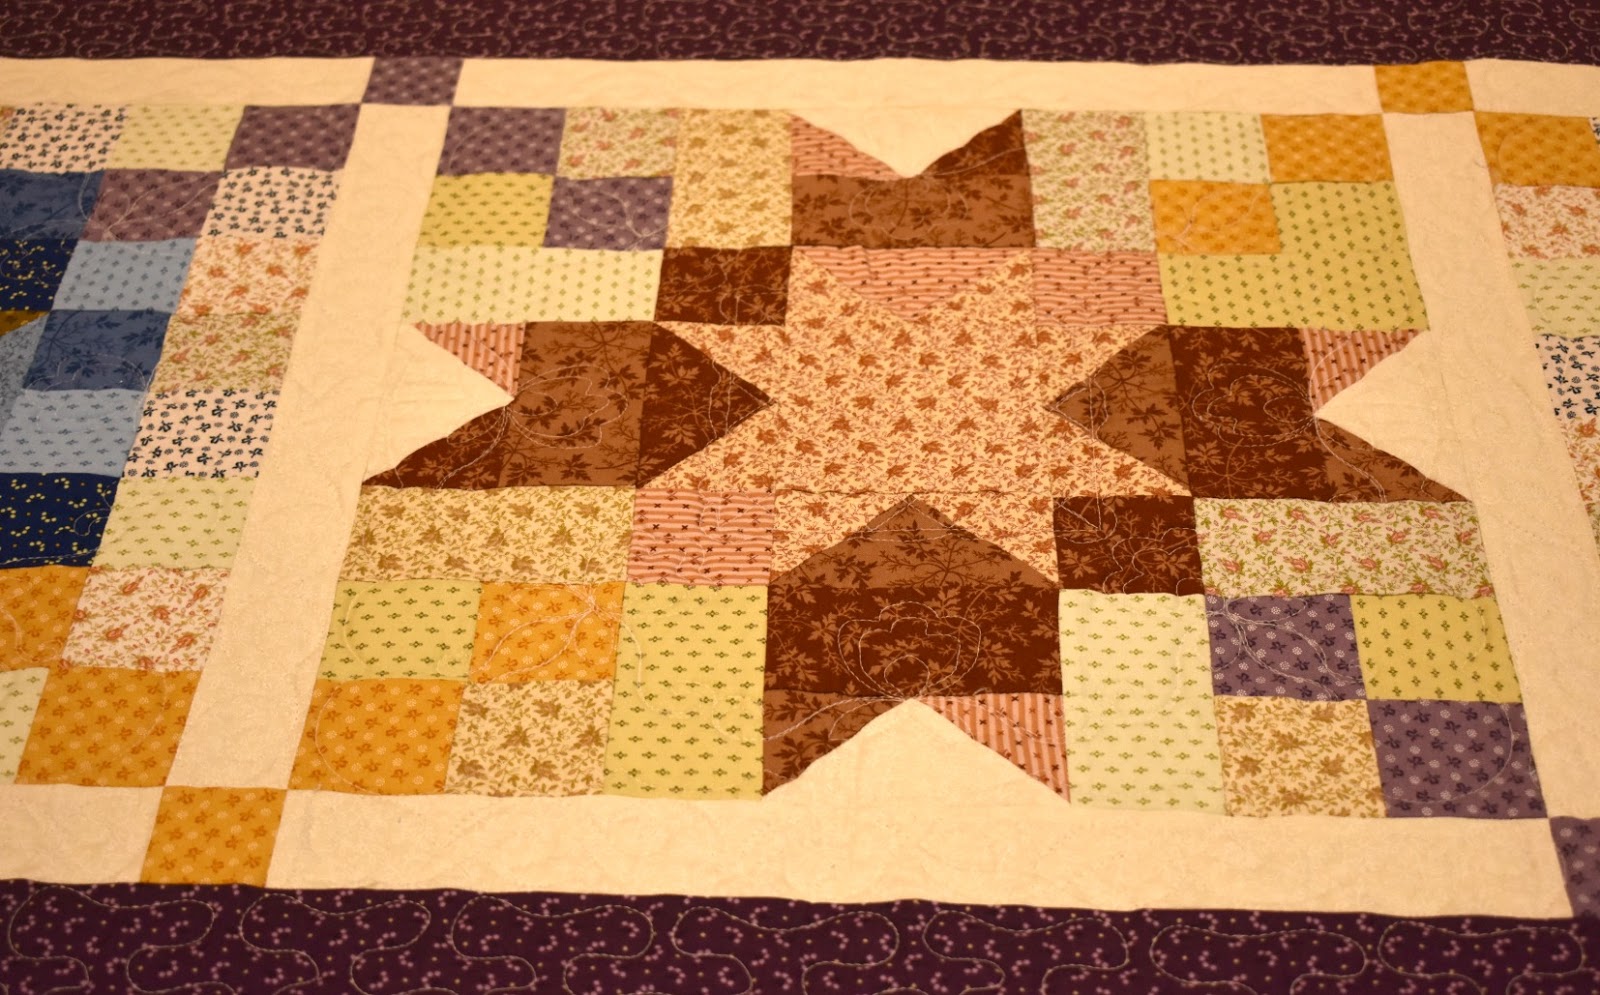

Rose Ann shows the quilt she made using her fabrics based on the antique version.  This quilt, called “Antique 4-Corners” is also a Sisters Quilt Pattern.  She made Antique 4 Corners and the Cracker Jack quilt from the same fat quarter bundle!! 
SISTERS Quilt Patterns are available from Rose Ann’s shop, Quilter’s Emporium.

Click here for a sneak peek at the Modern Antiques collection, available in quilt shops this fall.

Cheryl Haynes' booth display features her three newest collections, Pumpkin Patch, Liberty Hill and Chicks on the Run


Cheryl used her Liberty Hill collection to create an iconic Americana quilt, the Liberty Hill Collection Quilt. The pattern can be made into three smaller quilts or combined into the quilt Cheryl's holding below. 


Ready for fall? Pumpkin Patch has all the right prints!


Using Liberty Hill coordinates for a beautiful star quilt.

Cheryl's Liberty Hill quilt on its own.

More details from the Liberty Hill Collection Quilt:

Chicks on the Run--so cute!

Sweet bird and chick themed quilts using the Chicks on the Run fabric:


Click here to see the entire Pumpkin Patch collection, available in quilt shops now. 

Click here to see the entire Liberty Hill collection, available in quilt shops this summer.
Click here for a sneak peek at the Chicks on the Run collection, available in quilt shops this fall.

Stop by tomorrow as we continue our booth tour! 
Love It? Share It! Facebook Twitter Google Pinterest Email

Thursday, May 18, 2017

Summer Mini Quilt Blog Hop: Day 4

We can't wait for summer! To help put us all in a carefree, sunshine-y mindset, this week we're hosting the Summer Mini Quilt Blog Hop! Thanks to our talented designer friends, we'll be featuring tutorials to make four different summer-themed mini quilts.


Who doesn't love bright and bold colors in the summer? Today Kelly from My Quilt Infatuation is sharing a tutorial for a modern flying geese mini using a gorgeously textured and cheerful palette from the Patio Splash collection. Check out her tutorial and then head over to her blog to enter for a chance to win a bundle of Patio Splash. 

Here's Kelly!
Happy almost summer, friends!  I'm Kelly, and my blog home is My Quilt Infatuation.  I'm super excited to share the tutorial for this little mini, featuring a few fabrics from the Patio Splash collection.  I chose to use the Color Strokes prints from this collection, and I am in love with the fresh, summery palette.


This mini is a fun twist on the timeless flying geese block.  My making geese of several sizes, it creates the fun illusion of sliding right down the quilt.

Materials-
(6) assorted fat quarters, Patio Splash Color Strokes
1/4 yard solid white background fabric
1 fat quarter, Color Strokes fabric for backing
binding fabric (cut from leftovers)

This mini requires cutting your fabrics into several different sizes, and I've tried to make this part as organized as possible so it doesn't get too tedious.

From the pink and purple fabrics, cut-
(1) 2" x 3.5" rectangle
(1) 4.5" x 8.5" rectangle

From the red and turquoise fabrics, cut-
(1) 2.5" x 4.5" rectangle
(1) 4" x 7.5" rectangle

From the Yellow and orange fabrics, cut-
(1) 3" x 5.5"
(1) 3.5" x 6.5"

From the solid white fabric, cut-
(4) 4.5" squares
(4) 4" squares
(4) 3.5" squares
(4) 3" squares
(4) 2.5" squares
(4) 2" squares
(2) 1.5" x 4"rectangles
(2) 2.5" x 3.5"rectangles
(2) 3" x 3.5"rectangles
(2) 2.5" x 4.5"rectangles
(2) 2" x 5.5"rectangles

When working with so many different sizes, I find it easiest to lay everything out for your flying geese units before sewing anything at all.  Arrange them in increasing size order on the left, and decreasing size order on the right.  Then, to keep everything organized, go ahead and lay two white squares of the corresponding size on each rectangle.  These squares will be the corner units needed to create the flying geese units.


To sew the flying geese, we'll use the stitch and flip method.  When making several geese the same size, there are more efficient ways to make more geese at one time, but that doesn't really help when you only need a single unit of each size/color.  To make a single geese unit, align the white square with the edge of the print rectangle, and sew from corner to corner.


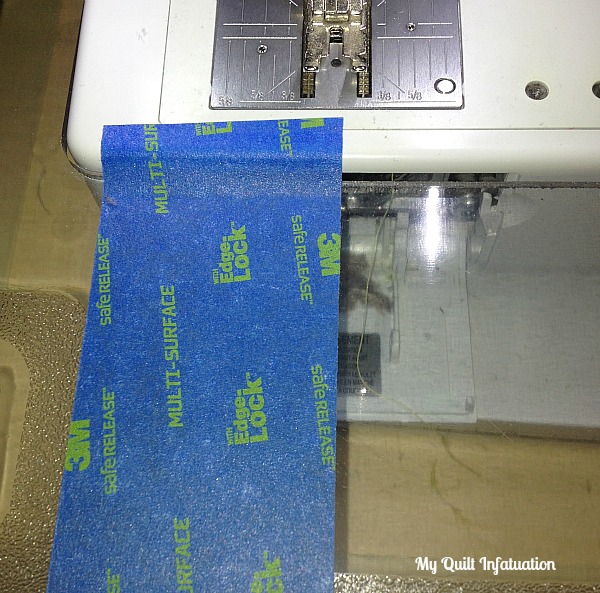
To help you sew a straight line, you can either draw a line on the wrong side of your square, or you can use painter's tape.  Keep the corners of your square aligned with the edges of the painter's tape, and you'll have no trouble keeping a straight seam.


Since there are only 12 total flying geese, it is pretty quick to sew the first square to each one, before heading to the ironing board.


Then, just take your scissors and trim each corner to 1/4" seam allowance. Don't worry!  This doesn't have to be perfect.  Just be sure you don't cut too close to the seam.  Then press each corner open!


Then, just repeat this process on the opposite side of each flying geese unit, using the second white square.


When they're all pressed open, lay them back out in order by size, and use your white rectangles to fill in the gaps, making each flying geese unit the length of the longest one.


Pay close attention to the direction of the flying geese.  I've chosen to have one row pointing upward, and the other down, but you can mix them up if you would rather.  Sew each unit to its corresponding strip, and then sew the flying geese strips together to make your mini.


Finish it up by quilting it however you like.  This finished mini measures 16" x 16 1/2" and the bright happy colors would be a cute addition to your favorite summer decor, either inside, or (dare I say it?) your patio!


I'm so excited that I have the opportunity to offer a fun giveaway!  Benartex is graciously offering a bundle of the Patio Splash fabrics I used to a a lucky reader.  Head HERE to my blog home to enter.


Happy summer and happy sewing, y'all!


Head over to Kelly's blog to enter the giveaway! 

Click here to see the entire Patio Splash collection. 

Don't miss the other days of our Summer Mini Quilt Blog Hop!

Summer Mini Quilt Blog Hop:
Day 1: Debby from Debby Kratovil Quilts using Liberty Garden
Day 2: Benartex blog design team using Play Ball
Day 3: Alison from Little Bunny Quilts using Anything Goes
Day 4: Kelly from My Quilt Infatuation using Patio Splash
Love It? Share It! Facebook Twitter Google Pinterest Email

Wednesday, May 17, 2017

Summer Mini Quilt Blog Hop: Day 3

We can't wait for summer! To help put us all in a carefree, sunshine-y mindset, this week we're hosting the Summer Mini Quilt Blog Hop! Thanks to our talented designer friends, we'll be featuring tutorials to make four different summer-themed mini quilts.


Today Alison from Little Bunny Quilts is here with a bright star mini quilt. Enjoy her tutorial (featuring some of the colorful prints from Ann Lauer's Anything Goes collection) and then head to her blog for a chance to win some Anything Goes for yourself! 

Here's Alison!
Hello, quilters! I am Alison from Little Bunny Quilts and I am happy to be back here today at Sew In Love With Fabric to share a tutorial for a quick and fun mini quilt made from the new line Anything Goes by Ann Lauer.

Here's a sampling of some of the fabrics in this line:


I used mainly the green and blue prints in this mini, which finishes at 20 inches square. I used one of my favorite blocks -- the Ohio Star -- and used partial blocks to give the design a little more pizzazz.

Cutting:
3 - 5.5 inch squares background fabric (for QSTs)
8 - 4.5 inch squares background fabric
1 - 5.5 inch square blue #1 fabric (for center QSTs)
2 - 5.5 inch squares green #1 fabric (for center QSTs)
2 - 5.5 inch squares blue #2 fabric (for outer QSTs)
4 - 5.5 inch squares green #2 fabric (for outer QSTs)
5 - 4.5 inch squares white print fabric


Draw diagonal lines on all of your green squares. Pair up each 5.5 inch square as listed below to create HSTs by sewing 1/4 inch on each side of the line, cutting apart on the drawn line, and pressing toward the green. Do not trim your units yet.

For center QSTs:
1 - 5.5 inch green #1 square + 1 - 5.5 inch background square (yielding 2 green/background HSTs)
1 - 5.5 inch green #1 square + 1 - 5.5 inch blue #1 square (yielding 2 green/blue HSTs)

For outer QSTs:
2 - 5.5 inch green #2 squares + 2 - 5.5 inch background squares (yielding 4 green/background HSTs)
2 - 5.5 inch green #2 squares + 2 - 5.5 inch blue #2 squares (yielding 4 green/blue HSTs)


In this picture, the units that will be used for the center QSTs are in the top row, and the units that will be used for the outer QSTs are in the bottom two rows.

Cut each HST in half, perpendicular to the sewn seam. Note: it is important to cut perpendicular to the seam, rather than just from corner-to-corner as this ensures nice "square" seams at the center of  your QSTs. If you find that your two corners are not perfectly aligned when you line your ruler perpendicular to the seam, do your best to position the cut such that the cut splits the difference between the offset corners, as in the diagram below.


After cutting your HSTs in half, pair each half with the corresponding complementary half to make your QST units. Sew together, making sure to align the center seam. Press seam open to reduce bulk and trim your QST units to 4.5 units, making sure that the center intersection remains the center of the trimmed block.


Lay out your QST units and 4.5 inch white print and background squares as shown below.


Sew together for your mini top.


Quilt as desired and bind. I quilted my mini with a swirly flower motif. I made bias binding with one of the black prints in the collection and also used the same print for my hanging pockets. I pieced together the leftovers from the green floral print and blue dot print for my backing fabric.


Thanks for letting me share this fun tutorial with you! I love making minis and I hope you do too! Hop on over to Little Bunny Quilts to win a mini bundle of fat quarters from the Anything Goes collection!

Click here to see the entire Anything Goes collection. 


Don't miss the other days of our Summer Mini Quilt Blog Hop!

Summer Mini Quilt Blog Hop:
Day 1: Debby from Debby Kratovil Quilts using Liberty Garden
Day 2: Benartex blog design team using Play Ball
Day 3: Alison from Little Bunny Quilts using Anything Goes
Day 4: Kelly from My Quilt Infatuation using Patio Splash
Love It? Share It! Facebook Twitter Google Pinterest Email

Tuesday, May 16, 2017

Summer Mini Quilt Blog Hop: Day 2

We can't wait for summer! To help put us all in a carefree, sunshine-y mindset, this week we're hosting the Summer Mini Quilt Blog Hop! Thanks to our talented designer friends, we'll be featuring tutorials to make four different summer-themed mini quilts.


Today we're celebrating America's favorite pastime (or second favorite, if you count quilting as America's true favorite)! We've used the vintage baseball-themed prints from the Play Ball collection by Bristol Bay Studios to create a mini wall hanging. 

Quilt measures approximately 16" x 22"


Here are the fabrics we've used: 

You'll Need:
1 fat quarter allover baseball print
1/3 yard red star print (includes binding)
1/4 yard baseball stripe
1 fat quarter bat stripe
5/8 yard beige star print (includes backing)
10" square of cream solid
20" x 26" piece of batting
Fusible web

Click here to download the pdf with the "Play Ball" words.

Cutting:
From the allover baseball print:
One 6-1/2" fussy-cut square, cut so design is on point

From the red star print:
One 3-1/2" x 42" strip; recut into two 3-1/2" x 16" pieces and four 2-1/2" squares
Two 2-1/4" x 42" strips for binding
One 1" x 42" strip; recut into two 1" x 7-1/2" strips and two 1" x 6-1/2" strips

From the baseball stripe:
One 2-1/2" x 42" fussy-cut strip; recut into four 2-1/2" x 7-1/2" pieces (fussy-cut to center two rows of baseballs)

From the bat stripe:
One 8-3/4" x 22" strip; recut into two 8-3/4" squares

From the beige star print:
One 20" x 26" piece for backing; reserve remainder for applique

Make the Quilt:
Step 1: Sew 1" x 6-1/2" red star strips to opposite sides of the 6-1/2" allover baseball square. Sew 1" x 7-1/2" red star strips to the remaining sides. 


Step 2: Lay out four 2-1/2" x 7-1/2" baseball stripe strips and four 2-1/2" red star squares around the center square as shown. Sew baseball stripe strips to opposite sides of the center square. Sew red star squares to both ends of the remaining baseball stripe strips. Sew these pieced strips to the remaining sides of the square. 


Step 3: Cut one 8-3/4" bat stripe square diagonally in half from lower left to upper right. Cut the second 8-3/4" bat stripe square diagonally in half from upper left to lower right. 


Step 4: Lay out the bat stripe triangles around the pieced square as shown, so the bats are all running the same direction. Fold each triangle in half and mark a crease at the center point of the long side of the triangle. Mark the center of each side of the center square as well. Matching the center marks, sew triangles to opposite sides of the pieced center square. Press triangles out. Sew triangles to the remaining sides. 


Step 5: Trim quilt center 1/4" past the red star points, approximately 16" square. 


Step 6: Sew the 3-1/2" x 16" red star strips to the top and bottom of the quilt center. 


Step 7: Print out the "Play Ball" template and trace onto the paper side of fusible web. Fuse to the wrong side of the beige star print. Cut out the letters. Adhere fusible web to the back side of one 10" cream square. Cut in half to make two 5" x 10" pieces. Fuse the words "Play" and "Ball" to the cream pieces.


Step 8: Cut out each word approximately 1/4" past the beige print to create a cream outline as shown. 


Step 9: Fuse the words to the top and bottom of the quilt as shown, centering from left to right.


Step 10: Layer the backing, batting and quilt top right side up. Baste layers together and quilt as desired, stitching the appliques down to secure as well. Trim the backing and batting even with the quilt top. Use the two 2-1/4" x 42" red star strips to bind the quilt. 

Click here to see the entire Play Ball collection. 

For a chance to win a bundle of Play Ball fabrics, make sure you follow us on social media--blog, FB, or IG. Leave a comment below letting us know how you follow us, and telling us your favorite thing about summer. Giveaway is open through Friday, May 19th at 11:59 pm EDT. 

Don't miss the other days of our Summer Mini Quilt Blog Hop!

Summer Mini Quilt Blog Hop:
Day 1: Debby from Debby Kratovil Quilts using Liberty Garden
Day 2: Benartex blog design team using Play Ball
Day 3: Alison from Little Bunny Quilts using Anything Goes
Day 4: Kelly from My Quilt Infatuation using Patio Splash
Love It? Share It! Facebook Twitter Google Pinterest Email