Showing posts with label My Quilt Infatuation. Show all posts

Thursday, May 18, 2017

Summer Mini Quilt Blog Hop: Day 4

We can't wait for summer! To help put us all in a carefree, sunshine-y mindset, this week we're hosting the Summer Mini Quilt Blog Hop! Thanks to our talented designer friends, we'll be featuring tutorials to make four different summer-themed mini quilts.


Who doesn't love bright and bold colors in the summer? Today Kelly from My Quilt Infatuation is sharing a tutorial for a modern flying geese mini using a gorgeously textured and cheerful palette from the Patio Splash collection. Check out her tutorial and then head over to her blog to enter for a chance to win a bundle of Patio Splash. 

Here's Kelly!
Happy almost summer, friends!  I'm Kelly, and my blog home is My Quilt Infatuation.  I'm super excited to share the tutorial for this little mini, featuring a few fabrics from the Patio Splash collection.  I chose to use the Color Strokes prints from this collection, and I am in love with the fresh, summery palette.


This mini is a fun twist on the timeless flying geese block.  My making geese of several sizes, it creates the fun illusion of sliding right down the quilt.

Materials-
(6) assorted fat quarters, Patio Splash Color Strokes
1/4 yard solid white background fabric
1 fat quarter, Color Strokes fabric for backing
binding fabric (cut from leftovers)

This mini requires cutting your fabrics into several different sizes, and I've tried to make this part as organized as possible so it doesn't get too tedious.

From the pink and purple fabrics, cut-
(1) 2" x 3.5" rectangle
(1) 4.5" x 8.5" rectangle

From the red and turquoise fabrics, cut-
(1) 2.5" x 4.5" rectangle
(1) 4" x 7.5" rectangle

From the Yellow and orange fabrics, cut-
(1) 3" x 5.5"
(1) 3.5" x 6.5"

From the solid white fabric, cut-
(4) 4.5" squares
(4) 4" squares
(4) 3.5" squares
(4) 3" squares
(4) 2.5" squares
(4) 2" squares
(2) 1.5" x 4"rectangles
(2) 2.5" x 3.5"rectangles
(2) 3" x 3.5"rectangles
(2) 2.5" x 4.5"rectangles
(2) 2" x 5.5"rectangles

When working with so many different sizes, I find it easiest to lay everything out for your flying geese units before sewing anything at all.  Arrange them in increasing size order on the left, and decreasing size order on the right.  Then, to keep everything organized, go ahead and lay two white squares of the corresponding size on each rectangle.  These squares will be the corner units needed to create the flying geese units.


To sew the flying geese, we'll use the stitch and flip method.  When making several geese the same size, there are more efficient ways to make more geese at one time, but that doesn't really help when you only need a single unit of each size/color.  To make a single geese unit, align the white square with the edge of the print rectangle, and sew from corner to corner.


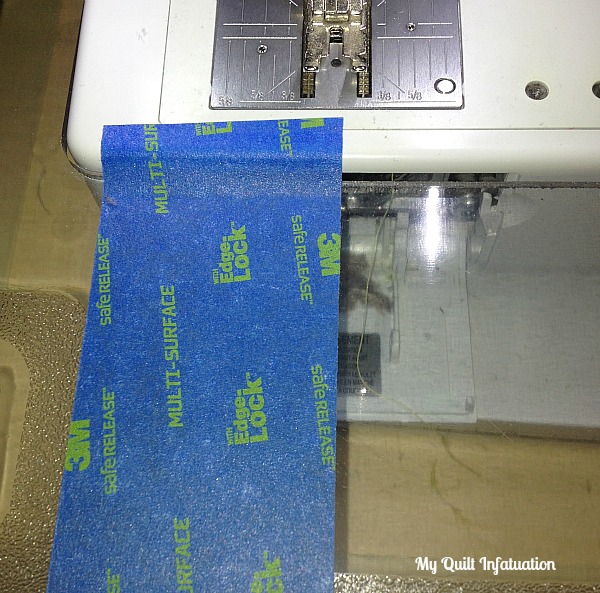
To help you sew a straight line, you can either draw a line on the wrong side of your square, or you can use painter's tape.  Keep the corners of your square aligned with the edges of the painter's tape, and you'll have no trouble keeping a straight seam.


Since there are only 12 total flying geese, it is pretty quick to sew the first square to each one, before heading to the ironing board.


Then, just take your scissors and trim each corner to 1/4" seam allowance. Don't worry!  This doesn't have to be perfect.  Just be sure you don't cut too close to the seam.  Then press each corner open!


Then, just repeat this process on the opposite side of each flying geese unit, using the second white square.


When they're all pressed open, lay them back out in order by size, and use your white rectangles to fill in the gaps, making each flying geese unit the length of the longest one.


Pay close attention to the direction of the flying geese.  I've chosen to have one row pointing upward, and the other down, but you can mix them up if you would rather.  Sew each unit to its corresponding strip, and then sew the flying geese strips together to make your mini.


Finish it up by quilting it however you like.  This finished mini measures 16" x 16 1/2" and the bright happy colors would be a cute addition to your favorite summer decor, either inside, or (dare I say it?) your patio!


I'm so excited that I have the opportunity to offer a fun giveaway!  Benartex is graciously offering a bundle of the Patio Splash fabrics I used to a a lucky reader.  Head HERE to my blog home to enter.


Happy summer and happy sewing, y'all!


Head over to Kelly's blog to enter the giveaway! 

Click here to see the entire Patio Splash collection. 

Don't miss the other days of our Summer Mini Quilt Blog Hop!

Summer Mini Quilt Blog Hop:
Day 1: Debby from Debby Kratovil Quilts using Liberty Garden
Day 2: Benartex blog design team using Play Ball
Day 3: Alison from Little Bunny Quilts using Anything Goes
Day 4: Kelly from My Quilt Infatuation using Patio Splash
Love It? Share It! Facebook Twitter Google Pinterest Email

Friday, November 1, 2013

Holiday Headstart Blog Hop: Day 4

Welcome back! It's the final day of our Holiday Headstart Blog Hop! Today, Kelly from My Quilt Infatuation is here, sharing a quick and easy quilt design, the Bold Braid. We hope you enjoy her tutorial and are inspired to make your own--who doesn't love a super-quick quilt?! Make sure you also pop over to Kelly's blog to see more of her creative ideas and find out how you can enter to win a fat quarter bundle of Dori for yourself. If you missed any of the other tutorials featured this week, you'll find links at the bottom of this post.

Hey y'all, I'm Kelly from My Quilt Infatuation.  I'm thrilled to share a tutorial with you for a quilt using the Benartex's new Dori fabric line.  I just love the bright, fresh colors in this line.  The fabrics are super versatile and would look fun in a kids' room, or even outside on a picnic table.


I love the look of braid quilts and herringbone quilts, but when I'm short on time, I don't want to fuss with all of those tiny strips.  By making the strips wider, you can create a quilt with big impact in a snap!  Here's how-

Fabric Requirements-
10 fat quarters
2.5 yards backing fabric
1/2 yard binding fabric


Cutting-

Start by pressing your fat quarters and trimming to 18 x 18 inches.  We'll be using those scraps later so hang onto them!  Make a cut across one side to get a 4.5 inch strip.  Trim it to 13.5 inches, and choose two of the leftover 4.5 inch squares to begin your braids.

Cut the remaining fabric into 4.5 inch strips in the other direction.  They will be 13.5 inches long.  Each fat quarter will yield 5 strips measuring 4.5 x 13.5 inches for a total of 50 strips.


Piecing the Quilt Top-

To build the braid pieces, start by taking one of your 4.5 inch squares and sew a strip to one side using a 1/4 inch seam.


Add another strip to the adjoining side of the square.  This is the beginning of your braid!


Continue adding strips to one side, then the other until you have 10 strips on each side.  This basic construction could really be used to make a braid of any length or width by varying the strip length, or by adding more strips, but for this fun little quilt, we'll stop at ten.


You can get as particular as you like about your strip arrangement.  Personally, I enjoy sewing in a carefree style and letting the fabric "fall where it may."  Of course, I know other quilters that prefer to lay out every single piece.  That's really up to you!

Time to take your braid to your cutting mat.  Start by lining up your ruler across your beginning square and trim at the widest point.


Then trim each side to a straight edge, cutting as little away as possible.


Finally, trim the bottom of your braid at the widest point.  I know it seems like a lot to trim off, but I usually square up these cut pieces and add them to my scraps.  I just refuse to waste pretty fabric!  Your trimmed braid will measure 16.5 inches wide by 52 inches long.


Once you have both of your braids pieced and trimmed up, lay them side by side and sew them together.  You should have 10 remaining strips after sewing both braids.  Sew four strips into a border for each long side.


Marvel at your finished quilt top!


Finishing the Quilt-

Now, let's talk about those scraps.  I always use my scraps in my backing so that nothing goes to waste-- and you get the added bonus of making your quilt fun on both sides!


Once you've pieced your backing, just baste, quilt and bind with your favorite method.  I opted for the Dottie Lime fabric in this line as my main backing fabric, and I picked out that awesome orange color for the binding.  I quilted it with a simple meander, and I love the crinkly texture it gives the quilt.


Your finished quilt will measure 40 x 52 inches.  That's a great size for a baby or child, or even a large table topper!


Thanks Kelly! We're always happy for a quick quilt idea--great for a holiday or a baby gift! Head over to Kelly's blog, My Quilt Infatuation, to find out how you can win a fat quarter bundle of these fantastic fabrics!


Don't miss the other tutorials featured in our Holiday Headstart blog hop:
Day 1: Take Me to Class Tote by Tessa from The Sewing Chick
Day 2: Window Zip Pouch by Emily from Mommy's Nap Time
Day 3: Squared Stripe Pincushion from the Benartex blog design team

Love It? Share It! Facebook Twitter Google Pinterest Email

Tuesday, October 29, 2013

Holiday Headstart Blog Hop

Today we're kicking off our October Blog Hop, full of great gift ideas to give you a holiday headstart! We think you'll love these tutorials--projects you can stitch and give to a sewing friend, a non-sewing friend, or even just keep for yourself! As usual, each day we'll also be giving away a fat quarter bundle of fabric, so make sure you stop by all four days!
Here's the line-up:

10/29: Day 1 Tessa from The Sewing Chick
10/30: Day 2 Emily from Mommy's Nap Time
10/31: Day 3 the Benartex blog team
11/1: Day 4 Kelly from My Quilt Infatuation

Enjoy!


Love It? Share It! Facebook Twitter Google Pinterest Email