Monday, September 30, 2013

September Blog Hop Day 4: Cachet Zigzag Pillows

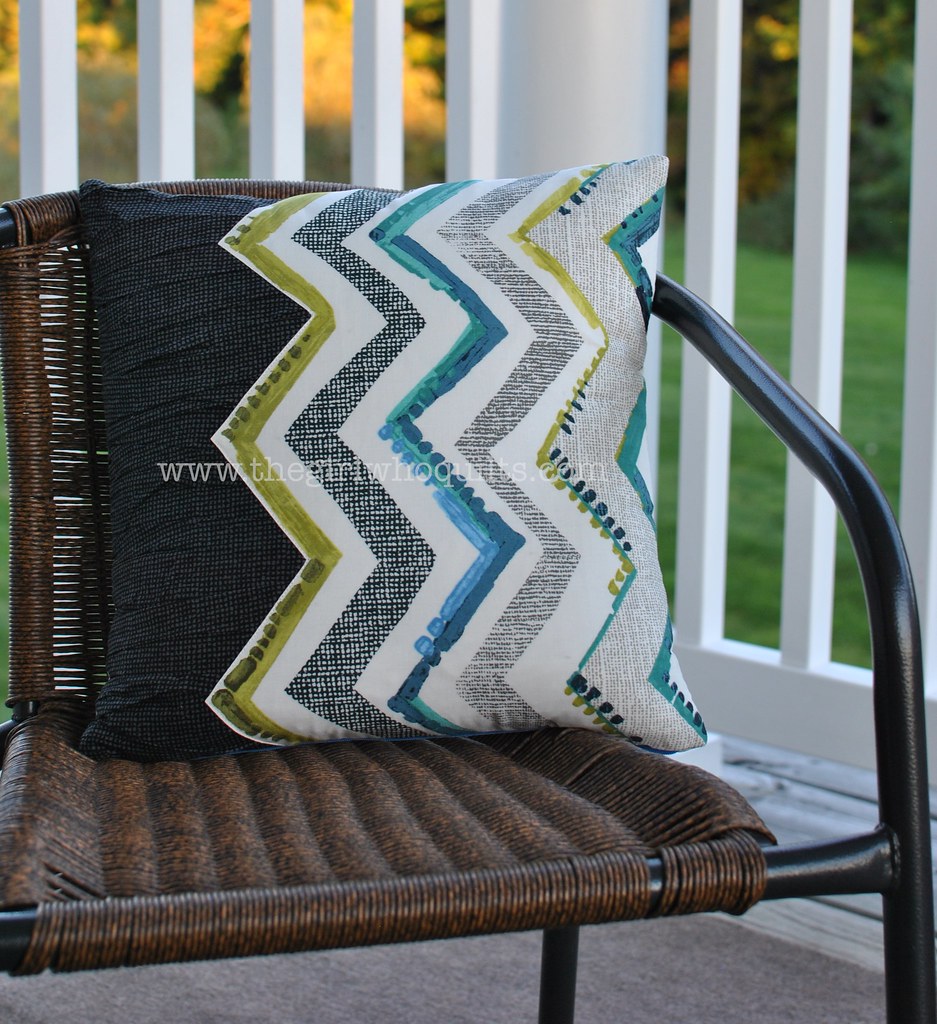
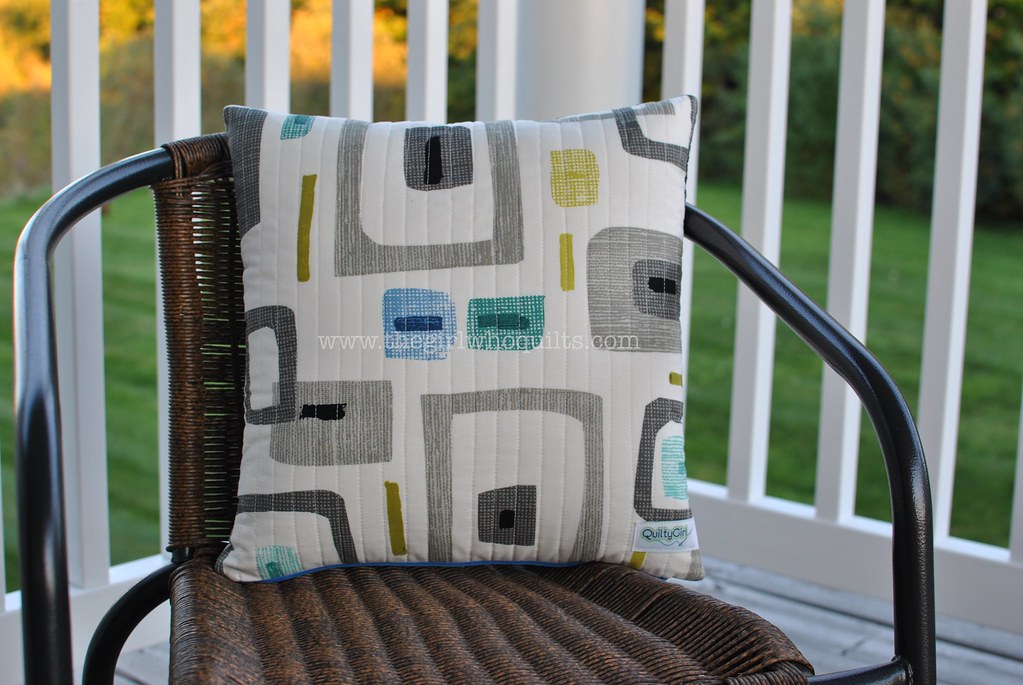
It's Day 4 of our hop, and today Nikki from The Girl Who Quilts is here, sharing a cool gathering and fusing technique to make a textured pillow topped off with a zigzag print from Contempo's Cachet collection. We hope you enjoy her tutorial! Don't forget to scroll to the bottom to see how you can win some Cachet fabric for yourself. 

Happy Monday, everyone! My name is Nikki Maroon, and I blog over at The Girl Who Quilts.  Today I'm going to share with you a tutorial for a super easy throw pillow made using the Cachet fabric line. I really like the watercolor look of this line. The zigzag print is definitely my favorite, which is probably why I decided to design a pillow around it!

Gathering Place Pillow

Supplies:
Fat Quarter of focal print
1/4 yard coordinating print (preferably a blender fabric)
Fat Quarter for pillow back
16" x 16" piece of lightweight fusible interfacing
16" x 16" pillow form
14" zipper (optional)

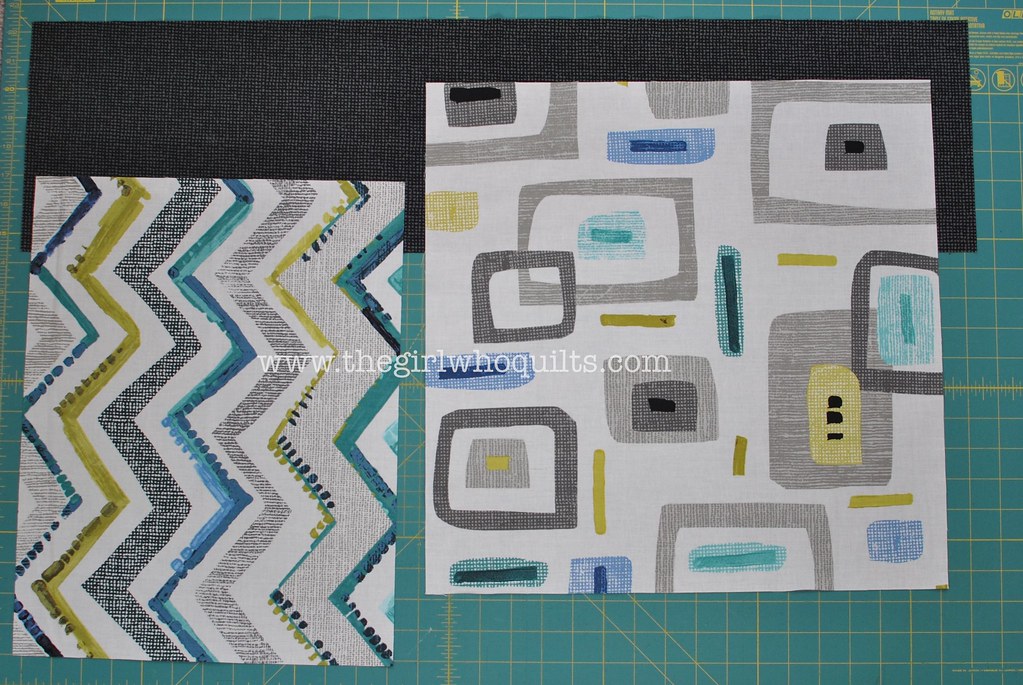
Let's start cutting!

Gathering Place Pillow

Focal fabric (zigzags): 12.5" wide x 16" long
Coordinating print (black): 8" wide x 32" long
Backing (squares print): 16" x 16"
Lightweight fusible interfacing - not shown: 16" x 16"

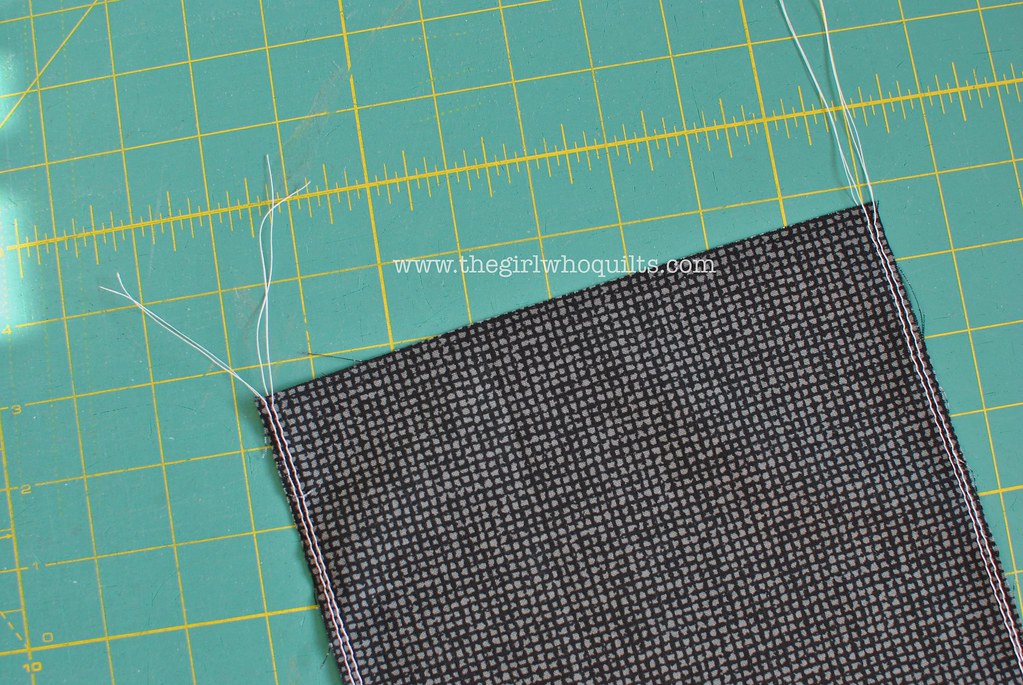
We are going to gather the coordinating print, so let's start by sewing gathering stitches down both long sides of the 8" x 32" piece. To do this, set your sewing machine stitch length as long as possible. Leave at least 3-4" thread tails at the beginning of your seam and sew about 1/8" from the raw edge. Leave 3-4" thread tails at the end of your seam. Sew another row of stitches in the same manner about 1/4" from the raw edge. Repeat on the other long edge of this piece.

Gathering Place Pillow

Now find both of the top threads on one side and gently tug those threads to gather the fabric up. Do this slowly and gently so as to not break the thread. Repeat on the other side. Evenly distribute the gathered fabric so that the piece is now approximately 16" long.

Gathering Place Pillow

We are going to fuse this gathered piece to the 16" x 16" square of fusible interfacing so that it is easier to work with. It doesn't need to be perfect, and you will end up pressing your gathering as you fuse. Don't worry, all of the "wrinkles" will look great on the finished pillow!
Begin by aligning one gathered edge to the edge of the fusible. Lightly fuse the piece so that you can lift it and move it slightly if you need to. When you're happy with the placement, press it once more.

Gathering Place Pillow

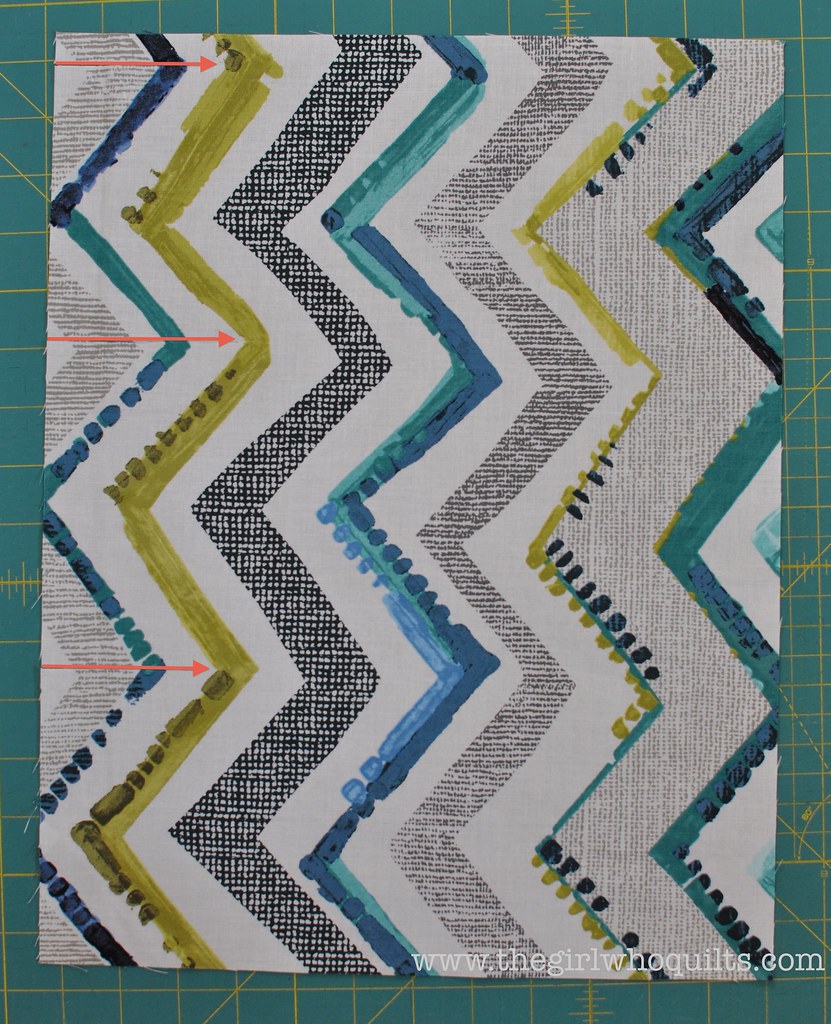
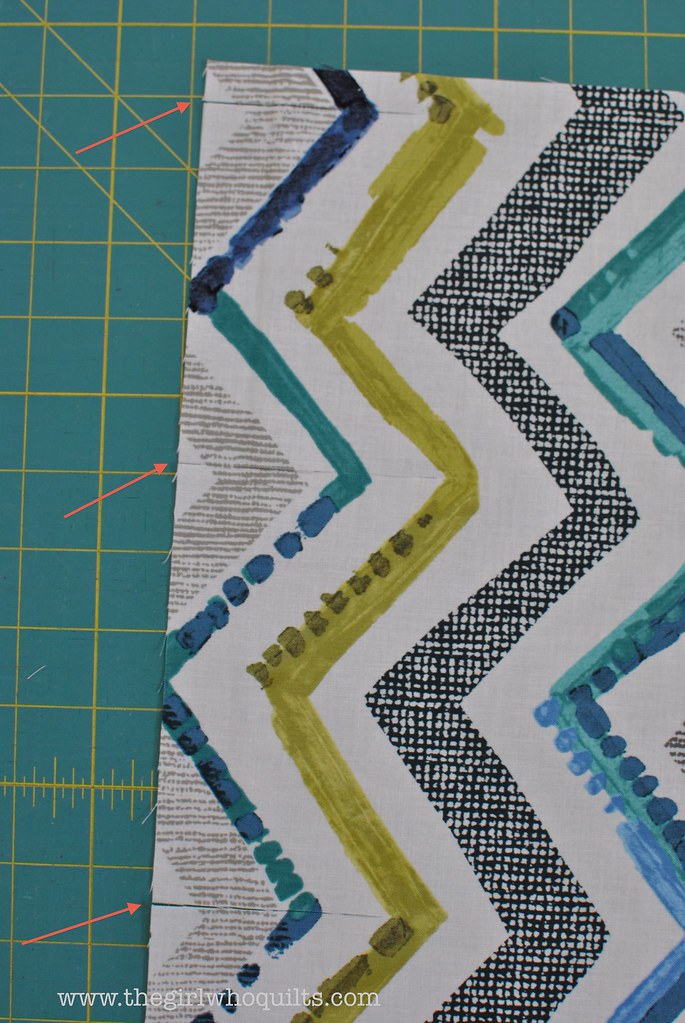
Next we will prepare the focal print. Cut slits into the fabric as shown with the red arrows below. I followed the zigzag print of the fabric, so my cuts aren't even or uniform. I chose to cut up to about 1/8" from the lime green zigzag so that the cream background would show.

Gathering Place Pillow

Here are my cuts in the fabric:

Gathering Place Pillow

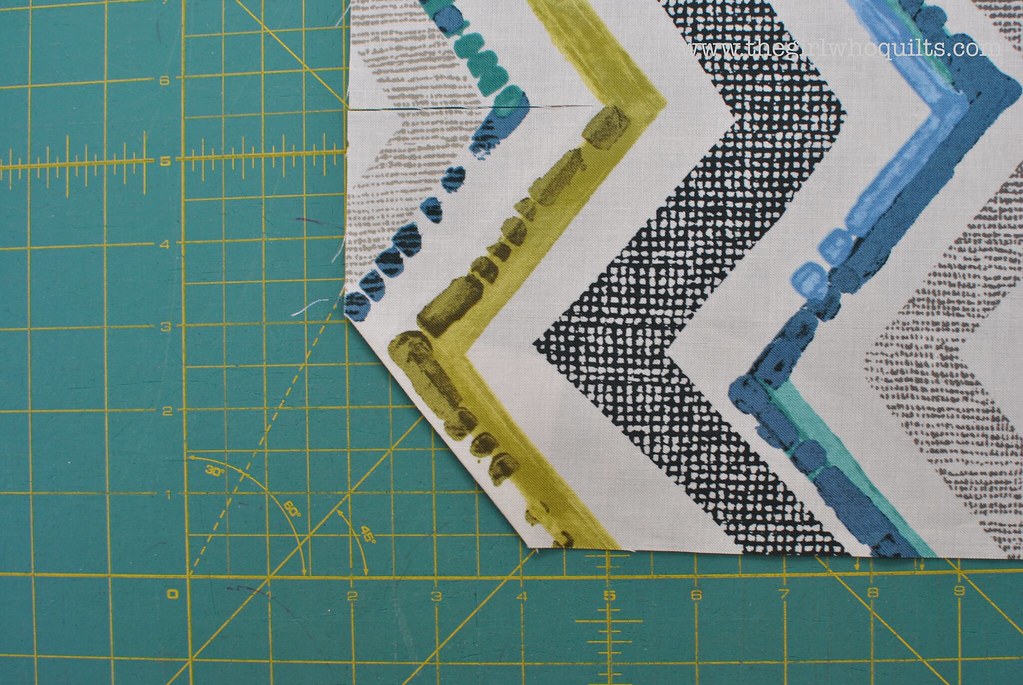
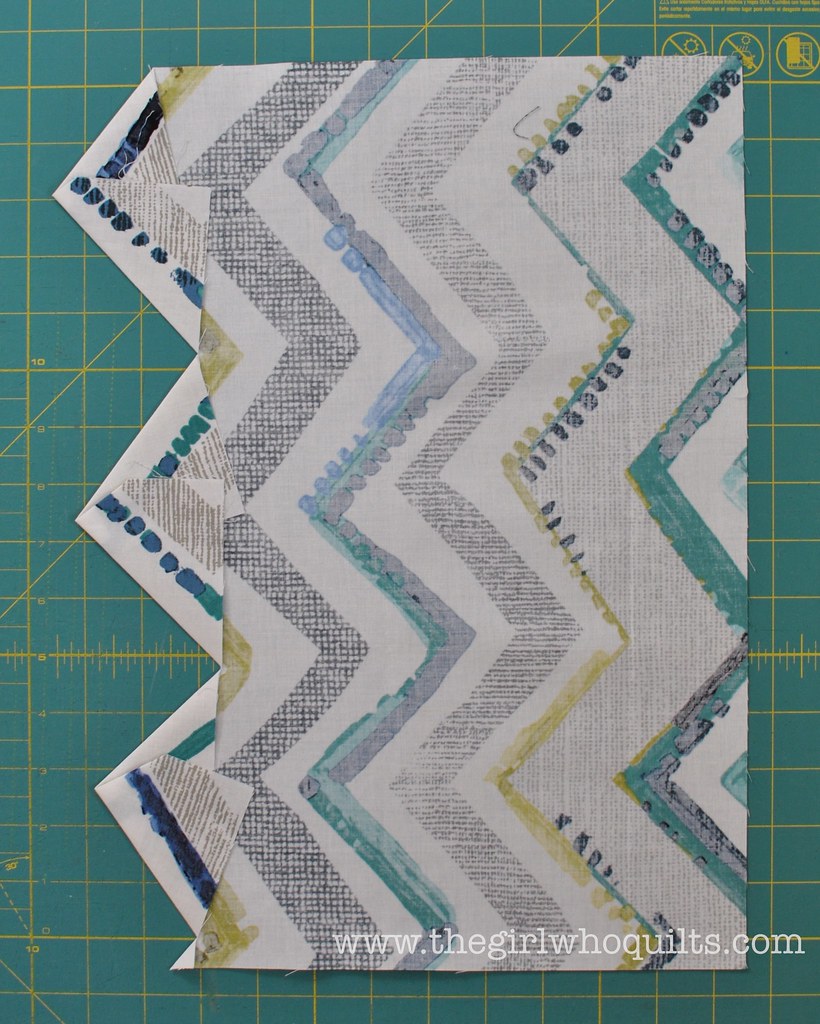
Starting at one corner, fold the corner to the back following the zigzag.

Gathering Place Pillow

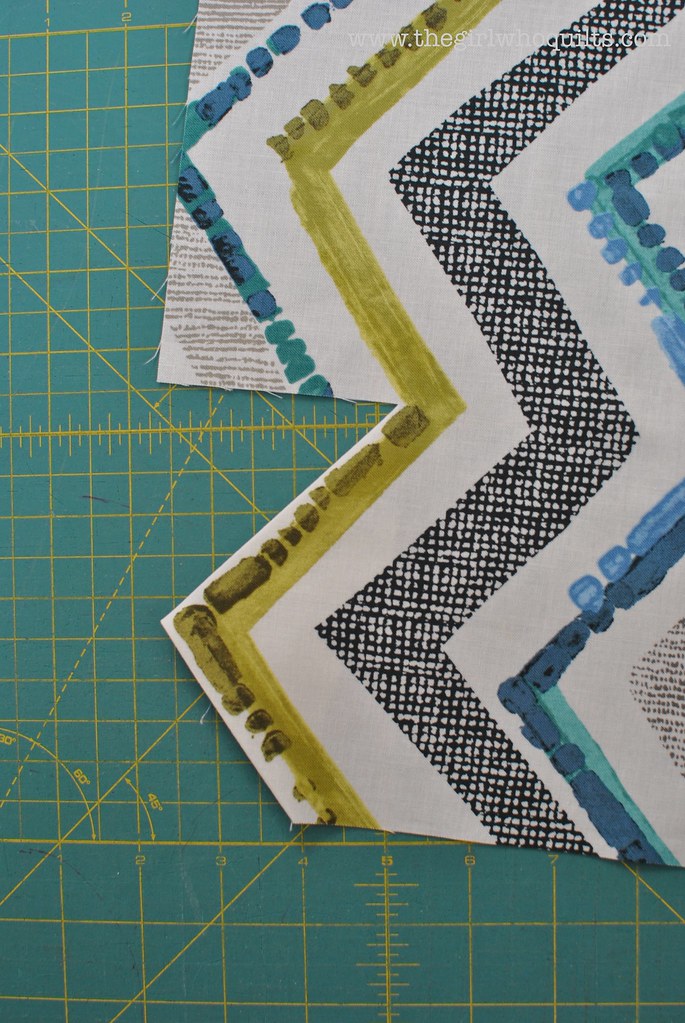
Fold one edge and press before moving on to the next fold, always following the print for guidance. Continue up the side of the fabric.

Gathering Place Pillow

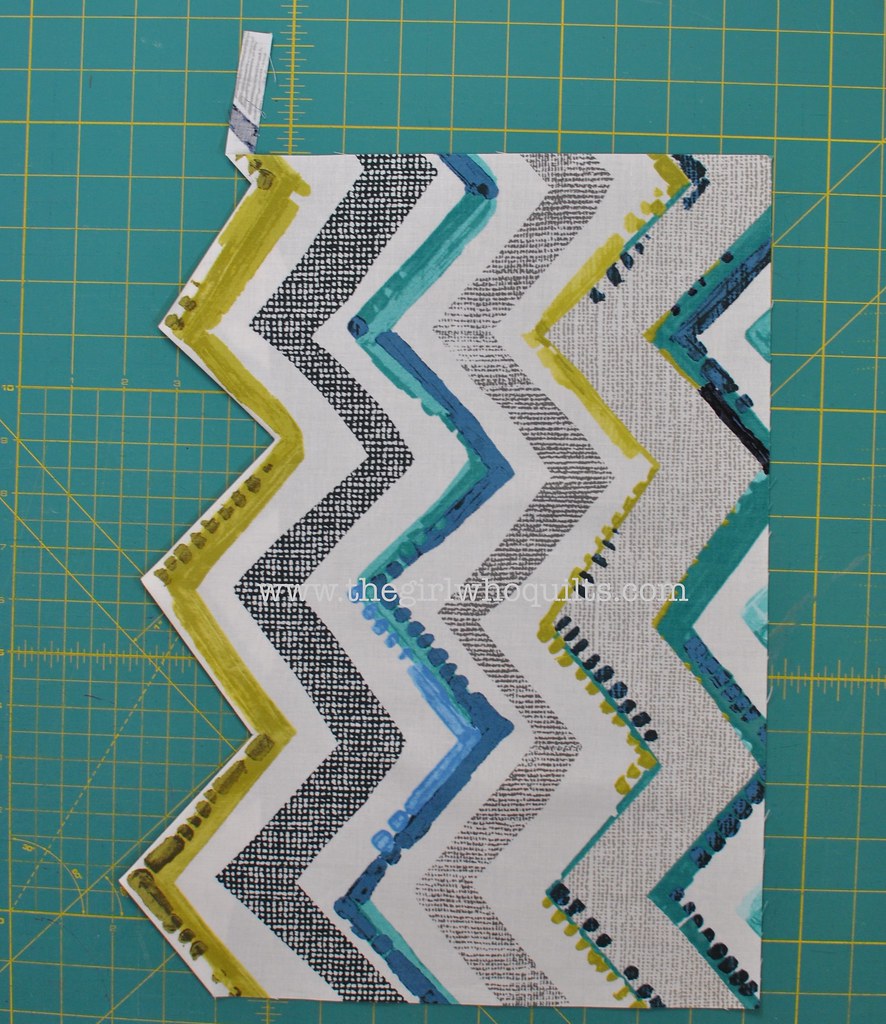
This is how your piece should now look! I clipped away that little piece of fabric at the top.

Gathering Place Pillow

Here is how the back of your piece should look:

Gathering Place Pillow

Now place the focal print on the fusible interfacing. Align the raw edges and lightly fuse in place.
The points will overlap the gathered fabric, so they will not fuse down. Pin the points down as shown.

Gathering Place Pillow

Now it's time to sew again! Set your stitch length to about 2.5 and use a thread that blends with your focal print (I used cream here). Topstitch the folded edges of the zigzag. If you'd rather, you can use a zigzag stitch instead of a straight stitch for this step. Remove the pins as you sew.

This next step is optional. Do you see the shadowing caused by the black fabric underneath the cream?

Gathering Place Pillow

If you want to fix that, here's how:
Because we *lightly* fused the pieces down, we can go back and peel the fabric up from the interfacing.

Gathering Place Pillow

Now CAREFULLY trim away some of the  fabric underneath as shown by the red arrows. When you're done, fold the fabric back down and fuse back onto the interfacing.

Gathering Place Pillow

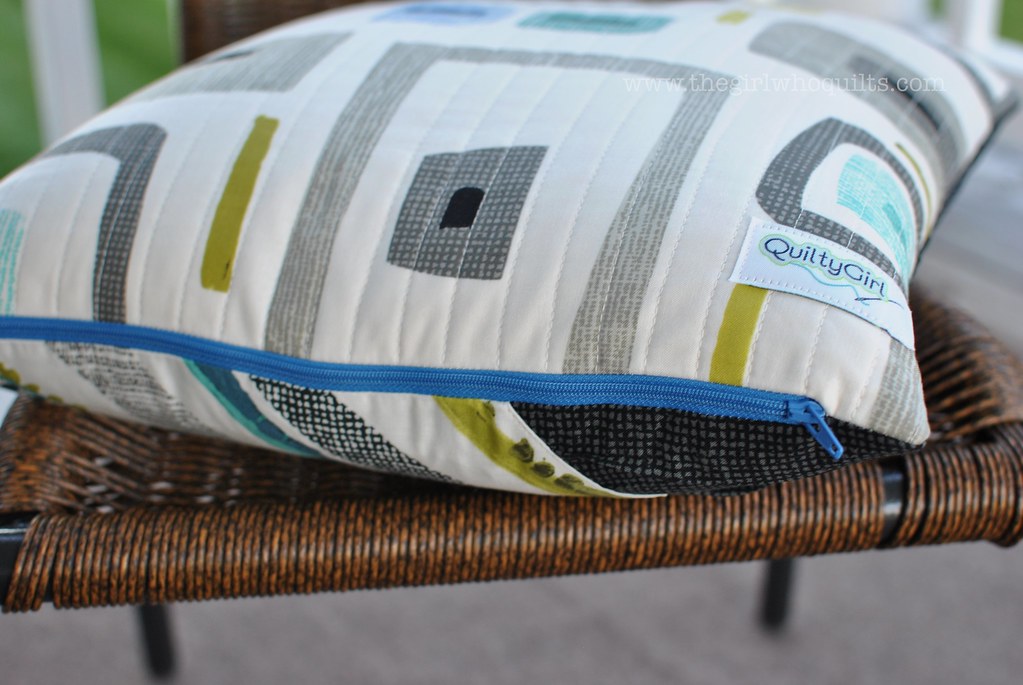
Let's put the pillow together! I like to zigzag stitch or serge the raw edges of my pillow front and back before assembly. You can also quilt the front and/or back of the pillow. I chose to quilt the back with straight lines.

Gathering Place Pillow

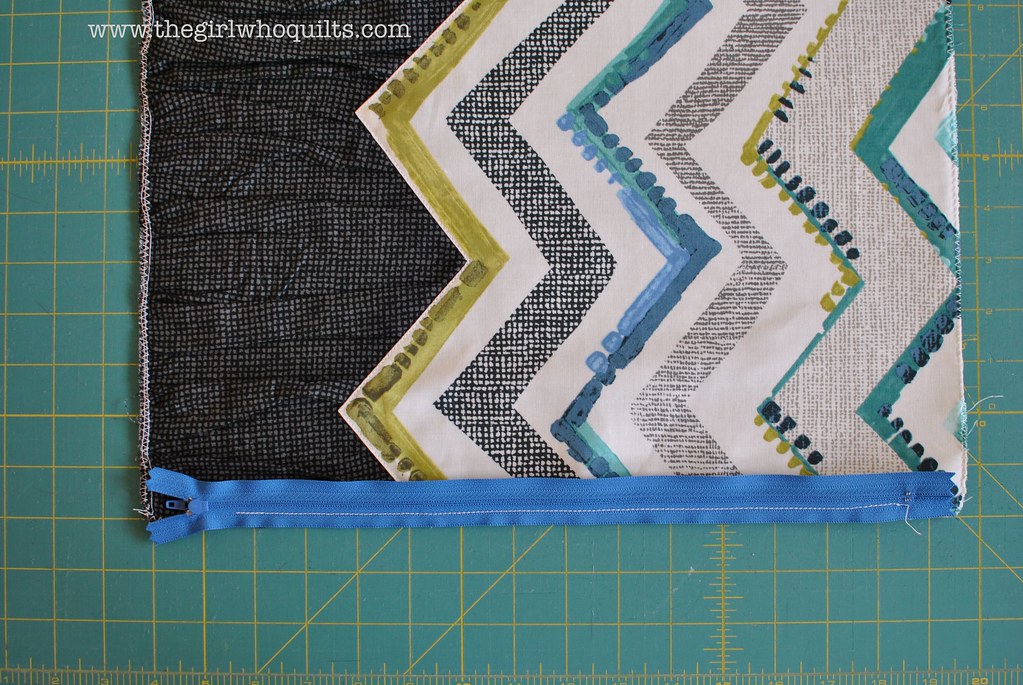
To install the zipper, place the zipper down along the bottom edge of the pillow front and sew down using your zipper foot. I start and stop my stitching 1-2" in from the pillow corners as shown below (my stitch line is the white thread on the blue zipper).
**As an alternate to the zipper closure, you may wish to finish the pillow with an envelope-style back or another technique of your choice!**

Gathering Place Pillow

Now sew the other edge of the zipper to the pillow back.
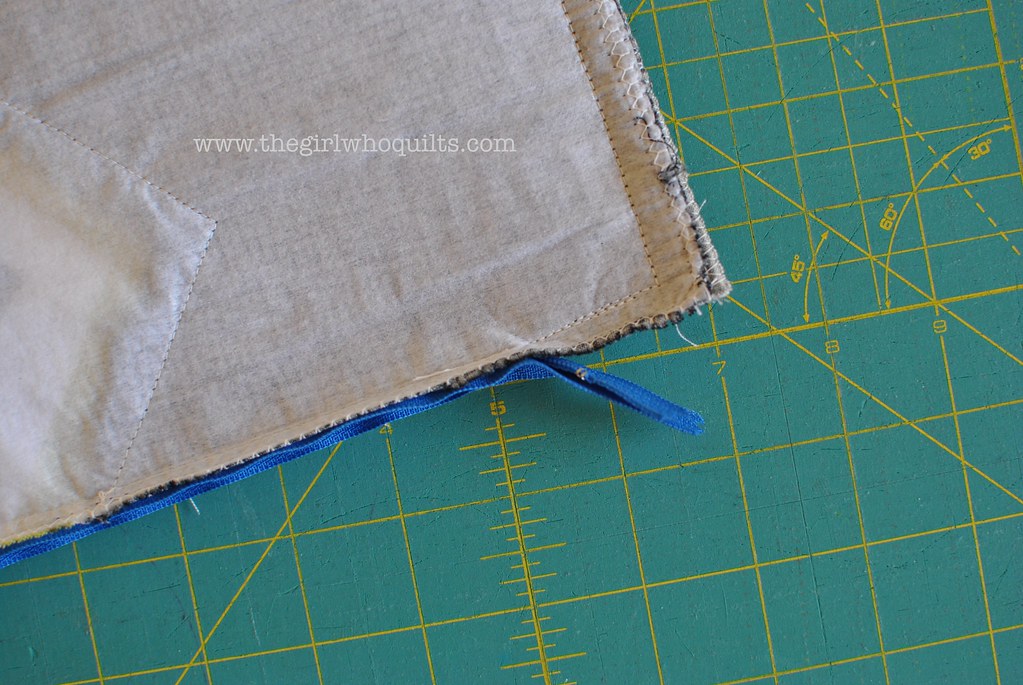
Open up your zipper at least half way. Now line up the raw edges of the pillow front and back, and sew using a 1/2" seam. On the bottom edge of the pillow where you installed the zipper, pull the zipper ends out and away from the seam, and stitch from the corner up to the zipper seam, as shown below.

Gathering Place Pillow

Turn your pillow cover right-side out, poke the corners out nicely, and give it a light press with your iron.

Now you can insert your pillow form, and you're finished!

Gathering Place Pillow 


Pillow front:


Gathering Place Pillow 

Pillow back:

Gathering Place Pillow

I hope you enjoyed this tutorial! If you have any questions, feel free to contact me through my blog.
Happy pillow making!


Thanks Nikki! What a great way to use these prints! Head over to Nikki's blog to find out how you can enter to win a fat quarter bundle of Cachet!


Don't miss the other tutorials (and giveaways!) featured in our September blog hop:
Day 1: Urban Oasis Table Runner from Kristen of KD-Quilts
Day 2: QAYG Drawstring Backpack from the Benartex blog team


Love It? Share It! Facebook Twitter Google Pinterest Email

Friday, September 27, 2013

September Blog Hop Day 3: Britain's Best Notebook Covers

Welcome! It's Day 3 of our September blog hop, and we're thrilled to have Svetlana from s.o.t.a.k handmade here sharing a clever notebook cover design using Greta Lynn's Britain's Best collection from Kanvas. We hope you enjoy Svetlana's tutorial! Keep reading to find out how you can win a fat quarter bundle of these fun prints, and find the links for the hop's other tutorials!

Hello, my name is Svetlana Sotak and I blog over at s.o.t.a.k handmade. I'm so glad to share these notebook covers with you today. 


As soon as I came across  Britain's Best collection, I knew they would be perfect to make these covers.  Fun, aren't they? The print on top is my absolute favorite :)

*******************************

Here's what you'll need to make your notebook cover (fits the regular 9-3/4" x 7-1/2" composition notebook) :

1/2 yard exterior fabric
1/2 yard lining fabric
medium weight interfacing

Let's start, shall we? Oh, all the seams are 1/4" unless otherwise stated.

Step 1: cutting the fabric and interfacing

main fabric: cut two 11" x 14" rectangles
lining fabric: cut one 1-1/2" x 11" strip for the spine of your notebook cover
                      cut one 11" x 16" rectangle
interfacing: cut one 11" x 28-1/2" rectangle

Step 2: assembling the main/ exterior panel

Arrange the fabric for the exterior of the cover as shown in the picture.  Stitch all three parts together and  press the seams. The panel now measures 11" x 28-1/2".

Step 3: fusing the interfacing

Following the manufacturer's directions, fuse the 11" x 28-1/2" interfacing to the wrong side of the main panel. 

Step 4:  shaping the main panel

Hem both 11" edges of the main panel (fold 1/4" under, then  fold 1/2" under, stitch in place).

Place the main panel right side up. Form the flaps by folding the main fabric over at 5-1/2" mark from the edges of the main panel. Pin, stitch in place using 1/8" seam allowance. 

Your main panel now measures 11" x 16".

Step 6: attaching lining to the main panel

With lining fabric right side up, place the main panel on top of it (right side down), right sides of the lining fabric as well as the main panel are touching.

Pin and stitch all the way around, making sure to leave a 4" opening on the bottom for turning.

Step 7: finishing the cover

Trim the corners, press the seams open, and turn the cover right side out through the opening from the previous step.

Press, pin the opening closed, and stitch all the way around the cover using 1/8" seam allowance.

Give it one more quick press and you're all finished!!! 

Wasn't that easy? Now go ahead and make covers for all your notebooks. 
They make great teacher gifts, too :)

Thanks so much for reading, everyone. Hope you enjoyed the tutorial!

Thanks Svetlana!
Head over to Svetlana's blog to find out how you can enter to win a fat quarter bundle of the Britain's Best fabrics.

Don't miss the other tutorials (and giveaways!) featured in our September blog hop:
Day 1: Urban Oasis Table Runner from Kristen of KD-Quilts
Day 2: QAYG Drawstring Backpack from the Benartex blog team

Love It? Share It! Facebook Twitter Google Pinterest Email

Thursday, September 26, 2013

September Blog Hop Day 2: Quilt As You Go Drawstring Backpack


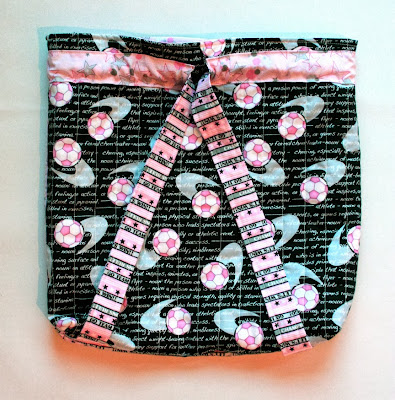
It's Day 2 of the September Blog Hop and the Benartex Blog Team is here, sharing a tutorial for a Quilt As You Go Drawstring Tote. We chose the All Stars collection from Kanvas--these black and pink sports-themed prints make a perfect bag for a girl on the go, and the the bag's style adds a fun, modern touch. What we love about the bag, besides the cool, quilted front: Just one drawstring strap serves as both the way to cinch the backpack and as the straps to wear it!

The fabrics we used:

You'll Need:

  • 2/3 yard black with text and soccer balls
  • 3/4 yard pink star print
  • 1/2 yard stripe
  • Fat quarters of 3 additional black/pink prints
  • Two 21" squares of batting

Cutting:
Black with text and soccer balls:
(1) 20" square


Pink star:
(2) 18" squares
(1) 3" x 42" strip


Stripe:
(2) 5-1/2" x 42" strips

Reserve the remaining fabrics for making the quilt as you go bag front.

Batting:
(2) 21" squares

Let's make the bag!
The front of the bag is created through the quilt as you go method. No need to measure or cut pieces in advance! Start with a 21" batting square. Cut your first piece of fabric--on our bag it is about 4" x 6", but yours can be any size. Quilt it onto the center of the batting square using straight lines, approximately 1/2" apart. 

Continue adding pieces around the first piece, log cabin style. Measure the height of the first quilted piece and cut a piece from another fabric to roughly that same measurement. Lay it right sides together on the quilted piece and stitch with a 1/4" seam allowance. If it's a little too long, no problem. The edges will be covered up as you add more pieces.

Press open and quilt straight stitches down the new piece, 1/4" to 1/2" apart. Always quilt lines parallel to the seam you just sewed. 

Continue adding pieces in the same way, quilting as you go.

Add fabric until the quilted square measures more than 18". Square up to measure 18".

Baste the 20" fabric square to the second piece of batting and quilt it however you like for the backpack backing. We used straight lines 1/2" apart.

Square up to measure 18". Place the quilted front and back right sides together and stitch down the two sides only (creating a tube). 


To make the casing, fold and press the long edges of the 3" x 42" pink star strip in 1/4".

Fold one short edge of the casing in 1/2", press, and stitch. Measure 1-1/4" down from the top edge of the tote and pin the casing in place, all the way around. Trim the casing strip where it touches the starting point and press, fold, and stitch so there's a 1/2" opening between casing ends. 

Topstitch the top edge of the casing. Then topstitch the bottom edge. 


Sew the two 5-1/2" x 42" stripe strips short ends together to make a long strip. Fold and press the strip in half lengthwise, wrong sides together. Open the fold and press both raw edges in to the center fold. Fold on the center line and topstitch along both long sides to create the drawstring strap.

Using a safety pin, feed the drawstring strap through the casing. 

Pull the ends of the straps even and then cinch the bag shut. Decide on a length for the shoulder straps. (It's important to do this while the top of the bag is cinched shut because that's how the bag will be worn.) Trim the straps to the desired length and pin to the bottom edge of the bag back, about 3" in from each corner. 

Turn bag wrong side out and sew along the bottom edge, catching the straps as you stitch. To box the corners, turn the outer tote wrong side out and cut a 1-1/2" square out of each bottom corner. 

Match the seams and stitch across using a 1/4" seam allowance. Repeat on the other corner. 

Use the two 18" pink star squares to make the lining. Stitch around three sides, leaving an opening along the bottom for turning. Box the corners just like for the outer bag. 

Turn the outer bag right side out. Leave the lining wrong side out. Slide the lining around the outer bag, matching raw edges. Pin in place. 


Stitch along the top edge using a 1/4" seam allowance. Turn bag right side out through the opening in the lining. Stitch the opening in the lining closed and tuck the lining inside the bag. Topstitch the top edge of the bag. And here's a hint: When you're sewing the lining and bag together or topstitching, start and end along one of the side seams. That way, if things don't line up perfectly, you can hide it along the seam.


The giveaway: For a chance to win a fat quarter bundle of the All Stars collection, sign up to follow the Benartex blog using either Bloglovin’ or the email feature (both in the right sidebar). Then leave a comment below this post telling us that you are a follower and letting us know if you've ever made a bag before (and if you have...how many?). This giveaway will be open through Wednesday, October 2 at 11:59 pm EST.

Don't miss the other tutorials featured in our September blog hop:
Day 1: Urban Oasis Table Runner from Kristen of KD-Quilts


Love It? Share It! Facebook Twitter Google Pinterest Email