Wednesday, August 22, 2018

Free Motion Fantasy Hop: Day 2

What would you make with Amanda Murphy's Free Motion Fantasy fabrics? We have five designers this week who will be showing you how they used these fun, colorful prints. Today we have projects from two designers-- Jayne and Laura--get ready to be inspired! 


Jayne from Twiggy and Opal; @twiggyandopal:
"Free Motion Fantasy had me at ‘free motion’, something that I’d love to master one day!  The fabric evokes all the best of FMQ from pebbles to swirls.  The floral and geometric designs along with the bright colors were the icing on the cake for me!"

Jayne used the teals and greens from Amanda's collection to make varying sizes of Ohio Star blocks floating on the Flying Geese White print background. Beautiful! 
Head to Jayne's blog to read more about her quilt and find out how you can win a FQ bundle of Free Motion Fantasy prints.


Laura from Slice of Pi Quilts; @sliceofpiquilts:

"I'm 36 weeks pregnant, so I had baby on the brain when I got the Free Motion Fantasy fabrics! I really wanted to try making a quilted diaper changing pad, so that's what got my creative juices flowing. Then I added a wet bag, nursing cover, and a quilt, of course! I've always loved Amanda Murphy's fabrics. I think it's pure genius to create fabric with free motion quilting motifs!"
Laura used blues, purples, and teals from Amanda's collection and used her new long-arm to finish a few of these projects! What new mom wouldn't prefer these handmade beauties to the options available in stores?!?

Head to Laura's blog to read more about her projects and find out how you can win a FQ bundle of Free Motion Fantasy prints. 


Click here to see the entire Free Motion Fantasy collection. 
Click here to visit Amanda's website.

Follow along with our Free Motion Fantasy features
Monday: 
Introducing Free Motion Fantasy

Tuesday: 

Technique Tuesday with Debby from Debby Kratovil Quilts

Wednesday: 

Jayne from Twiggy and Opal; @twiggyandopal
Laura from Slice of Pi Quilts; @sliceofpiquilts

Thursday: 

Sandra from MMM Quilts @mmmquilts
Lisa from Color My World @lisaerin1121

Friday:

Amanda's Virtual Trunk Show

Love It? Share It! Facebook Twitter Google Pinterest Email

Tuesday, August 21, 2018

Free Motion Fantasy Hop: Day 1

What would you make with Amanda Murphy's Free Motion Fantasy fabrics? We have five designers this week who will be showing you how they used these fun, colorful prints. Up first is Debby Kratovil from Debby Kratovil Quilts with a Technique Tuesday post. Today's technique: paper piecing! 


Debby says, "I love bright colors and these new fabrics by Amanda Murphy, Free Motion Fantasy, are right up my alley!" 


For her Technique Tuesday post, she's showing how to use these prints to make a scrappy version of her Circle of Geese pattern. Head over to Debby's blog to see how she creates her quilt (we love how those geese are looking here!) and enter for a chance to win a fat quarter bundle of Free Motion Fantasy for yourself. 


Click here to see the entire Free Motion Fantasy collection. 
Click here to visit Amanda's website.

Follow along with our Free Motion Fantasy features
Monday: 
Introducing Free Motion Fantasy

Tuesday: 

Technique Tuesday with Debby from Debby Kratovil Quilts

Wednesday: 

Jayne from Twiggy and Opal; @twiggyandopal
Laura from Slice of Pi Quilts; @sliceofpiquilts

Thursday: 

Sandra from MMM Quilts @mmmquilts
Lisa from Color My World @lisaerin1121

Friday:

Amanda's Virtual Trunk Show
Love It? Share It! Facebook Twitter Google Pinterest Email

Monday, August 20, 2018

Amanda Murphy's Free Motion Fantasy

If you've followed our blog for any length of time, you've probably admired Amanda Murphy's gorgeous machine quilting. She designed her new fabric collection, Free Motion Fantasy, to help quilters practice those quilting motifs. We'll be featuring Free Motion Fantasy all week here on the blog, starting with an interview with Amanda about her vibrant fabrics. Get your free motion foot ready to stitch! 


Tell us about the idea behind your Free Motion Fantasy collection.
It’s an educational collection. The patterns that I like to machine quilt are printed on the fabric so that you can follow the lines and learn how to create them. These fabrics are a great way to practice free motion quilting.


How did you decide which motifs to include?
I started with some of the basics—pebbles, for instance, and bricks. I knew I wanted some type of swirled design. I honestly could do four of these collections because there are so many different options that I could include.

Pebbles

Bricks


How did you develop the feature fabric?
I actually worked backwards on this line, which is very different than how I usually work. I started with the different quilting motifs and finished with the feature fabric, which includes many of the bigger patterns on a bigger scale. The feature print comes in four colors, which I named after the seasons.
Orange - Autumn

Pink - Summer

Blue - Winter

Aqua - Spring


Can you tell us about the color palette?
It’s rainbow plus gray. All of the coordinate prints can function as blenders. Some have higher contrast, with little pops of analogous color, like the Flying Geese print.


What’s your favorite print in the collection?
My favorite of the four feature prints is the orange one, and I usually hate orange. It’s very vibrant with the aqua added in.


I really like how the swirls in the flying geese print came out. When it’s quilted, it has amazing movement to it. I also really like the paisley. 
Paisley


Click here to see the entire Free Motion Fantasy collection. 
Click here to visit Amanda's website.

Free Motion Fantasy Features
Monday: 
Introducing Free Motion Fantasy

Tuesday: 

Technique Tuesday with Debby from Debby Kratovil Quilts

Wednesday: 

Jayne from Twiggy and Opal; @twiggyandopal
Laura from Slice of Pi Quilts; @sliceofpiquilts

Thursday: 

Sandra from MMM Quilts @mmmquilts
Lisa from Color My World @lisaerin1121

Friday:

Amanda's Virtual Trunk Show
Love It? Share It! Facebook Twitter Google Pinterest Email

Friday, August 17, 2018

Midnight Poppies Virtual Trunk Show

We've had fun sharing Ann Lauer's Midnight Poppies collection with you this week! We hope you'll enjoy Ann's virtual trunk show of the quilts she has designed featuring her new fabrics. 


 "Love That Print" showcases two large prints in a quick and easy design. 
Click here to find the kit.

"Midnight Stars" - this one really sparkles! This two-block quilt is easier than it looks and shows off a large focal print as well. 
Click here to find the kit.

"Montana Summer" features on-point blocks. The pieced blocks are made from three-fabric strip sets, and the border showcases the iris border stripe. 
Click here to find the kit.

"Afternoon Delight" is made with fast flying geese, four-patches, and large focal print squares. 
Quick and easy! 
Click here to find the kit.

"Free Fall" is one of my most popular designs. The wall quilt version is assembled using quilt-as-you-go technique, and the colors blend beautifully together! 
Click here to find the kit.

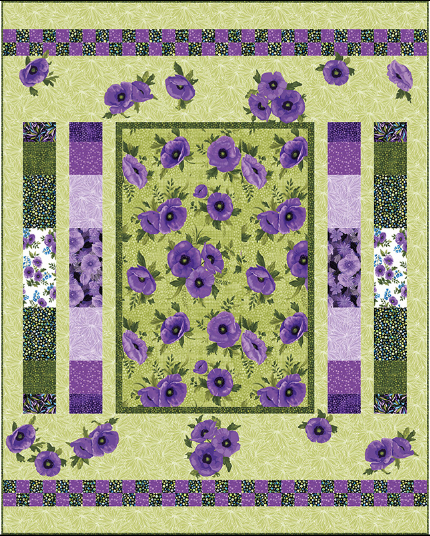
"Poppy Toss" is a free quilt pattern available on Benartex's website. The centerpiece is the large poppy print, surrounded by strips of pieced stripes. Finish the quilt off with fussy-cut appliqued poppies!
Click here to download the pattern.
Click here to find the kit.

Click here to see the entire Midnight Poppies collection.
Click here to read our interview with Ann about Midnight Poppies. 
Click here to visit Ann's website and see her additional Midnight Poppies patterns.


Love It? Share It! Facebook Twitter Google Pinterest Email

Thursday, August 16, 2018

Cats on Parade

Ann's Midnight Poppies collection may be hitting stores, but her previous line, Cat-I-Tude, is still going strong! Today we're featuring a quilt from Quilter's World that uses the Cat-I-Tude fabrics. 


Cats on Parade designed by Lisa Swenson Ruble
and machine quilted by Diane Oakes;
featured in Quilter's World Fall 2018

What attracted you to the Cat-I-Tude collection? 
I really love the paisley swirls! There's so much detail and depth in that fabric, and it ties the entire line together. It's also a fun challenge to design a quilt featuring fussy-cut blocks; I wanted a quilt that would highlight the cat blocks but also have interest in the background. 


How did you choose the coordinates to use? 
Aqua is my go-to color, so that was easy. I tried a digital version using green instead of the purple, but it didn't pop the way I wanted it to. I chose to use the cat blocks on black and the black tonal background to enhance the rich contrast of the colors.

Tell us about your design.
I've designed several quilts with a woven look. I like the over-under illusion, and the depth that it creates. I actually designed this quilt about a year before Ann's fabric came out but hadn't found the right collection for it yet. It seemed to work perfectly with these prints. 

Tell us about the machine quilting.
Diane Oakes has quilted several of my woven quilt designs, and I think she does a great job. She chooses one motif (and thread color) for each "weave," so for example the purple areas all have the same design. This helps to enhance the woven idea. She followed the paisley lines in the outer border and also quilted some of the details on the cat blocks. 

What do you like best about this quilt? 
Definitely the woven effect. I like that it creates the illusion of dimension. 


Click here to see the entire Cat-I-Tude collection by Ann Lauer.
Click here to read more about this quilt.
Click here to order the kit for Cats on Parade.
Click here to purchase the fall 2018 issue of Quilter's World.

Love It? Share It! Facebook Twitter Google Pinterest Email

Tuesday, August 14, 2018

Debby Kratovil's Technique Tuesday: Using a Border Stripe

It's Technique Tuesday! Debby Kratovil from Debby Kratovil Quilts is here today to show us an idea for using the border stripe from Ann Lauer's Midnight Poppies collection. (Hint: it's a great focal sashing strip!) 

Here's Debby!

Lovely, lovely fabrics: Midnight Poppies. 

When Benartex invited me to design with them, I was sure I could come up with something. I was concentrating on that large border print. There is a black stripe on either side of it (shown in second picture) and I thought I could use one of my rulers to slice it up.


My approach is always simple: Make the fabric do all the work! 
I'll walk you through my design process.

When the fabrics arrived I was back to square one because my original plan wasn't going to work. Here are the fabrics I chose. I ended up not using the large poppy green and purple floral on the right. This will be incorporated on the back of the quilt.

Midnight Poppies with a selection of 7 coordinates

OK, Debby. Now what?

I always consult my own patterns and designs and figure out a way to rework them. Oh, yes. And I consult the "voices in my head" to see what vibes they are getting from the voices from the fabric. This is true; I'm not making this up! 


Here is my second plan, but I didn't have enough fabric of each print to get an even number of squares for symmetry. Dang! But I did know that I wanted to cut the four sections of border print and use them as vertical and horizontal sashings!


Midnight Poppies Draft 2

So, here is what I did - Plan 3! This is just the concept--I tweaked the design a bit, and you will see that scale of the prints makes the actual quilt turn out differently.

Midnight Poppies Off Center Log Cabin

First the steps:
1. Cut four 8-1/2" squares of 622-60 White Floral and one 8-3/4" square (for center unit).
2. Cut 3-1/2" strips of supporting fabrics to begin building my Off Center Log Cabin blocks (4 of them)
3. Row 1: One (5427-44 Green) 3-1/2" x 8-1/2" and one green 3-1/2" x 11-1/2" strip. Stitch as shown.

Start of Off Center Log Cabin
4. Continue adding strips, cutting for EACH block, the following:
  • Row 2 (5425-40 Sage Green): One 3-1/2" x 11-1/2" and one 3-1/2" x 14-1/2"
  • Row 3 (5424-44 Mosaic Petals Green/Purple): One 3-1/2" x 14-1/2" and one 3-1/2" x 17-1/2"
  • Row 4 (5425-09 Daisy Petals White): One 3-1/2" x 17-1/2" and one 3-1/2" x 20-1/2"
  • Row 5 - I was short on fabric and so used two: One 3-1/2" x 20-1/2" strip 5427-44 Green and one 3-1/2" x 23-1/2" strip 5426-50 (Criss Cross Dot Blue/Green)
Here's one block:
One Off Center Log Cabin: 23-1/2" x 23-1/2"

5. Make two blocks and join with a trimmed border strip (measures 8-3/4" wide including seam allowances). Here is the trimming of the border print. I allowed the LENGTH of 29" to stay until the very end.

Trim each side of the border print, allowing for 1/4" seams

6. Two blocks joined:
Two blocks joined and then border print trimmed to 23-1/2" to match the blocks.

7. Make two more blocks, but be careful of where you stitch the strips. Uh oh!

My Uh, Oh Block. Gotta remove that renegade white strip!

8. Add the 8-3/4" floral square to two remaining border strips:
Add center square to remaining two border strips
9. Join blocks and wide sashing strips; measure and trim the sashings at the very end.

10. Here is my 54" x 54" quilt top hanging in the breeze on my deck after a summer rain!

Midnight Poppies Off Center Log Cabin: 54" x 54"
Follow the cutting instructions as listed above. Here is the supply list for making the quilt as shown here. Backing and batting needs to be at least 3-4" larger around all sides for quilting.


Thanks, Debby, for showing us a great idea for using Ann's border stripe and those gorgeous poppy prints!
Click here to see Ann's entire Midnight Poppies collection.
Love It? Share It! Facebook Twitter Google Pinterest Email