Monday, February 15, 2016

Spring Parade

Spring is around the corner! (and Easter too!) Get ready for the new season with the sweet pastel prints in Maria Kalinowski's Spring Parade collection. Bunnies, decorated eggs, chicks and tulips--all the spring favorites--along with a tiny jelly bean dot in several colors! 

Try Wendy Sheppard's free quilt pattern, Tulip Time:
Click here to download the free quilt pattern. 

Click here to see the entire Tulip Time collection.

Love It? Share It! Facebook Twitter Google Pinterest Email

Wednesday, February 10, 2016

Oh Fudge! Sweet Treats Runner Tutorial

Ready for one more Oh Fudge tutorial? 
Alison from Little Bunny Quilts transformed these luscious chocolates into wrapped candies! So cute! Enjoy her tutorial and then head over to her blog for a chance to win your own pack of 10" Oh Fudge squares. Here's Alison!

Hello there! I am Alison and I blog over at Little Bunny Quilts and I am back here at Sew in Love With Fabric to share a tutorial using the adorable Oh Fudge fabric by Maria Kalinowski.

With a few pieces from a 10x10 stacker and some background fabric, you can whip up a sweet treat for Valentine's Day!


Cutting:

From each of eight (8) different 10x10 pieces, cut
      One (1) 5 inch square (eight (8) total)
      One (1) 4 inch square (eight (8) total)

From your background, cut
      Eight (8) 5 inch squares
      Seven (7) 1 inch by 11 inch strips
      Two (2) 2 inch by 11 inch strips
      Two (2) 2 inch by 35 inch strips

For backing, you will need a piece approximately 18 inches by 40 inches.
For binding, you will need three (3) strips 2.25 inches by WOF

Construction:

Draw a diagonal line on the back of each of your 5 inch background squares. Pair each with one of your print 5 inch squares and sew 1/4 inch from each side of the line. Cut along the drawn line and press toward your print fabric. Do not trim squares yet.


Using a ruler, cut a each half square triangle in half perpendicular to the sewn seam.  Line up the cut as close to the corners as possible, but do not simply cut from corner to corner as your squares may have shifted slightly. Cutting perpendicularly to the seam will result in more accurate quarter square triangles.


Sew together pairs of cut half square triangles into quarter square triangles.


Press as desired and trim quarter square triangle units to 4 inches square. Helpful hint: the center of your quarter square triangle should line up with the 2 inch square mark if you have a square ruler. My ruler also has a diagonal line which is helpful to line up along your seam lines.


Sew one quarter square triangle unit to each side of your print 4 inch square. Press as desired and make eight (8) candy blocks, which should measure at 4 inches by 11 inches.


Sew a 1 inch by 11 inch strip between each of your candy blocks and connect as shown below. I found it helpful to press towards the background strips.


Sew the 2 inch by 11 inch strips to each end of your row, and sew your 2 inch by 35 inch strips to the top and bottom. Press as desired.


Layer with backing and batting and quilt as desired. I quilted my table runner with a loopy meander with some hearts scattered in. Bind as desired. I used a brown, red, and pink stripe from my stash.


Thanks for letting me share my "sweet" tutorial with you today!

Head over to Alison's blog for a chance to win some Oh Fudge for yourself!

Love It? Share It! Facebook Twitter Google Pinterest Email

Tuesday, February 9, 2016

Oh Fudge! Love Letters Tutorial

Looking for more Oh Fudge ideas? 

Debby Kratovil has a sweet project for you! Here she is!

Chocolate is the way to THIS woman's heart! Let me tell you why this Oh Fudge Collection by Maria Kalinowski for Kanvas is better than flowers (we are close to Valentine's Day, you know).


Stack of 10" Oh Fudge squares - yum, yum!
What could be better than having your fill of chocolate and not gaining one pound? Now to me, that's living! I was inspired to use this fabric line to go with some letters I made LAST Valentine's Day using a stack of luscious reds from Benartex.


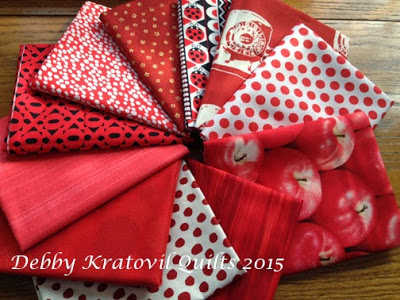
Group of red fabrics from a variety of Benartex collections
 And the letters:
Red letters mixed up; can you figure out what I'm trying to say?
And then last week I shared how I appliqued the letters to plain white background HERE using freezer paper. Check it out.

Let's see where I went with this awesome Oh Fudge fabric. The blocks are rectangles (don't ask me why), finishing to 5" x 7".

I cut strips of 6 fabrics, 7" x 10".
6 yummy squares of chocolate delights
I had to measure-guess the dimensions so I could set the blocks on a tilt. This is the same technique I used with another Benartex collection (Fowl Play) a year ago. See it HERE (you will love it!)

I used my own Arrowheads Template for half-rectangles. This is the same angle as used in the Tri-Recs Tool set (my EZ Wrights by Darlene Zimmerman). You probably have one of those in your sewing room! There is a link for a pdf pattern with the correct angle on the Fowl Play post, but it's not quite tall enough. Just extend the angled side up the 7" height. Or go look for your Tri-Recs tool in your sewing room!


7" x 10" strips cut using my version of a Tri-Recs tool ( the Recs one)
These are cut from a 7" x 10" strip:
Four half-rectangle triangles cut
I pulled the letters L O V E for another quilt (you can see a sneak peek on my blog). This is what I have left and I added a heart (actually two).
Remaining letters with an extra heart
Then I added a set of 4 triangles to the sides. Here they are before sewing:


Aligning the triangles for a RIGHT tilt
And aligning the triangles for a LEFT tilt:


Aligning triangles for a left tilt
Now let's talk about WHY I didn't just cut fabric Willy-Nilly and disregard the straight of grain. ARE YOU KIDDING? Cutting triangles this way ASSURES that the sides of the block are NOT on the bias.

Here they are sewn.
Triangles sewn; now ready for trimming
Now to trim the sides, leaving a 1/4" seam:
Trim, leaving 1/4" seam around all sides
I put them all together but didn't have the perfect sashing. But what do you think so far? Pretty sweet, wouldn't you say?


Find the tutorial that has a pdf for the letters I used here.

Head over to Debby's blog for a peek at the LOVE quilt she made with the remaining letters and a random collection of Benartex red prints, plus a chance to enter a giveaway for a stack of 10" Oh Fudge squares.


Love It? Share It! Facebook Twitter Google Pinterest Email

Monday, February 8, 2016

Oh Fudge! Table Runner Tutorial

Recently we showed you Maria Kalinowski's Oh Fudge collection for Kanvas, perfect for chocolate lovers, especially around Valentine's Day, the unofficial season of chocolate. 
This week we'll be offering a few tutorials showing you ideas of what you can make with these mouth-watering fabrics. Enjoy, and make sure you enter our giveaway for a chance to win some of these delicious fabrics for yourself!


What's up today? We'll show you how to take 10" Oh Fudge squares and Blush fabrics in pale pink and dark brown and create the "Pieces of My Heart" table runner--a cut and swap project using fusible web. 

Here's a close-up of just one heart: 

Here's what you'll need:
1 pack of precut 10" squares (you'll use 10)
1/2 yard Blush Tea Rose (light pink)
1/3 yard Blush Espresso (dark brown)
3/4 yards backing fabric
Fusible web


Cutting: 
Set aside four 10" squares for the hearts (Hint: Choose squares with a variety of colors and size of motifs for more interesting hearts.)

From four darker brown 10" squares:
Cut a total of thirteen 2-1/2" x 10" pieces (for sashing)

From two lighter 10" squares:
Cut a total of ten 2-1/2" squares (for sashing squares)

From the light pink:
Cut four 10" squares

From the dark brown:
Cut three 2-1/4" x 42" strips for binding

From the fusible web: 
Cut four 9-1/2" squares

Making the Blocks:
Note: Download the heart template here
1. Following manufacturer's directions, adhere the fusible web squares to the wrong side of each of your four reserved 10" chocolate squares. 
2. Trace the half heart template to make a full heart. Lay the template on each square and cut out the heart shape. 


3. Stack the four fabric hearts. Using your rotary cutter and ruler, cut through all four layers to create a "puzzle." Start by cutting the heart into two bigger pieces. Divide each bigger piece into smaller pieces. Aim for somewhere between seven and nine pieces. Keep pieces stacked.

4. Lay out the four 10" light pink squares. Lay out the pieces from the top heart, positioning a few on each square. Continue adding pieces from each heart until you have four scrappy looking hearts, leaving roughly 1/4" of space between pieces. 


5. Reposition the pieces as needed to center each heart on a square, with the bottom point angled toward a corner of the square (moreso than you see in this picture!) Carefully fuse the pieces to each square, making sure they don't shift as you work. 

6. Lay out the four heart squares with the thirteen 2-1/2" x 10" sashing pieces and ten 2-1/2" sashing squares. Rotate the heart squares so they face in alternate directions. 

7. Join the sashing pieces and blocks into rows and join the sashing squares and pieces into rows. Join the rows to complete the runner top.
8. Layer with backing and batting, baste, and quilt as desired. We recommend also stitching on the raw edges of the hearts--either with a straight stitch or a zig zag stitch. Bind with the three 2-1/4" x 42" dark brown strips. 

We hope you enjoyed the "Pieces of My Heart" runner tutorial! For a chance to win a pack of 10" Oh Fudge squares, make sure you follow our blog (either by blog reader or by email; see right hand sidebar). Then leave a comment letting us know, as well as letting us know your favorite way to eat chocolate (ice cream, chocolate covered strawberries, candy bars, by the pound...) 

Stop by tomorrow for another Oh Fudge tutorial and giveaway!

Click here to see the entire Oh Fudge collection

Love It? Share It! Facebook Twitter Google Pinterest Email

Thursday, February 4, 2016

All Aflutter: A Hint of Spring

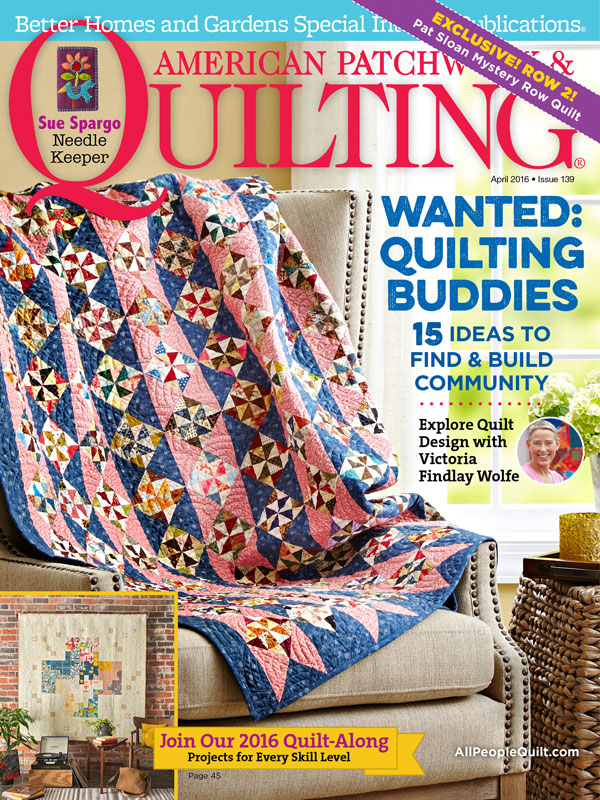
February is the perfect time for a breath of fresh air, for a hint of spring. Which makes it the perfect time for Ann Lauer's wall quilt, "All Aflutter," featured in the April 2016 issue of American Patchwork & Quilting. Ann designed this quilt using a bargello quilt-as-you-go technique and her Butterfly Forest fabric collection.

"All Aflutter" by Ann Lauer
Used with permission from American Patchwork & Quilting® magazine.
©2015 Meredith Corporation. All rights reserved.
Here's what Ann has to say about her "All Aflutter" wall quilt:


What makes a great bargello design?
I particularly like asymmetrical designs. Skinny rows help to create dramatic impact, especially in a smaller project like this. The wider rows on the right side create a big swoop, which really shows off the butterfly fabrics.

Why do your Butterfly Forest fabrics work so well in this design?
There’s a really nice transition to move between the fabrics and get from light to dark. The fabrics that appear solid are actually the packed wing design, and then the lighter prints are the stained glass wings. In the stained glass prints you have lots of value and different colors, moving between greens and blues and purples.

What about the appliqued butterflies?
Those come from the large butterfly prints. You can pick and choose which ones you want to use—they’re simply fused on and then edge stitched. The butterflies in this collection are realistically shaped, but we’ve taken creative license in the coloring.

What are the advantages of quilting as you go?
Not only do you save the effort of having to quilt it after piecing, but you don’t add quilting lines over a pieced top that already has a lot of lines. There aren’t any quilting lines to compete with the design.
I recommend using gridded flannel for the quilt as you go technique—I pair it with a thin batt, and the combination is great for table runners and wall quilts. The grid is an easy way to make sure you’re keeping the quilt absolutely straight as you add the rows.

What do you like best about this wall quilt?

I love the fabrics and the way the combinations of the colors flow really well. I think the design is dramatic and gives a really nice composition and backdrop for the butterflies to show up.

Click here to see Ann's entire Butterfly Forest collection.
Click here to find the kit for this project.
Click here to find American Patchwork & Quilting magazine.


Love It? Share It! Facebook Twitter Google Pinterest Email

Tuesday, February 2, 2016

It's Groundhog Day!

Will we have six more weeks of winter? An early spring? 

According to Punxsutawney Phil, spring will come early this year! 
(Read the details here)


Find 5 fun facts about Groundhog Day here.
Love It? Share It! Facebook Twitter Google Pinterest Email

Monday, February 1, 2016

Our favorite Valentine's Day tutorials

It's February 1st and Valentine's Day is right around the corner! Today we're sharing some of our favorite tutorials in case you're feeling inspired to do a little love-themed sewing before the 14th. 

Heart Garland from Sew Crafty Jess
Click here for the tutorial


Hearts on Fire quilt from Debby Kratovil Quilts
Click here for the tutorial


Heart Pillow from Stitched Together Studio
Click here for the tutorial


Heart Shaped Mug Rugs from the Benartex Blog Team
Click here for the tutorial


Fabric Fortune Cookies from Brassy Apple
Click here for the tutorial

Grab some fabric, a little chocolate, and start sewing! 


Love It? Share It! Facebook Twitter Google Pinterest Email