Showing posts with label Joyful. Show all posts

Friday, December 2, 2016

More holiday decor ideas!

Our Christmas preparation is continuing with two more holiday-themed magazine projects. Both projects were designed by Joanie Holton and Melanie Greseth of Tailormade by Design and are featured in the Winter 2016 issue of Quilter's World magazine. 

Golden Holiday
"Golden Holiday" by Joanie Holton and Melanie Greseth;
quilted by Sue Krause
featured in Quilter's World Winter 2016

Why did the Golden Holiday fabrics appeal to you?
I really liked the warm, rich colors it had. Plus the little bit of gold created a really pretty line that was fun to work with. Sometimes it’s hard for people to see how to use black background fabric, especially in Christmas. I think it gave the quilt a richer tone, which is what we were looking for.

Tell us about the triangle method you used to make this chevron-style quilt.
It’s easier than people think to create—it’s a simple process, all using the same piece. You’re not doing inset seams because you’re sewing them in rows. It’s such an easy way to add a rich-looking Christmas quilt to your living room with it having to be a three month process.

Any tips for making this quilt?
Starch is your friend. And the time it takes to starch is well worth it. It really makes a huge difference in the ease of the sewing and the quality of the finished project.

What do you like best about the quilt?
I like that it’s a traditional quilt with kind of a non-traditional flair to it. I like how it turned out as a more contemporary Christmas quilt.

Click here to see the Golden Holiday collection. 

*********************************************

Joyful Table Runner
"Joyful Table Runner" by Joanie Holton and Melanie Greseth;
quilted by Naomai Polzin
featured in Quilter's World Winter 2016


What drew you to the Joyful collection?
The really cool stripe caught our attention. It’s always a challenge to decide how to use a great stripe.

How did this table runner develop?
We had designed it as a quilt to start with but it was too big and overwhelming. We realized it would be a great runner. It’s a very do-able pattern, and creates a beautiful table runner for Christmas. The runner is assembled with larger fussy cut diamonds—again, starch is your friend!

Tell us about how you used the stripe here.
Because we really liked all parts of the stripe, our focus was how to use it efficiently throughout the project. We wanted to avoid fabric waste and to create a design where quilters could use as much of it as possible. We used fussy-cut triangles in the runner center, and then different fussy-cut strips that alternate with the green and red diamonds.

What do you like best about the runner?
How the simplicity of the design created such a beautiful runner. It’s not complicated but it just turned out so lovely.


Click here to see the Joyful collection.
Click here to find the winter 2016 issue of Quilter's World. 


Love It? Share It! Facebook Twitter Google Pinterest Email

Friday, July 29, 2016

Christmas in July Blog Hop: Day 5

Christmas in July continues with a week of holiday-themed tutorials! Stop by each day this week to see the featured tutorial and find out how you can enter to win the fabric line being used!

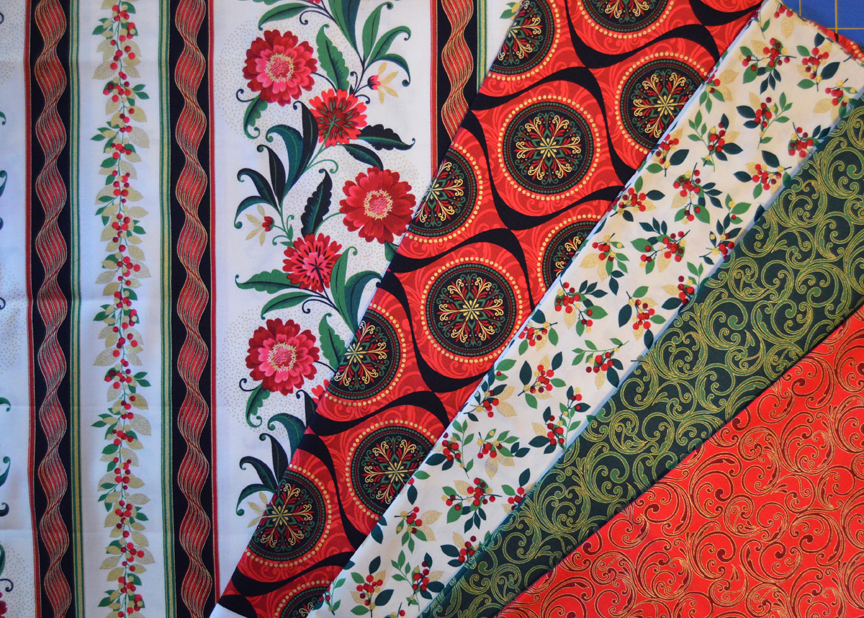
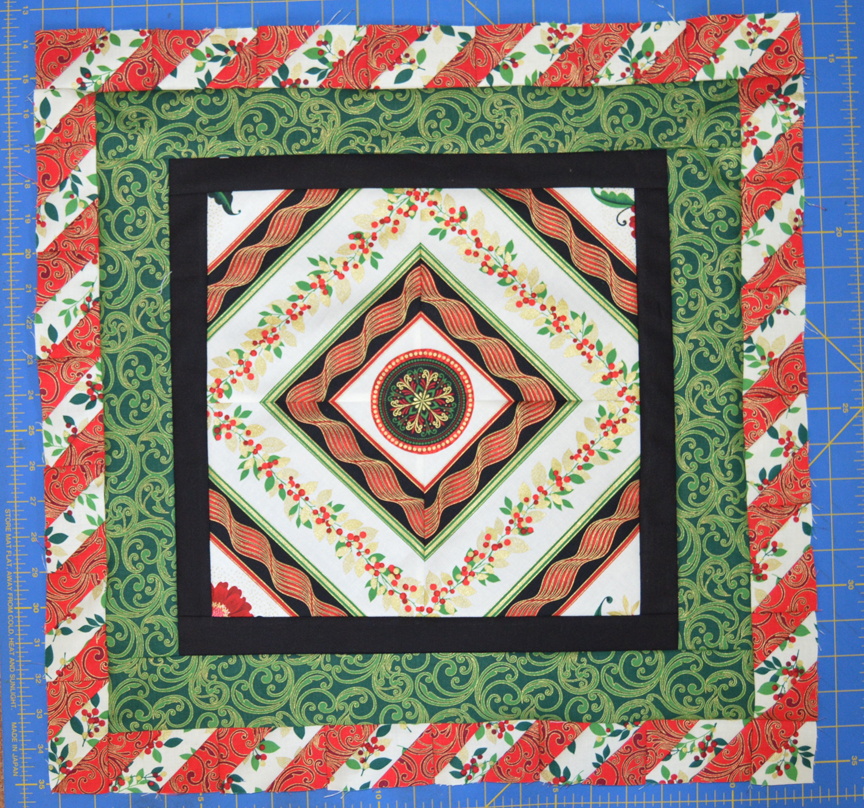
Today we're featuring a table topper tutorial using Maria Kalinowski's Joyful collection. Rich red, deep green, black, cream and metallic accents--this line is certainly full of joy! It has a fun stripe for fussy-cutting, but we think the star of the show is the print we've used in the outer border. 

Table topper measures 33" square

A closer look at the fabrics used:

Materials:
1/4 yard floral stripe
1/4 yard green scroll
1/3 yard red scroll
1/4 yard cream berry
3/4 yard red/black ornament print
2/3 yard black solid (includes binding)
1-1/4 yards backing fabric
39" square of batting
4" square of fusible web

Cutting:
From the floral stripe:
Fussy-cut (4) 6-1/2" squares, centering the berries and leaves as shown


From the green scroll:
(2) 2-1/2" x 42" strips; recut into (2) 2-1/2" x 18-1/2" strips and (2) 2-1/2" x 14-1/2" strips

From the red scroll: 
(1) 2-1/2" square
(3) 2" x 42" strips; recut into (50) 2" squares

From the cream berry:
(1) 2-1/2" square
(2) 2" x 42" strips; recut into (25) 2" x 3-1/2" pieces

From the red/black ornament print: 
Fussy-cut (4) 5-1/4" x 23-1/2" strips as shown

From the black solid: 
(1) 5-1/4" x 42" strip; recut into (4) 5-1/4" squares
(4) 2-1/4" x 42" strips for binding
(4) 1-1/2" x 42" strips; recut into (2) 1-1/2" x 23-1/2" strips, (2) 1-1/2" x 21-1/2" strips, (2) 1-1/2" x 14-1/2" strips, and (2) 1-1/2" x 12-1/2" strips

Make the Table Topper:
Step 1: Sew the (4) 6-1/2" fussy-cut squares together in pairs, aligning the fabric design, and then join the pairs to create the quilt center. 


Step 2: From the remaining red/black ornament print, loosely cut out around a medallion shape. Following manufacturer's directions, adhere fusible web to the back of the medallion and cut out neatly around shape. 


Step 3: Fuse to the middle of the quilt center. 


Step 4: Sew the 1-1/2" x 12-1/2" black strips to the sides of the quilt center. Sew the 1-1/2" x 14-1/2" black strips to the top and bottom. 


Step 5: Sew the 2-1/2" x 14-1/2" green scroll strips to the sides of the quilt center. Sew the 2-1/2" x 18-1/2" green scroll strips to the top and bottom. 

Step 6: Draw a diagonal line on the wrong side of all the red scroll squares. 
Step 7: Lay the marked 2-1/2" red scroll square right sides together on the 2-1/2" cream berry square. Sew 1/4" on either side of the marked line. Cut on the line and press each half-square triangle unit open. Trim to measure 2" square. 


Step 8: Lay a marked 2" red scroll square right sides together on the left side of a 2" x 3-1/2" cream berry piece. Sew on the drawn line, trim 1/4" past the seam, and press open. 

Step 9: In the same way, position a marked square on the right end of the cream berry piece so the line is parallel to the first seam line. Sew on the line, trim, and press open. 

Step 10: Make a total of (13) right-angled stripe units with red in the upper left and lower right corners. 

Step 11: In the same way, position a marked square on the right side of a 2" x 3-1/2" cream berry piece as shown, sew and press. Repeat on the left corner, making sure the seams are parallel. Make a total of (12) left-angled stripe units. 


Finished right-angled stripe unit (top--make 13) 
and left-angled stripe unit (bottom--make 12)


Step 12: We'll be adding the border one side at a time to create the stripe pattern and avoid using partial seams. Start with the right side border: Sew together (6) left-angled stripe units as shown and then join to the right side of the quilt top. 


Step 13: For the bottom border, Sew together (6) right-angled stripe units and then add a HST to the right end. Sew to the bottom of the quilt top. 


Step 14: To make the left side border, sew together (6) left-angled stripe units and then add a HST to the top. Sew to the left side of the quilt top. 


Step 15: To make the top border, sew together (7) right-angled stripe units and add to the quilt top. 


Step 16: Sew 1-1/2" x 21-1/2" black strips to the sides of the quilt. Sew 1-1/2" x 23-1/2" black strips to the top and bottom. 


Step 17: Sew 5-1/4" x 23-1/2" red/black ornament print strips to the sides of the quilt. Sew 5-1/4" black squares to both ends of the remaining two strips and sew to the top and bottom of the quilt. 

Step 18: Layer the quilt top with batting and backing, baste, and quilt as desired. Use the (4) 2-1/4" x 42" black strips to bind the table topper. Enjoy!


For a chance to win a fat quarter bundle of Joyful, make sure you're following our blog! Leave a comment letting us know that you are, as well as letting us know if you've started any Christmas sewing yet. Giveaway is open through Tuesday, August 2nd at 11:59 pm EST; U.S. addresses only, please. 


Don't miss our Christmas in July tutorials all this week!
Wednesday: Alison from Little Bunny Quilts, featuring Sparkle
Friday: Benartex blog design team featuring Joyful
Love It? Share It! Facebook Twitter Google Pinterest Email

Thursday, July 21, 2016

Christmas in July: Joyful

The sun is shining, the temperatures are hot, everyone's wearing flip flops...it must be time for Christmas in July! 

Because we know that you like to get a head start on the holidays (or at least like the idea of getting a head start on the holidays), we're sharing Christmas in July here on the blog over the next few weeks. We'll be featuring our new holiday-themed lines and then hosting a blog hop showing projects made from these collections. 

Grab some mittens and a mug of hot chocolate (just kidding!) and enjoy!


Have you seen Maria Kalinowski's Joyful line for Kanvas? Enhanced with metallic gold details, this gorgeous floral collection says "Christmas" in a subtle, yet elegant way. 
Here's a look at a larger piece of the stripe--ideal for fussy cutting! 


Use these elegant Joyful prints in Diane Nagle's "Under the Mistletoe" quilt, available for free on our website: 
Click here to download the pattern.

Click here to see the entire Joyful collection. 

Click here to find the free quilt pattern. 
Love It? Share It! Facebook Twitter Google Pinterest Email