Get ready for more Meadow Dance inspiration! We've seen what Amanda Murphy has created with her new fabrics (click here if you missed it), and now it's time for some more fun! This week we'll be featuring four different projects using the gorgeous Meadow Dance florals and coordinates. Enjoy the tutorials, and make sure to enter to win a fat quarter bundle!
Today Chris from made by ChrissieD is here with a pillow made from Meadow Dance (watch for the coordinating table runner next week!). There's so much color variety in the Meadow Dance fabrics--this pillow has a totally different feel than the other projects we've seen, just because of the palette chosen. Follow Chris' tutorial and then head over to her blog to enter for a chance to win a fat quarter bundle of Meadow Dance.
Hi, I'm Chris Dodsley of made by ChrissieD, a sewing teacher blogging about my textile crafts and travel adventures. I love to share my tips, tutorials and projects on my made by ChrissieD blog, in my newsletter and various social media sites including Facebook, Instagram, Pinterest, Twitter and Flickr.
It's the final day of the Meadow Dance Blog Hop and what a great collection we're sharing.
Meadow Dance by Amanda Murphy has 28 fabrics and a learning panel designed for long arm quilting too. With focal prints and smaller florals and textures in plum, turquoise, green, grey, white, red, aqua, orange, coral and yellow ... my own favourite is the crochet lace, absolutely stunning ... and they're all 100% cotton.
Meadow Dance by Amanda Murphy has 28 fabrics and a learning panel designed for long arm quilting too. With focal prints and smaller florals and textures in plum, turquoise, green, grey, white, red, aqua, orange, coral and yellow ... my own favourite is the crochet lace, absolutely stunning ... and they're all 100% cotton.
I have a couple of projects to share with you that I've made using some of the fabrics from Amanda's latest collection.
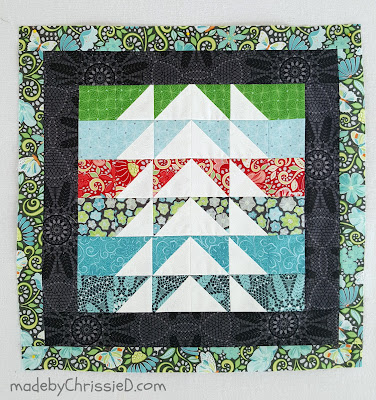
My first project is the Meadow Dance Pillow Cushion. I'm sharing the tute for the cushion front today, here on the Benartex Sew in Love {with Fabric} blog while the tute for the cushion back is already available over on my blog, so you have all the instructions you need to make one too.
My second project is the Meadow Dance Table Runner (approx 48" x 13"). The tute for this project will be available on my blog early next week, so be sure to visit again!

Meadow Dance Pillow Cushion
fits an 18" pillow insert
Supplies Needed To Make the Pillow Front:
All fabric sizes are width x height and Benartex fabric codes are in italics.
All fabric sizes are width x height and Benartex fabric codes are in italics.
Note: Additional supplies will be needed to make the cushion back and complete the cushion cover.
HSTs
(12) 3" squares of Floral Blender White on White 4044-09
(2) 3" squares and (2) 2-1/2" squares of each of the following 6 fabrics from the Meadow Dance collection (totalling 24 squares)
Garden Path Red 4041-10
Crochet Lace Aqua 4043-05
Floral Blender Turquoise 4044-84
Little Flowers Grey 4045-11
Diamonds Aqua 4046-05
Diamonds Green 4046-44
Inner Border
(2) 12-1/2" x 2-1/4" and (2) 16" x 2-1/4"
of Crochet Lace Grey 4043-11
Outer Border
(2) 16" x 1-1/2" and (2) 18" x 1-1/2"
of Garden Path Grey 4041-11
Batting + Lining
Batting (1) 18" square
White muslin or cotton lining (1) 18" square
Creating The HST Centre
Pair each of the (12) 3" Meadow Dance prints with the (12) 3" Floral Blender White on White squares and create 24 HSTs using the HST method I detail in this tute on my blog.
TIP: If you make the Meadow Dance Table Runner (tute available next week on my blog) you can use the left-over 24 bonus/no-waste HSTs to make the centre of this pillow front - that's what I did.
Trim the 24 HST squares down to 2-1/2".
Place the diagonal line on your ruler along the diagonal seam of your squares to ensure your squares are square.
TIP: Using 3" squares to make the HSTs allows you plenty wiggle room for trimming, if you're super comfortable with making HSTs you can actually get away with using 2-7/8" squares to make a 2-1/2" (unfinished)/2" (finished) HST .
Lay out the HSTs in 6 rows of 4, as shown below.
Sew the HSTs into rows using a scant 1/4" seam allowance.
Place a 2-1/2" print square at each end of its matching HST row.
Sew each 2-1/2" square in place and then sew the rows together always using a 1/4" seam.
Trim HST centre to a 12-1/2" square.
Take care to leave a 1/4" fabric visible above the top of your top row white triangles when trimming. Better to lose the base from the bottom triangles than the points from the top triangles, ask me how I know!
Adding the Inner Border
Add the two shorter length inner borders to the sides of the HST centre.
Add the two longer length inner borders to the top and bottom of the HST centre.
Adding the Outer Border
Add the two shorter length outer borders to the sides of the centre section.
Add the two longer length outer borders to the top and bottom of the HST centre.
Quilting The Pillow Front
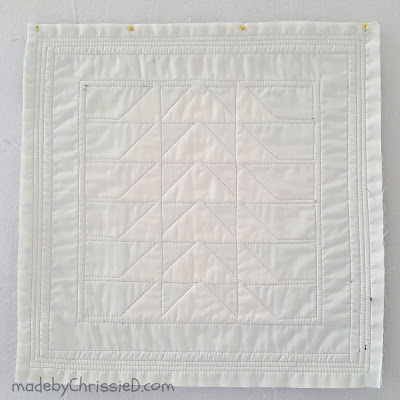
Using spray baste or pins, sandwich the batting between the pillow front and the lining fabric.
Quilt as desired - in the pics below you can see how I've quilted my pillow, 1/8" from the ditch.
You now have a finished 18" pillow front.
Making The Pillow Back
Below you can see both the finished pillow front and the finished pillow back. For the pillow back I've used the following fabrics from Amanda's collection.
Floral Blender Turquoise 4044-84
Diamonds Red 4046-10
Wildflowers Grey/Multi 4040-11
And take a peek at the hidden zipper in my pillow back.
Don't let that zipper make you nervous! I'll walk you through how to do it, just click below to head over to my blog where there's a step-by-step hidden zipper tute.
Meadow Dance Pillow Cushion
I hope you've enjoyed my day on the Meadow Dance Blog Hop and want to make your own Meadow Dance projects. Head over now to my made by ChrissieD blog for a chance to win a Fat Quarter bundle of Meadow Dance fabric and, of course, I'll be sharing all the tutes and tips you need to make the full cushion cover. Don't forget that next week I'll be sharing the free tute for the Meadow Dance Table Runner on my blog too. Looking forward to meeting you there! Chris :D
Follow along on all 4 days of our Meadow Dance Blog Hop!
Tuesday: Alison @Little Bunny Quilts
Wednesday: Benartex blog design team
Thursday: from Sandra @MMM Quilts
Friday: Chris @made by ChrissieD
Click here to see our original Meadow Dance post.
Click here to see the full Meadow Dance collection.
Click here to visit Amanda's website and find her patterns.


Both your pillow and table runner look so fun! I really like the Meadow Dance fabric!
ReplyDeleteI like the way you showed each step in the tutorial and the final product is just fantastic. Thank you.
ReplyDeletethese are lovely. thank you for sharing the tutorials
ReplyDeleteI just love the fabrics in Meadow Dance and every project shows how wonderfully they work in so many ways! This Pillow Tutorial is done fantastically and is another one on my to do list! Thank you so much for sharing it! Have a great day!
ReplyDeleteI really love these fabrics. Thank you for another great Blog Hop.
ReplyDeleteTwo terrific projects Chrissie! I especially like your cushion back- such fun! Will check out your zipper tute ;-)
ReplyDeleteI love the colors! I like that she designed more "solids" to infancy the prints. Your pillows are great! I need to make one. Thank you for sharing your pattern. I'm a confident beginner and you have made it look like I can do this!!
ReplyDeleteIt inhance the prints! Thank you!
DeleteA fabulous pillow cover and thank you for the tutorial!
ReplyDeleteThank you for the great blog hop!
ReplyDeleteGreat look to this
ReplyDeletepillow, love the
back cover. Fun
blog hop all week,
lovely creations.
Carla from Utah
I follow you on bloglovin! mumbird3(at)gmail(dot)com
ReplyDeleteThe blog hop is so much fun. It's great to see all the project they make.
ReplyDeleteClever pillow ideas. thanks for the inspiration😊
ReplyDeleteLOVE your Pillow!! Thank you for sharing Tutorial!! Look forward to Tablerunner How-to as well!! This fabric collection is Gorgeous!!
ReplyDeleteI love all your ideas. The fabric is darling.
ReplyDelete