
Get ready for more Meadow Dance inspiration! We've seen what Amanda Murphy has created with her new fabrics (click here if you missed it), and now it's time for some more fun! This week we'll be featuring four different projects using the gorgeous Meadow Dance florals and coordinates. Enjoy the tutorials, and make sure to enter to win a fat quarter bundle!

Today Sandra from mmm! quilts is here to share her quilt design, Ribbon Stars. Enjoy her tutorial and then head over to her blog to enter to win a fat quarter bundle of Meadow Dance fabrics.
Here's Sandra:
Hello everyone! I am Sandra of http://www.mmmquilts.com/. I originally named my blog Musings of a Menopausal Melon, because I'd recently retired early from teaching, was just beginning menopause and was musing about that and the new direction my life was taking, and was also blogging about my quilting. I shortened it to mmm! quilts when I started to gain readership, and the focus became primarily on quilting with occasional diversions, 😉. So now you know where mmm! comes from. I was super-excited to be asked to take part in this hop for Amanda Murphy's new line, Meadow Dance.

Fabric needed (based on 43" of useable fabric width)
Background: 1 yard
Star points: 1/4 yard of each of two different fabrics (Note that the four cornerstones in the border will be cut from the remainder of one of these fabrics.)
Centre ribbon blocks: a variety of prints to TOTAL 1/2 yard, OR if you prefer to do all the centres the same with four colours only, then a 1/4 yard of each colour will do it.
Border: 1/2 yard
Backing: 1 1/2 yards (This means your quilt will just fit across the width of the fabric; if you prefer to have extra allowance along the sides, you will have to piece the backing, so 2 yards will allow for this.)
Batting: a piece that is approximately 45X50"
Cutting
Background
Cut 2 strips @ 7 1/4". Subcut into seven 7 1/4" squares.Cut 4 strips @ 3 1/2". Subcut into 12 rectangles 3 1/2 X 12 1/2" and four 3 1/2" squares.
Cut 2 more 3 1/2" squares from the remainder of the 7 1/4" wide strips for a total of six 3 1/2" squares.
Star points
Cut 14 squares @ 3 7/8" of two different fabrics for a total of 28 squares.
Centre ribbon blocks
Scrappy look: cut a total of 48 rectangles @ 6 1/2 X 2" which will make 12 centre ribbon blocks. Matching: cut 12 rectangles @ 6 1/2 X 2" of each of four different prints to total 48 rectangles which will make 12 centre ribbon blocks.
Borders
Cut two border strips 3 1/2 X 36 1/2" (or the width of your quilt centre) and two strips 3 1/2 X 39 1/2" (or the length of your quilt centre)
Cut four cornerstone squares @ 3 1/2" from the remainder of one of the star points fabrics.
 |
| Quilt centre pieces all cut! No borders cut yet; might be an idea to wait to check your quilt centre measurements before cutting yours. |
Sewing
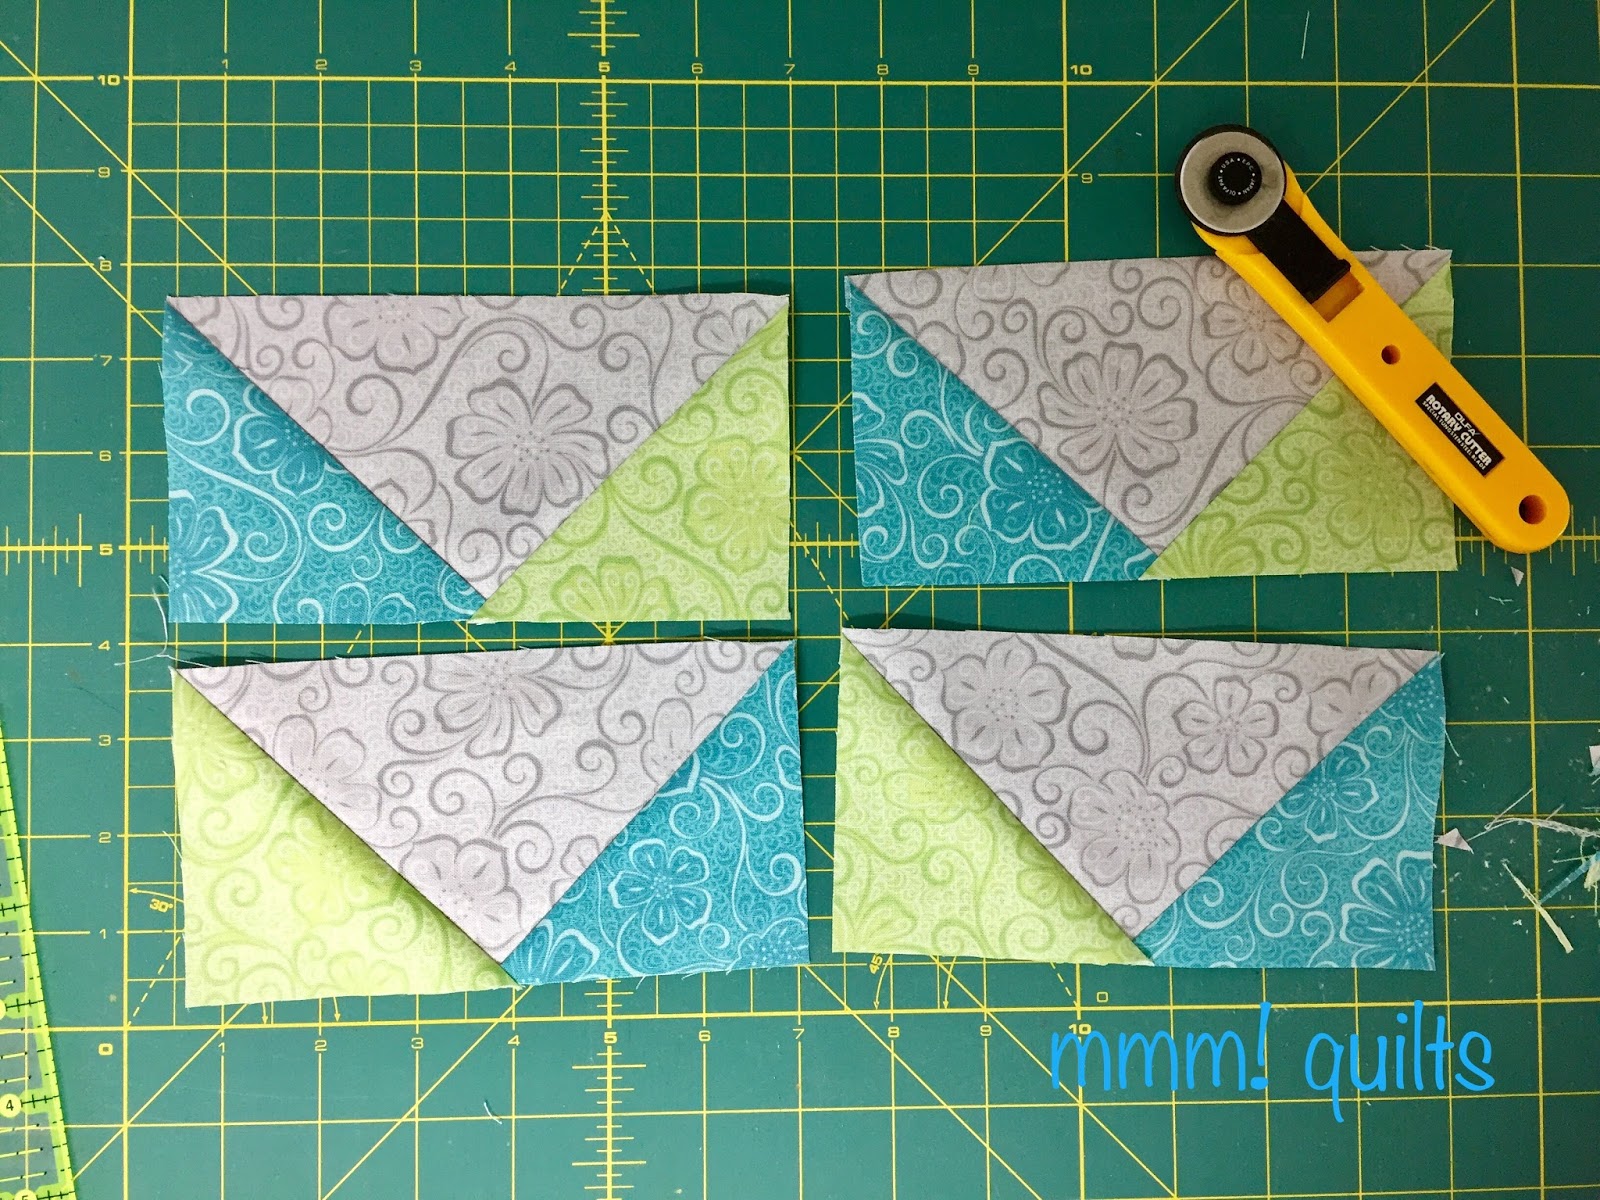
Star pointsDraw a diagonal line on each of the 3 7/8" squares. I like to use my Hera marker. Lay two squares of one colour across the diagonal of a 7 1/4" square as shown below, left. The 3 7/8" squares will overlap slightly in the centre. Sew a scant 1/4" on either side of the drawn line. Cut apart on the drawn line.

Press the seams to the 3 7/8" squares (turquoise in my case). The units look a bit like a heart shape. Now lay a 3 7/8" square of the second star point fabric atop the background fabric at the bottom point of the heart shape unit. Again, sew a scant 1/4" on either side of the drawn diagonal line.

Cut apart on the that drawn line. Press to the star point fabric. Trim to 3 1/2 X 6 1/2". You will get two of each orientation as shown below. Make 28 of these flying geese units. (Note that the quilt requires 27, so you will have one extra.)
Centre blocks Sew four 6 1/2 X 2" rectangles together to form the centre ribbon block. Tip for scrappy: I separated my rectangles into basically cool and warm colours, and then paired them up. Then I sewed the pairs together. This controlled the scrappiness a bit, and evenly distributed the cool and warm colours as well as the prints. The block should measure 6 1/2" square. Make 12.

Quilt Assembly
The quilt is constructed in columns, not blocks. Lay out the pieces on your design wall according to the diagram as shown below.
Sew the pieces for column 1: a 3 1/2" square, a flying geese unit, a 3 1/2 X 12 1/2" rectangle, another flying geese unit, followed by one more 3 1/2 X 12 1/2" rectangle. Press the seams toward the background fabric, away from the flying geese units, or open if you prefer. Place column 1 back on the design wall; you can label it column 1 if you wish with painter's tape or a numbered pin.
Now piece column 2: a flying geese unit, a centre ribbon block oriented horizontally, a flying geese unit, a centre ribbon block oriented vertically, a flying geese unit, and so on, but press the seams toward the centre squares. This will ensure opposing seams nest.
Continue in this manner until you have all 9 columns pieced. Now sew columns 1, 2, and 3 together, pressing the long seams outward. Set this unit back on the design wall. Now sew columns 4, 5 and 6 together, and then 7, 8 and 9 together, pressing as before. You will have 3 larger columns now.


Follow along on all four days of our Meadow Dance blog hop!
Tuesday: Alison @ Little Bunny Quilts
Wednesday: Benartex blog design team
Thursday: Sandra @ Mmm Quilts
Friday: Chris @ made by ChrissieD
Tuesday: Alison @ Little Bunny Quilts
Wednesday: Benartex blog design team
Thursday: Sandra @ Mmm Quilts
Friday: Chris @ made by ChrissieD
Click here to see our original Meadow Dance post.
Love It? Share It!


Nice quilt.
ReplyDeleteLove all of the colors in this great looking quilt.
ReplyDeleteSo beautiful quilt.
ReplyDeleteI really enjoyed Sandra's tutorial! This will make a fabulous quilt. Thank you for sharing it with us!
ReplyDeleteBeautiful and so
ReplyDeletecolorful on her
quilts.
Carla from Utah
Such a beautiful quilt. You did a fantastic job designing it.
ReplyDeleteGreat tutorial and beautiful fabric line.
ReplyDeleteI LOVE this quilt! I am a hugh star quilt lover so this one is something I will add to my to-do list.
ReplyDeleteVery pretty. My favorite of this line is the main fabric in your back sounds like your favorite also.
ReplyDeletecork@pa.rr.com
the Meadow Dance fabrics are a lovely assortment of bold colors and terrific blenders. I'm excited to begin stitching something with them. This quilt is a perfect choice!
ReplyDeleteMeadow Dance is an especially beautiful line!
ReplyDeletebarbkaup(at)(yahoo)(dot)(com)
Great tutorial! I have a baby quilt to make and this pattern and fabric are perfect for it! Thank you for sharing.
ReplyDeleteI love this quilt and the fabric used!
ReplyDeleteLove this collection.
ReplyDeleteSandra, that is such a sweet quilt, and pretty fabric! I can see why you wanted to use all of it!
ReplyDeleteLove this!
ReplyDeleteWildflowers in White is my favorite as well as the Bugs too. I love the Lady Bugs...
ReplyDeleteLove this quilt!
ReplyDeletegreat tutorial and a lovely tactile quilt
ReplyDeleteLove this fabric collection!
ReplyDeleteOh, Sandra, such a delightful quilt and well written tutorial! You are so right, the fabrics are very pretty!
ReplyDelete