Tuesday, September 30, 2014

Feels Like Fall Blog Hop!

The leaves are changing from green to rich gold, fiery red, and blazing orange; the calendar says it's almost October; pumpkins are everywhere! It definitely feels like fall. Since we're all in that fall spirit, it's the perfect time for our Feels Like Fall Blog Hop! 


We have six autumn and/or Halloween themed tutorials coming your way, starting on Wednesday, October 1. Be sure to check out all six and enter for a chance to win a fun fall fabric bundle!

Here's the line-up:
Day 1: Kelly from My Quilt Infatuation featuring the Harvest Song collection
Day 2: Christina from Sometimes Crafter featuring the Spooktacular collection
Day 3: Melissa from My Fabric Relish featuring the Daily Zen collection
Day 4: Benartex blog design team featuring the Fall Festival collection
Day 5: Debby from Debby Kratovil Quilts featuring the Spooktacular collection
Day 6: Erin from Why Not Sew featuring the Indian Summer collection
Love It? Share It! Facebook Twitter Google Pinterest Email

Monday, September 29, 2014

Monkeying Around!

If you need to whip up a quick kid's quilt, we suggest you consider this adorable "Monkey" quilt designed by Melanie Greseth and Joanie Holton of Tailormade by Design. The pattern is featured in the Fall 2014 issue of Easy Quilts magazine, and uses a fun monkey focal stripe from Kanvas' Monkeying Around collection that makes the quilt sparkle. 


"Monkey" designed by Tailormade by Design;
pieced by Sue Homan; machine quilted by Naomi Polzin; featured in Easy Quilts fall 2014 


We asked Joanie and Melanie to tell us about this bright, playful quilt, and the monkey stripe that takes center stage.

What do you like about the Monkeying Around collection?
The fabrics are very playful and the monkeys were really cute.It was just so fresh--perfect for a toddler or young kid. And the colorway we used was gender neutral, which is nice. 

Tell us about the monkey stripe.
There are always a lot of great stripes but sometimes they can be hard to use in different ways. The focus of this quilt was finding a way to use it in a block rather than the border. The large strip block we designed worked out well and is simple to sew together. It makes for a contemporary, easy-to-sew style quilt. The two different versions of the block create a woven design, which we liked.

What great appliqued vines you have on the border! What prompted that addition?
We added the vines on bottom right and top left. The quilt just didn't feel quite finished--we felt like it needed something extra to tie everything together. The vines, made out of coordinating solids, was the final piece.

How was the quilt quilted?
It has an overall design with a bit of a vine look that didn't take away from the busy-ness of the fabric. 

What is your favorite part of the quilt?
I love the big monkey stripe. It's what drew me to design the quilt. 

Click here to see the entire Monkeying Around collection.
Click here to find the kit for this quilt project.
Click here to find Easy Quilts.


Love It? Share It! Facebook Twitter Google Pinterest Email

Friday, September 26, 2014

Quilters Take Manhattan

Last week we welcomed two tour groups into our office through "Quilters Take Manhattan," an event put on by The Quilt Alliance. The groups were led by quilter and fabric designer Paula Nadelstern, a New York City native, who gave a tour of the Garment District. 

The groups started off in our showroom, where Paula spoke more about her design process accompanied by Stylist Ruth Beck and CAD Artist Kay Saniga.  The quilters also received a sneak peak at her new collection that will be debuting at Fall Market. (Don't worry...we'll be showing it to you soon as well!)


Here are a few pictures from their visit:
Paula points out details in this quilt design.

Paula shares the ins and outs of putting together a fabric collection with the group.

Kay talks about how fabric is designed. (Look at the fabulous quilt on the wall behind her!)

After leaving our office, the group visited both famous sights in the district, as well as those only known by insiders. They also stopped and shopped at Paula’s favorite boutiques selling fabric, trims, buttons, feathers, leathers and more--lucky them!

To learn more about the Quilt Alliance and its Annual Quilters Take Manhattan event, click here.


Love It? Share It! Facebook Twitter Google Pinterest Email

Wednesday, September 24, 2014

Are you a sunflower expert?

The sunflower may win the prize as the most likable flower ever. It's nearly impossible to look at one of these golden beauties and not be awed--by its size, complexity, glowing colors...and that's just admiring one bloom. A field full of sunflowers...absolutely breathtaking!

If you, too, are a sunflower lover, you'll love our two new collections, Sunflower Fields and Sunflower Journal.


Sunflower Fields, by Maria Kalinowski for Kanvas, features rich, bright colors: sunflowers on their own, in autumn-hued bouquets, and a sampling of other fall-friendly motifs including leaves and pears.


A larger view of one of the focal prints:

And another, perfect for fussy-cutting:


Try this free quilt pattern designed for Sunflower Fields:

"Fall Arrangements" by Stitched Together Studios

Click here to see the entire Sunflower Fields collection.
Click here to download the free quilt pattern for Sunflower Fields.


Sunflower Journal has a softer, muted, vintage feel, with a fabric collage look, as well as a variety of coordinating textured prints.

A larger view of the layered scrapbook-style print:

And the sunflowers:


Try this free pattern using Sunflower Journal:

"Sunflower Journal" by Stitched Together Studios

Click here to see the entire Sunflower Journal collection.
Click here to download the free quilt pattern for Sunflower Journal.


And now for a little fun...become a sunflower expert! 
Did you know?
  • Sunflowers are one of the fastest growing plants. They can grow 8 to 12 feet tall in rich soil within six months.
  • Sunflower heads consist of 1,000 to 2,000 individual flowers joined together by a receptacle base. The large petals around the edge of a sunflower head are individual ray flowers which do not develop into seed.
  • The tallest sunflower was grown in the Netherlands by M. Heijmf in 1986, and was 25 feet 5½ inches tall.
  • 32½ inches diameter was the size of the largest sunflower head, which was grown in Canada.

Find more sunflower trivia here and here.


Love It? Share It! Facebook Twitter Google Pinterest Email

Tuesday, September 23, 2014

Technique Tuesday: Taking the fear out of hexagons!

Debby Kratovil of Debby Kratovil Quilts is here with another Technique Tuesday post! Up today: taking the fear out of hexagons. Debby will show you how to cut and fussy cut these six-sided shapes (and give you some ideas on how to use them!) Or as she calls it, "the joys of hex with BenarTEX Fabrics!"

Here's Debby:
The people on the bus go round and round . . .
September is for Back to School in most places. My grandsons are back in daycare, but they don't take a bus - yet! Did you miss these free patterns for the bus and all sorts of trucks and cars? Pam Rocco shares her via Quilters Newsletter.
Round and round . . .
And you can see all of my own renditions of Pam's patterns here: For My Boys

Hilary (the mother of my two grandsons and my 2nd daughter) told me about the first time Miles got to ride a city bus. He was totally spellbound; star struck. Can you imagine how he will feel next year on a school bus with a bunch of little kids like him?

But, hey, this is supposed to be about quilting and fabric and patterns, right? I mean, my motto is: All quilts. Only quilts. All the time! No discussions about a bunion surgery for 8 days in a row (with graphic pictures). And discussions about the re-do of my bathroom and pictures of all the junk spilling out of the old cabinets (including unmentionable female hygiene products). I'm not making this up - there are professional quilters who go off the quilt path like that!!

ONLY QUILTS, RIGHT?

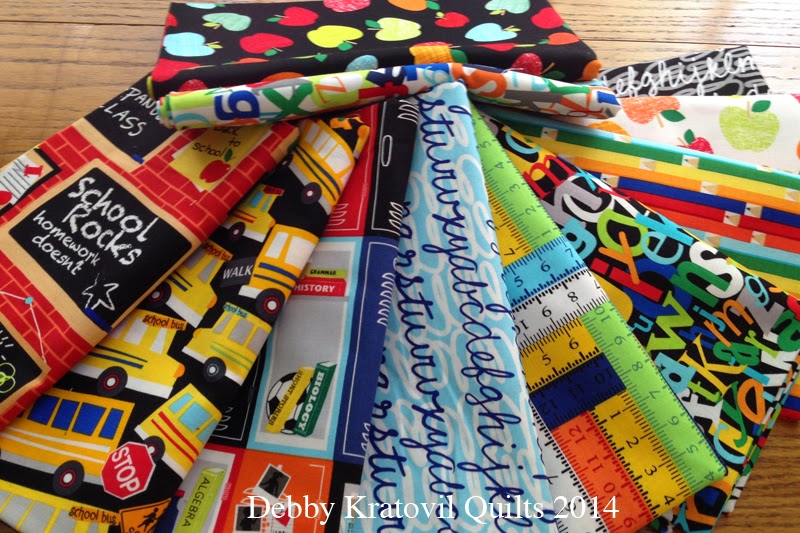
First the fabric from Benartex: Head of the Class Collection:

Head of the Class Collection by Benartex Fabrics
Were you ever the head of the class? I was in my nerdy years a bazillion years ago. It can be a lonely place . . .

What did I make with this fun group of fabrics? I pondered for several weeks about what I could create. I'm sure Benartex despaired that I would ever find something.

First, let's cut one 6-1/2" strip from most of the prints. I didn't use the cream with apples because I am using a white background fabric and it would be lost. I also fussy cut from the large scale print with the "School Rocks" words on that (more about fussy cutting later).

Using the Creative Grids 60˚ ruler and the folded 6-1/2" strip (fold side at the bottom), I cut whole hexagons - YES, I did! Formula? Half the FINISHED height of the hexagon = 3". Align the 3" horizontal ruler line with the top raw edges of the folded strip. Slice on both sides.

6-1/2" x wof strip folded to 3-1/4" x wof (fold at bottom)
 And can we see the whole hexagon?
Open up the cut shape to reveal a PERFECT hexagon
How many whole hexagons can you get from a 6-1/2" x wof strip? Five (5)
And what about the little triangles left over from cutting like this? Eight (8)

5 whole hexagons; 8 little triangles to be used in another project
And tell us about fussy cutting! First, what does it mean? Centering a motif in the middle of a patch (being "fussy" about making sure an image is exactly where you want it to appear within the confines of a fabric patch).

First, cut out a freezer paper hexagon the same way you did the fabric. This is your template.

Cut out freezer paper hexagon

Next, iron it (waxy side down) over the motif you wish to use:

Iron to fabric, waxy side down. Cut it out with scissors or rotary cutter
Here it is:
Peel off freezer paper and you have a perfect hexagon with "School Rocks" in the center!
Now, let's see all the hexagons cut from the strips:
5 hexagons from each of the strips I cut
Well, what are you going to do with them? Let me show you a few ideas I have floating around in my fertile quilter's mind:

One of my "GO TO" patterns, my Hexie Ring. Sew them into a circle, add triangles cut from a 3-1/2" strip (using the CG ruler) and add center hexagon (faced with interfacing) last, sewing with a small zigzag stitch and monofilament thread (you can see this in the Owl Be There post below).

This block is 18" high and could easily be a table topper or child's large placemat!

Sew triangles to hexies; then hexies into a ring. Add center faced hexagon last
Sew hexagons in sets of 3, along with two triangles on each hexagon.
Each hexagon is joined with two white triangles. Then they are joined into a half-circle. The two half-circles are joined into a ring. The center hexagon is faced with NON-fusible interfacing (to turn the raw edges). The block is "squared up" with 30˚ triangles cut from the same Creative Grids 60˚ ruler.
18" high block

And a simple set of hexagon rows here:

Hexagons and white triangles; trim sides or add more white
I hope you look at your 60˚ rulers a little kinder after this. Can you believe you can cut whole hexagons with that thing?

You can see this technique at an earlier post with Benartex fabrics here: Boogie in Hen House
And an even earlier post using the Owl Be There Collection
Love It? Share It! Facebook Twitter Google Pinterest Email

Friday, September 19, 2014

Starring St. Nick!

We showed you Jackie Robinson's Father Frost collection the other day, and now you can see it done up in a quilt! Here's a peek at Jackie's design, Starring St. Nick, which is featured in the November/December issue of McCall's Quilting, plus a little background on the quilt from the designer herself.

"Starring St. Nick" by Jackie Robinson;
featured in McCall's Quilting November/December 2014


Tell us about your Starring St. Nick quilt.
It uses the entire panel except the trees. It's very straightforward to make, with reasonably easy piecing. The star centers are fussy-cut. (Note: And the magazine pattern includes a lesson on accurate fussy cutting!)


And all the colored stars? What a great way to highlight the fussy-cut squares!
Using different colored star points gave the quilt more interest. I played with the different colors with the different square backgrounds. The santas had to have blue around them because I wanted the points to match the background. I just love those santas! Then I moved the stars around a bit, layout-wise. The end result is an on-point square in the middle with the santas marching around.

What's your favorite part of the quilt?
Definitely the Santas that are in the stars. I seem to be a little wilder about these santas than others. When I was in Russia I bought all these things and I hauled them home. I love them. I also like the amount of blue that's there. It's nice to have blue in a Christmas collection.


Click here to read more about Jackie's Father Frost collection.
Click here to see the Father Frost collection.
Click here to find the kit for this project.
Click here to find the Nov/Dec issue of McCall's Quilting.


Love It? Share It! Facebook Twitter Google Pinterest Email

Wednesday, September 17, 2014

Ready for the Holidays: Father Frost


The other day we shared Jackie Robinson's Glorious Hummingbirds fabric collection with you. Today we're still focusing on Jackie, but we've shifted to a different season--get ready for Christmas with Father Frost


The panel, featuring St. Nick figurines, ornaments, and more, 
ready for fussy cutting:

Some of the coordinates in the Father Frost collection:
Just why did this master of floral fabrics (and now bird prints too!) turn her attention to all things Christmas with a collection featuring dazzling trees, ornaments and St. Nick figurines? 

It all started with a vacation eight years ago... 


Here's Jackie:
In 2006, I enjoyed a spectacular trip to Russia with my cousin Doris. We took the River Cruise from Moscow to St Petersburg, with stays at both ends and various stops along the way. It was FABULOUS! We found the Russian people charming and gracious, and enjoyed visiting with them and learning that during the cold war days, they were as afraid of us as we were of them.

Here are some photos from my trip:
The Architecture was AMAZING! We toured the city of Moscow with several stops for museums and churches. Even on an overcast day the Domes at St Basil were outstanding.


We went to the Bolshoi Ballet one evening. BUT - the highlight of Moscow was a meeting with Mikhail Gorbachev. As you can imagine, our Russian tour guides were excited beyond their wildest dreams. We'll never know 'why' we got this special audience with him, though the thought is he wanted to meet with some non-political Americans. In this photo you see Mr. Gorbachev in the front center. See the man with the red tie on the left? I'm right behind his shoulder- glasses, grey hair. Doris is at the top of the photo, glasses and black & white jacket.


The trip along the Volga was terrific, with lots of stops along the way. One of my favorite stops was in Kizhi. The roof and domes of this charming old church is all old and weathered wood. The sun is what makes it look like silver.


In St Petersburg we enjoyed all the typical sights AND I had pre-arranged a meeting with a small group of quilters. They were at the way opposite end of town - a long way away - so we took a young helper from the boat with us to not only navigate the subways to reach them, but also to help interpret our visiting. Our visit was great fun! They shared lots of quilts with us, and I had taken one, plus a great amount of fabric to give them. This photo hangs in my sewing room and I see it every time I pick up my purse. That's me in the front row, 2nd from the left. Doris is standing at the right end of the back row.


I quickly fell in love with the painted Father Frost figures, and gathered a few along the way. I enjoy those wooden Father Frost figures each Christmas, and they, along with the designs painted on them, were the inspiration for this collection. It's the first time I've ever done Folk Art, and it was FUN!


Click here to see the Father Frost fabrics.
Click here to download a free pattern designed by Jackie featuring these fabrics.
Click here to visit Jackie's website and see what else she has designed using Father Frost.

Love It? Share It! Facebook Twitter Google Pinterest Email

Monday, September 15, 2014

The Magic of Hummingbirds


Q. When you see this gorgeous floral stripe, can you name the designer?


A. If you answered Jackie Robinson, you're right! Well known for both her florals and her unique stripe prints, in her Glorious Hummingbirds collection, Jackie has branched out into birds. She combines these tiny creatures and morning glories into a classic line on both black and cream. Take a peek at the fabrics below and then scroll down to find out more about the fabrics!

The focal prints:


The coordinating tonals:


You're so well known for your floral prints…tell us about these hummingbirds.
I've been wanting to do hummingbirds for quite some time. I think they're interesting—they're so tiny—it's amazing what they do. I don't personally have any bird feeders in my yard because I have a cat who is a good hunter and it just wouldn't be fair. We do occasionally see some, and they're fun to watch. I've heard from so many people about how much they love hummingbirds since this fabric line came out.

And how did you choose morning glories to pair with the hummingbirds?
When I wanted to do the hummingbirds the next thing was to see what they liked best, flower-wise. Morning glories aren't the only flowers they like, but I thought they'd have more design capabilities than most of the other options.

How did you come up with the color palette?
The blue that's in the collection is my very favorite blue—close to a robin's egg blue. I like all blues, but this is my favorite, and I wanted to use it in this collection. Pink is the other main color, and then I chose both black and cream for the backgrounds. The cream is very sweet, but to me, the black is dramatic. I like the black the best because it has more punch.


Jackie's quilt, Garden Glories, is featured in the October-November issue of McCall's Quick Quilts magazine.

Garden Glories designed by Jackie Robinson,
pieced by Marilyn Eider, machine quilted by Aimee Mahan;
featured in McCall's Quick Quilts Oct-Nov 2014

What can you tell us about the Garden Glories quilt design?
It's a rail fence block set on point. A lot of my quilt ideas roll through my head before I sit down to design them, and I knew I wanted this to weave. I thought a rail fence block would work to show off the flowers in the stripe in larger pieces. I played with the width of the stripes to see what would work best, and I even tried using yellow and green (instead of the pink and blue), but the pink and blue are the predominant colors in the stripe. Using the different values of pink and blue gives the design more depth.The quilting was done by Amy Mahan of Splendid Stitches. It's what I call light custom quilting—not over the top quilting, but planned within specific areas, like the swirls in the pink and blue pieces.

What do you like best about the quilt?
I think it's just happy. It's smiling at me.


Click here to watch an interview with Jackie where she talks about her Glorious Hummingbirds fabric collection and other quilts she's designed using it.
Click here to see the entire Glorious Hummingbirds collection.
Click here to find the kit for Jackie's quilt (in two colorways!)
Click here to find McCall's Quilt Quilts magazine.


Love It? Share It! Facebook Twitter Google Pinterest Email