
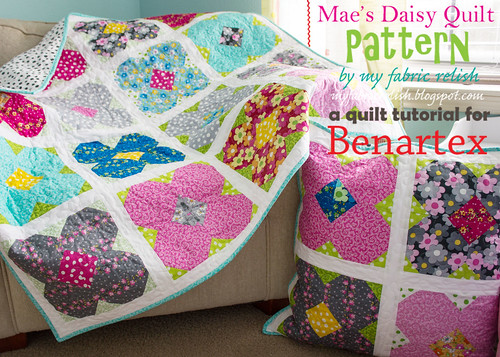
Welcome! It's Day 4 of our Holiday Gift Blog Hop, where some of our talented blogging quilter friends are sharing tutorials that we think you'll love--either for last-minute gift ideas or to file away to try after the holidays. Today we have a quilt and matching pillow combo from Melissa of My Fabric Relish, made using the Daisy Mae collection. You may prefer to save this cute quilt pattern for after the holidays, but we bet you can't resist trying out the pillow sooner! Enjoy Melissa's tutorial, and then make sure to head over to her blog to find out how you can win some fabric (and scroll to the bottom of the tutorial to see our other tutorials from this hop!)

Hi Y'all! It's Melissa over from My Fabric Relish and I am here to share my not so much Christmassy quilt tutorial with you today. Now, I am so super excited about this fun bright quilt and I hope you print, pin, share, or like (or whatever your "must make" list method is) my free quilt pattern. Go on, I'll wait....
A little about me and my blog. I am a stay at home mom to two little girls, teach sewing at my local library and sewing lounge, and share all my fabric happenings at my fabric relish. I love to sew just about anything, but my heart belongs to quilting. So of course, when I was asked to create a tutorial for Benartex it had to be quilty.

At first, I thought I would be conservative and just do a quick little pillow and call it a day. But what was the fun in that? Why not do a quilt AND a pillow? Before I designed anything, I went onto Benartex's website to check out all the fabric goodies. Oh. My. Word. How can I pick? So many choices! I thought I had finally picked out a collection, then another collection's name caught my eye. Daisy Mae. So I clicked on it and what I saw was a page full of colorful and happy daisy prints and polka dots. Sold! Anything with the name Mae just makes my heart smile. That's my big relish's middle name, but it's also a special family name and both my husband and mine's initials. Once I had the fabric, the idea for the pattern was simple. I just busted out my newly acquired EQ7 quilting software and got to work.

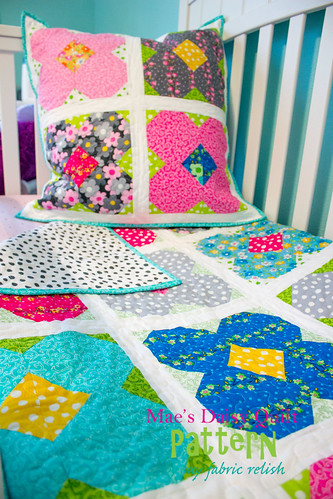
I have created an easy little printable for you to print out or your can follow along below to create your own Mae's Daisy Quilt. Remember, you can make your quilt to be any size, just adjust the amount of blocks you use. I have provided instructions to make the lap quilt and pillow/mini size. I left the border off my quilt because I actually forgot about it and cut the backing fabric before I realized my mistake. These instructions have the border included for the lap size. Also, the pillow fits a Euro pillow insert perfectly. I get mine at Ikea but I am sure you can grab one anywhere like Walmart or Target.

Fabric Requirements:


*less than 1/8 needed
**assuming fabric is 43 inches wide
***2-1/2 inch wide
Cutting Instructions: Crib/Lap Quilt:
- You will make 16 flower blocks that measure 10 inches each once finished (10 1/2 inches unfinished). For this pattern, I picked 16 different prints from the Daisy Mae collection, but you can do multiple fabrics for the flowers.
- Cut (4) 5 1/2 inch squares per block/fabric. Set aside.
- For the leaves (green), cut (192) 2 inch squares. Mark a line on the back of each square across the diagonal. Sorry! You can also place a piece of masking tape on your machine to line up with the corners to avoid having to mark all your diagonals. See picture below.
- For the flower center, cut (64) 2 1/2 inch squares. Mark down the center as well. So sorry again!
- For the sashing, cut (20) 2 x 10.5 inch strips & (5) 2 x 50.5 inch strips.
- Border consist of (36) 5-3/4 x 3 1/2 inch blocks (9 on each side) & (4) 3 1/2 inch squares for each of the corners.


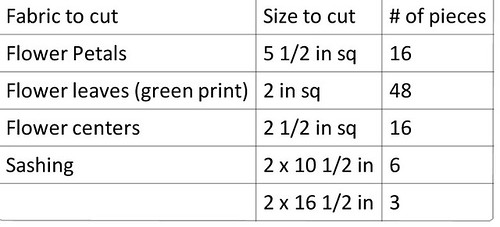
Mini/Pillow:
- You will make 4 flower blocks that measure 10 inches each once finished (10 1/2 inches unfinished). Cut (4) 5 1/2 inch squares per block/fabric. Set aside.
- For the leaves (green), cut (48) 2 inch squares. Mark a line on the back of each square across the diagonal. Sorry!
- For the flower center, cut (16) inch 2 1/2 inch squares. Mark down the center as well. So sorry again!
- For the sashing, cut (6) 2 x 10.5 inch strips & (2) 2 x 26.5 inch strips.
Piecing the petals:
- To make one of the petals, take one 5 1/2 inch square, three of the green squares and one of the center squares. Place one of the green squares on the corner right sides together and stitch ON the line. Do this with the other two green squares and then the center square. Trim off the corners and press seams open.


Construct flowers and add sashing:
- Take the four completed petal squares and piece together as shown above.
- Add a sashing border to one side of all 16 flower blocks. Then, select the 4 flower blocks that will make the first column on the left and add a sash to the opposite side of the side that has the sashing. Press sashing towards flower blocks.
- Make a row of four flowers with the sashing in-between.
- Add the long piece of sashing to the top of each row and one row will also have sashing on the bottom.
- Piece all the rows together and set aside.

- Take 9 of the 5 3/4 x 3 1/2 inch blocks and piece short sides together. Do this for all four borders. Add the 2 1/2 inch squares to the ends of only two of the borders. Press. Add the short sides first, then the long sides. Press.


For the envelope pillow back, cut (2) 25 x 16 inches. Hem on the long sides by folding over 1 inch once and press then fold again 1 inch and press. Stich along the hems. Sandwich the pillow with wrong sides of fabric to the back side of mini quilt top with the hemmed edges overlapped. Pin liberally to avoid shifting when binding. Bind as you would your quilt.
Baste and quilt as desired.

And there you have it! I so hope you make one of these fun quilts. Now be sure to head back over to my blog, my fabric relish, to enter to win a fat quarter bundle of Benartex fabrics.
Happy Holidays! Melissa
See the other Holiday Gift Blog Hop tutorials here:
Day 1: Fabric Gift Bags from the Benartex blog team
Day 2: Toddler Purse and Doll Blanket by Jennie from Clover & Violet
Day 3: Beer Coozies and Coasters from the Benartex blog team
Day 5: Honey Bee Quilt by Erin from Why Not Sew?
Looking for more holiday gift ideas? Check out the projects from our Holiday Headstart blog hop back in October:
Day 1: Take Me to Class Tote by Tessa from The Sewing Chick
Day 2: Window Zip Pouch by Emily from Mommy's Nap Time
Day 3: Squared Stripe Pincushion from the Benartex blog design team
Day 4: Bold Braid Quilt by Kelly from My Quilt Infatuation
Love It? Share It!


Oh this is a fabulous quilt pattern. So perfect for spring and little girls rooms
ReplyDeletethis is adorable, thanks!
ReplyDeleteI love this pattern! Thank you for sharing.
ReplyDeleteLove this variation of a snowball block. Fantastic idea!
ReplyDeleteWhat a super cute little quilt. Thank you
ReplyDeleteWonderful quilt pattern.
ReplyDeleteVery cute!!
ReplyDeleteVery cute!
ReplyDeletethe quilt and pillow are so cute and cheery!
ReplyDeleteI love this pattern - thanks!
ReplyDeleteVery cool. Thank you for the pattern
ReplyDeleteJust beautiful,Thanks!
ReplyDeleteReally cute.
ReplyDelete