Friday, December 6, 2013

Holiday Gift Blog Hop: Day 3

Welcome! It's Day 3 of our Holiday Gift Blog Hop, where some blogging friends are sharing tutorials that we think you'll love--either for last-minute gift ideas or to file away to try after the holidays.Today's tutorial, from the Benartex blog team, falls into the super-quick category: beer coozies (koozies? cozies? We're going with coozies for now) and coasters using Man Cave IV from Benartex. The fabric makes these projects, and they're ideal for your favorite guy.


We fell in love with the Man Cave IV fabrics--they're fun masculine prints, and they take two very simple (and fast!) projects and make them something special. In keeping with the laid-back guy vibe of the prints, these projects have some exposed raw edges and freehand machine quilting and cutting. If that's too relaxed for you, we've included tips and/or other methods on how to work with a little more structure as you sew.


Take a closer look at the fabrics:

You'll Need:
Coozies 
1/3 yard beer bottle print (fabric has 9 rows of bottles, so you'll be able to make 9 coozies using method 1 and 5 using method 2)
1/3 yard black solid
Batting

Coasters
1 fat quarter beer label print (will yield 10-15 coasters)
1 fat quarter backing fabric
Batting
Basting pins or spray baste
Free motion quilting foot (optional)

Making the Coozies:
We made these coozies two different ways; if you're a zigzag fan and want a super-casual look, try Method #1. If you prefer cleaner edges, try Method #2.

Method #1
Fussy cut a row of centered bottles measuring 4-1/2" x 9".

Cut a 4-1/2" x 9" piece of batting (We recommend using black batting here, as it blends in well with the black fabrics along the raw edges)
Cut a 4-1/2" x 10-1/2" black solid strip

Layer the black solid right side down, the batting, and then the fussy-cut bottle strip right side up. The slightly shorter batting and bottle strip should be aligned along one short edge of the black strip as shown, with the longer black extending on the opposite end (we used white batting just for this photo so you could see the placement: black on black = hard to photograph details!)

Pin the three layers together.
Sew close to both long edges with a zigzag stitch. We chose to use a tight zigzag to better encase the raw edges. Tip: Try using your walking foot while zigzagging through these layers.

Fold the piece in half, bottle sides together, matching the raw edges of the bottle fabric/batting (in other words, don't match the end up with the extra black fabric--leave that loose). Using a straight stitch and a 1/4" seam allowance, sew to create the round shape of the coozie. Fold the excess black edge over 1/4" and press.
Fold the pressed black edge over the seam allowances and slipstitch in place to hide the raw edges. Turn right side out, slide a cold bottle in place, and enjoy!


Method #2
Fussy cut a row of centered bottles measuring 5" x 9". 


Cut a 5" x 9" piece of batting (white or natural is fine here, as it won't show)
Cut a 5" x 10-1/2" black solid strip

Layer the batting, black backing right side up and bottle strip right side down, leaving the extra black length off to one side as in method #1. Pin in place.

Sew along the top and bottom using a 1/4" seam allowance and a straight stitch. Turn right side out and press. If you like, topstitch 1/4" from top and bottom edges. Press the top and bottom edges of the excess black in 1/4". Press the long excess black edge in 1/4". 


As in method #1, line up the short raw edges of the layered sections, pin in place, and stitch with a 1/4" seam allowance. Fold the pressed black edge over the seam allowance and slipstitch in place. Turn right side out and enjoy!


Making the Coasters:

The trick to this project is quilting a larger piece of fabric and then cutting the coasters shapes out when you're done; much easier than trying to quilt small fabric circles! 

Decide how many coasters you want to make and cut a section of beer label print that includes that many labels, plus at least 1/2" along the outer edge (in the photo below, there are 9 useable labels out of an approximately 10" x 12" piece). Cut backing and batting pieces slightly larger. Layer the backing right side down, batting, and beer label print right side up. Baste to secure.

Quilt each label as desired, extending at least 1/4" beyond the outer label edge. We used the free motion foot and quilted spirals on some labels, and a walking foot to quilt straight line asterisks on others.

Cut out each coaster 1/4" beyond the outer edge of label. Note: If you're uncomfortable free handing this circle cutting, trace a circle shape around each label with a fabric marking pen before cutting. You can cut out 2 adjoining labels if you are careful. It might be fun to cut out the circles with a pinking shears, if you like. If you do the asterisk quilting, after cutting out the coaster, stitch near the outer edge of the circle to secure everything.

There you have it! Easy bottle coozies and coasters...a great holiday gift!

Would you like to win a fat quarter bundle of Benartex or Kanvas fabric? Sign up to follow our blog (via email or Bloglovin'--both in the right hand sidebar) and leave a comment letting us know you did so (or are already following!). For a second entry, like us on Facebook and leave another comment. In your comment, also tell us the hardest person on your list to buy for. The giveaway will be open through Thursday, December 12th at 11:59 EST, at which point we'll use a random number generator to select a winner.

See the other Holiday Gift Blog Hop tutorials here:
Day 1: Fabric Gift Bags from the Benartex blog team
Day 2: Toddler Purse and Doll Blanket by Jennie from Clover & Violet
Day 4: Mae's Daisy Quilt by Melissa from My Quilt Relish
Day 5: Honey Bee Quilt by Erin from Why Not Sew? 

Looking for more holiday gift ideas? Check out the projects from our Holiday Headstart blog hop back in October:


Day 1: Take Me to Class Tote by Tessa from The Sewing Chick
Day 2: Window Zip Pouch by Emily from Mommy's Nap Time
Day 3: Squared Stripe Pincushion from the Benartex blog design team
Day 4: Bold Braid Quilt by Kelly from My Quilt Infatuation
Love It? Share It! Facebook Twitter Google Pinterest Email

Thursday, December 5, 2013

Holiday Gift Blog Hop Day 2 - Toddler Purse and Doll Blanket

Welcome! It's Day 2 of our Holiday Gift Blog Hop, where some talented bloggers are sharing tutorials that you can use for last-minute gift ideas or file away to try after the holidays. Today we're thrilled to have Jennie from  Clover & Violet here with a sweet purse project (plus a doll quilt!) for a little girl using Bella Morocco. After you read through Jennie's tutorial, be sure to head over to her blog to check out her other designs (such fun bags!) and find out how you can enter to win a fat quarter bundle of Benartex or Kanvas fabric.


Hi, it's Jennie from Clover & Violet and I'm excited to be here today sharing a tutorial for a toddler purse and doll blanket.  Since my mom and I design quilted handbags, a friend of mine sent me an e-mail the other day looking for a purse for her 18-month-old daughter.  My toddlers love carrying all their special toys around in little bags, so I was excited to make one for my friend.  I chose the Bella Morocco fabrics because they're so bright and fun.  And, I just had to make a little doll blanket to go with it too!


Supplies:

  • 3 Fat Quarters
  • 3 - 4" x 20" strips
  • 1/4 yard cotton flannel
  • 6" x 8" lightweight interfacing
  • Ric Rac
  • Sew in magnetic snap


For Purse cut:

From Fabric:
  • 3 - 4" x 6" rectangles of three prints for flap
  • 1 - 8" x 6" wrong side of flap
  • 2 - 9" x 10 rectangles for body
  • 2- 9" x 10" rectangles lining
  • 2 - 2 1/2" x 14" rectangles handle
From Interfacing:
  • 1 - 8" x 6" flap
From Flannel:
  • 2- 9" x 10" rectangles lining
  • 1 - 2 1/2" x 14" rectangles handle
All seam allowances are 1/4" unless otherwise noted.


Make the flap by sewing together the three 4" x 6" rectangles to create one 11 1/2" x 6" piece.  Set your sewing machine to a long stitch length and stitch 1/4" and 3/8" from the top and bottom edge.  Also stitch and 1 1/4" and 1 1/2" from the bottom.

Carefully pull the threads and gather the fabric until the piece measure 8" x 6".  Fuse the 8" x 6" interfacing to the wrong side to hold gathers in place.  Stitch the ric rac over the middle gathers, removing any gather stitches that show.


On the wrong side of the fabric, sew the magnet to the gathered flap at the ric rac stitching line.  Sew the 8" x 6" piece, right sides together, along the bottom and sides.  Clip corners.

Turn right side out and stitch 1/4" and 1/8" from bottom edge, making sure to stitch through the bottom of the magnetic snap.


Quilt the 9" x 10" rectangles to the flannel.  I like to leave the flannel extra large and then trim it to the fabric after quilting.

Cut a 1 1/4" square in on each corner of one 10" side of each panel.  Sew the bottom and sides of the panels together with a 3/8" seam allowance.


Fold the box so that the side and bottom seams line up, stitch 1/4" from edge.  Turn right side out to form a box on the bottom of the bag.


 Sew the remaining magnet piece to the wrong side of the purse body, 2 1/2" from the top edge, so that the flap magnetizes closed.


Make the handle by layering the two handle prints right side together and the strip of flannel on top.  Sew along long edges, leaving ends open (note: for easier turning, back stitch at beginning).  Turn right side out and stitch 1/4" from each edge.
Sew the flap, right sides together, to the back of the bag (the side without the magnet).  Then sew the handle to the sides of the bag.

Make the lining in the same manner as the body, but leave a 4" opening on one side.


Place the lining over the body of the bag, right sides together.  Sew around the top.  Carefully pull the bag body through the opening.  Hand stitch the opening closed, then push the lining into the bag.

For the Doll Blanket:


Cut the remaining 4" strips in half, 1 3/4", and sew together longways.  Trim the panel to 11 1/2" long.  From the body fabric, cut 3 - 2 1/2" strips and sew as a border around the stripped top.  Sew the ric rac 4" from the bottom of the blanket.

Use the remaining fat quarter for the backing, layer with right sides together and a piece of flannel (as for the strap), then sew, leaving a 4" opening on one side.  Turn right side out and quilt as desired.


And there you have a great gift for the little girl in your life!

Thanks, Jennie!
Don't forget to visit the Clover & Violet blog to enter to win some free fabric! 

See the other Holiday Gift Blog Hop tutorials here:
Day 1: Fabric Gift Bags from the Benartex blog team
Day 3: Beer Coozies and Coasters from the Benartex blog team
Day 4: Mae's Daisy Quilt by Melissa from My Quilt Relish
Day 5: Honey Bee Quilt by Erin from Why Not Sew? 

Looking for more holiday gift ideas? Check out the projects from our Holiday Headstart blog hop back in October:

Day 1: Take Me to Class Tote by Tessa from The Sewing Chick
Day 2: Window Zip Pouch by Emily from Mommy's Nap Time
Day 3: Squared Stripe Pincushion from the Benartex blog design team
Love It? Share It! Facebook Twitter Google Pinterest Email

Wednesday, December 4, 2013

Holiday Gift Blog Hop: Day 1


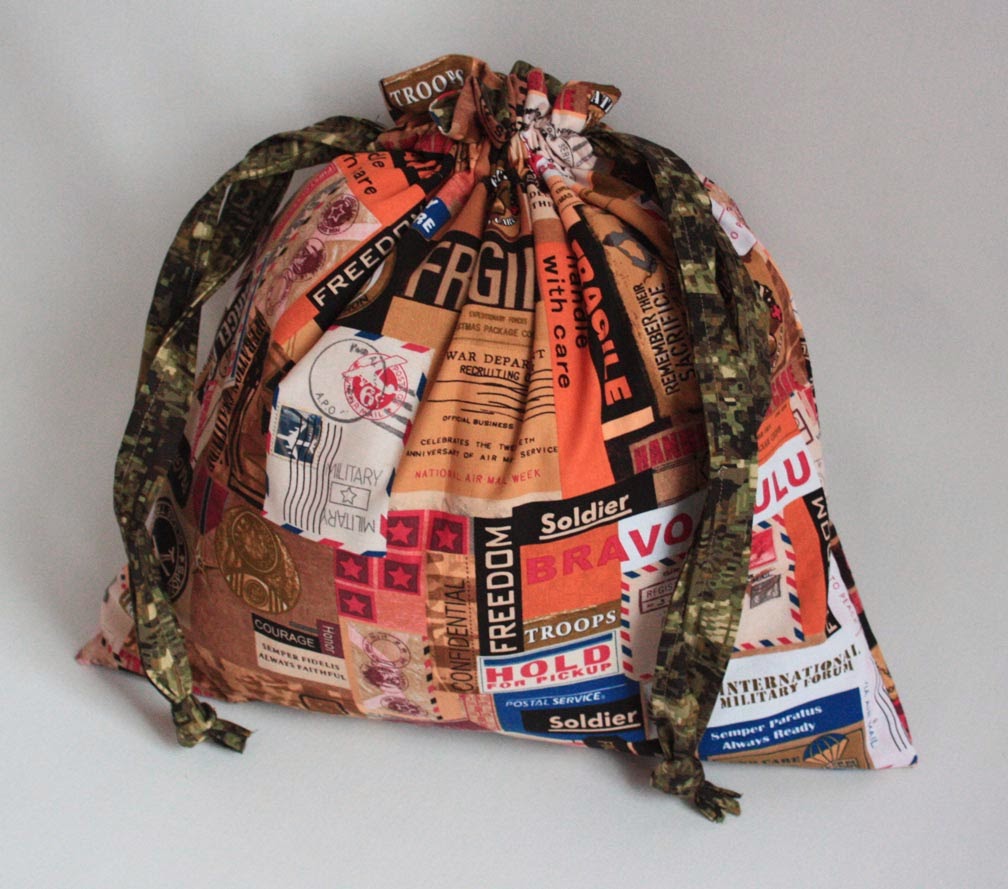
Hello! It's Day 1 of the Holiday Gift Blog Hop, and the Benartex blog team is sharing a tutorial for making easy fabric gift bags. You can use these bags instead of gift wrap and use them again and again! (And no tape or ribbons necessary--added bonus!)


We chose to make these bags up using the brand new United We Stand collection from Kanvas. Small swatches don't do these designs justice--take a look at them in larger pieces.

These military-themed prints would also make great gift bags for soldiers (and it's not too late to do something for this holiday season!). Put together a care package and fill a handmade drawstring bag and send it to troops away from home or drop it off at a local veteran's center. You can find a variety of links to opportunities for making/sending care packages here.

Now let's make the bag! 

You'll Need:
2/3 yard outer print
1 yard lining print (includes handles)
Fabric marking pen
Safety pin

Cutting:
From the outer print:
(2) 18-1/2" squares

From the inner print:
(2) 18-1/2" squares
(3) 4-1/2" x 42" strips for handles

On both side edges of an outer print square, measure and mark 1-1/2" down from the top and 4" down from the top. Layer the 2 outer squares right sides together and sew around 3 sides using a 1/4" seam allowance, leaving the 2-1/2" between marks unstitched. Make sure you backstitch at both marks. Do the same with the 2 inner squares, but leave a 4" opening along the bottom edge for turning.

Press seam open around each casing opening.


Turn the outer bag right side out. Insert inside the lining with right sides together, matching seams and raw edges. Pin. Stitch around the top edge with a 1/4" seam allowance. 

Turn the bag right side out, handstitch the opening in the lining, and stuff the lining inside. The casing holes should line up. Use a ruler and fabric marking pen to mark the top and bottom of the casing holes.

Stitch on the 2 marked casing lines, making sure not to stitch through both sides of the bag.

See how the casing holes line up? This means your bag can be reversible. (If you don't care about a reversible bag, you only need to make the casing holes on the outer bag.)

Sew the (3) 4" x 42" strips short ends together to make a long strip. Fold the strip in half, wrong sides together, and press. Open the folds and fold and press long edges in to the center fold. 

Fold the long strip in half again and topstitch. Cut stitched strip in half to create 2 pieces.

Attach a safety pin to 1 end of 1 handle. Starting on the left side of the bag, feed through the casing, past the casing hole on the right, and back through so the end comes out on the left side. Feed the other strap in from the right side, passing the left casing hole, and back out the right side. 

Trim strips to desired length and knot on each side. 

Your bag is done! 

Here's the bag with the original lining on the outside as well. 
When you've got 2 fabrics you love, having a reversible option is the best solution!

We couldn't stop with just one bag, so we used these prints and the drawstring pillowcase tutorial featured on the blog last summer (find it here) to make a larger bag/pillowcase option.

From drawstring bag to pillowcase!

The two bags together:

Would you like to win a fat quarter bundle of Benartex or Kanvas fabric? Sign up to follow our blog (via email or Bloglovin'--both in the right hand sidebar) and leave a comment letting us know you did so (or are already following!). For a second entry, like us on Facebook and leave another comment. In your comment, also tell us the most challenging gift you ever wrapped. The giveaway will be open through Thursday, December 12th at 11:59 EST, at which point we'll use a random number generator to select a winner.


See the other Holiday Gift Blog Hop tutorials here:
Day 2: Toddler Purse and Doll Blanket by Jennie from Clover & Violet
Day 3: Beer Coozies and Coasters from the Benartex blog team
Day 4: Mae's Daisy Quilt by Melissa from My Quilt Relish
Day 5: Honey Bee Quilt by Erin from Why Not Sew? 

Looking for more holiday gift ideas? Check out the projects from our Holiday Headstart blog hop back in October:

Day 1: Take Me to Class Tote by Tessa from The Sewing Chick
Day 2: Window Zip Pouch by Emily from Mommy's Nap Time
Day 3: Squared Stripe Pincushion from the Benartex blog design team
Day 4: Bold Braid Quilt by Kelly from My Quilt Infatuation
Love It? Share It! Facebook Twitter Google Pinterest Email

Tuesday, December 3, 2013

Holiday Blog Hop!

We're into December already...how did that happen?! 
Did Black Friday and Cyber Monday leave you feeling shopped out? 
We have just the cure. 

Starting Wednesday, we'll be sharing a week's worth of fantastic tutorials in our Holiday Blog Hop. 


We know December is busy, so we've jokingly named this the "Yes! You really do still have time to sew one more present" blog hop. But really, sewing a handmade gift is so much more satisfying and relaxing than waiting in yet another line at a big box store. (Now if you're shopping for fabric, that's another story.) The beauty of the tutorials we'll be sharing is that while they would make lovely gifts, they're not seasonal, so if December is just too full, you can come back to them in January when life calms down again. 

Here's our line-up:
Wednesday: Benartex blog team
Thursday: Jennie from Clover & Violet
Friday: Benartex blog team
Monday: Melissa from My Fabric Relish 
Tuesday: Erin from Why Not Sew
Wednesday: Wendy from Ivory Spring

Stop by our blog each day to see the featured tutorial and find out how you can win a fat quarter bundle of Benartex fabric.

Love It? Share It! Facebook Twitter Google Pinterest Email

Monday, December 2, 2013

All in the Family: Stitched Together Studios


Is the turkey gone? What about the pumpkin pie? :)
We're still in the holiday weekend mood, so we're sharing another "All in the Family" feature; this time it's Stephanie Sheridan and Linda Leathersich of Stitched Together Studios.


Stephanie
Linda


Can you each talk about how/when you learned to quilt?
Linda: I learned to quilt in the early 1970's when I went to a class with my favorite aunt, Alice Rogers.
Stephanie: I learned to sew from my mom when I was barely tall enough to reach the foot pedal.

When/why did you start quilting together?
We just always have bonded over fabric, so it seemed natural to go into a quilting business together.

Do you each have a strength you play to, or do you take turns designing/piecing/quilting?
While we are both fully capable of start–to–finish quilts, we both prefer our own niche in the partnership.
Linda: My main strength is the machine quilting. I've quilted nearly 5000 quilts on my older model non-stitch regulated Gammill longarm machine.
Stephanie: I prefer the design aspect, and piecing the quilt tops...I have logged almost 3 million stitches on my Bernina 640 in 3 years!

Do you feel you have the same style, or different? How would you describe your style(s)?
We are polar opposites in style ... Linda likes improvisational quilting and her slogan is "Finished is Better than Perfect" while Stephanie plans out the entire quilt before even cutting the first piece of fabric and will re-piece.
One thing that we have in common regard styles is our love for all quilts ... traditional, modern, pieced, appliqué ... we love them all!

How did you come up with your name, Stitched Together Studios? 
Linda's machine quilting business was called "Stitched Together" so when we created our partnership we added the "Studios" to the name because while we live and work 1000 miles apart we are truly "Stitched Together."

Can you describe how you typically work together?
All we can say is ... thank goodness for technology. Between the Internet, unlimited long distance and cell phone cameras we manage quite nicely in spite of the miles between our studios. Usually Stephanie develops a preliminary design, and then together we fine tune it. Stephanie pieces the quilt and Linda quilts and binds it. We apply the same process to our patterns.
Stephanie: It is always fun when Mom comes up with a design concept ... because of her limited techno know-how ... she sketches the idea on graph paper and then uses her cell phone camera to take a picture the sketch and texts it to me to put into EQ7. This works much better than the original plan which was her trying to describe said design to me over the phone! That was a barrel of laughs!

What are the benefits of working together?
Quilting is just another way for us to bond as mother and daughter, and an added benefit is our 3rd generation quilter Charlotte! Hopefully one day she too will be "Stitched Together" with her very own studio!

Can you share some quilts you've made?
We have designed/pieced/quilted close to 200 quilts for Benartex or using Benartex fabrics in the last 3 years so it is hard to pick favorites, but these are some of our most memorable.

Fenestella – This quilt is a favorite because it was the first one that we used the "Cell Phone Picture of a Design Sketch" method of quilt design. We were honored to have it featured in the Quilter's Newsletter June/July 2013 issue. (Read more about it here.)

Cubit – This pattern is our first that we self published ... we adore the "Manhattan Modern" line and had fun creating this modern 3D design using very traditional piecing techniques.


Grape Crush – We both love batiks, and our favorite colors are purple (Stephanie) and turquoise (Linda) ... so this quilt is definitely a favorite! The free pattern is available here!


Ribbon Weave – This quilt was featured on the cover of Keepsake Quilting catalog in the Spring of 2011. It was one of our early designs, using our favorite colors, and Stephanie loved it so much that she modeled her entire studio around it! 


Find out more about Stitched Together Studios here.

Love It? Share It! Facebook Twitter Google Pinterest Email