Tuesday, November 22, 2016

Dreamscape Block Blog Hop: Day 6

Hello, fabric lovers! Is your turkey thawing in the bathtub? :) 

It's the second last day of our Dreamscape Block Blog Hop today. For this blog hop, we selected a six-color palette from our luscious Dreamscape prints to play with: Navy, Cloud, Lime, Grape, Daffodil and Lead. You'll love the variety of blocks our designers have created! And make sure you enter each day's giveaway for a chance to win fat quarters of these six Dreamscape prints! Enjoy!


Today, Debby from Debby Kratovil Quilts is here to tell you what the Dreamscape fabrics said to her. ("Make us into a block, Debby!") 


Here's Debby!
I LOVE bright colors. I can always find something to sew when I have crayon box colors to work with. Having the mottled gray for the background (instead of a flat solid) is a perfect "go with."
Fat quarters of Dreamscape

The fabrics told me to scroll through my files and look for something that would make them look good. After all, this is going to be a 12" block and they were each jockeying for the star position. I told them to hold on and I began looking. I came upon a block I call Striped Star that I designed 10 years ago (and never sewed). It's for paper piecing and is not for beginners, but is certainly doable for those who are familiar with the technique.


I began with cutting oversized patches for the block: 8 squares 4-1/2" x 4-1/2" of the gray/cloud color and 8 strips 1-1/2" x 6" of EACH of the four bright colors (grape, daffodil, navy and lime).
Patches cut for Striped Star Block
Then I printed 4 copies of my foundation (pattern link appears at bottom of this blog post). Notice that I identified where my patches needed to be placed. Also, on the pattern, there are arrows pointing in the direction of how the patches are to be pressed. This will enable the seams to nestle when joined.
Pattern with names of patches written down


The patches MUST be placed so that they angle as shown. Sewn one at a time, pressed and then trimmed.
Building the strips at an angle

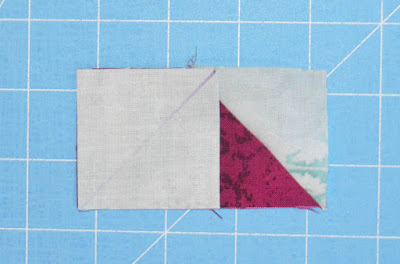
Then trimming before adding one of the two gray triangles:


Fold paper back; use a ruler to leave 1/4" seam

Notice that the edges of the fabrics extend beyond the paper pattern. These will be trimmed later. The gray triangles are also cut oversized. This last triangle is placed first so that you don't mistakenly sew it on the wrong side! Then it gets flipped over and stitched from the paper side.


Adding the last gray triangle

Now what?
Trim fabrics even with the outside line on the paper

 And from the front?
1/4 of the block before removing the paper
Removing the paper? Oh, yeah. That's right! What does that look like?


CAREFULLY remove the paper without disturbing the seams
Place the two units together. Sew with 1/4" seam allowance. Because you pressed the seams in opposing directions, this makes for a very nice join.
Pin at the seams as shown

I prefer to press the seam open in order to reduce the bulk.


Press diagonal seam open to reduce the bulk

Let's see four units together:


Four block units before stitching into the Striped Star Block
 A perfect 12" (finished) block made easy using paper piecing.


Striped Star
You can find the FREE Striped Star pattern (in pdf) here: Striped Star. You can also see more of the fabrics at the Benartex site: Dreamscape.

Thanks, Debby! Head over to Debby's blog for a chance to win a Dreamscape bundle. Contest runs until November 25 and winners will be announced on Tuesday, November 29.


Follow along each day of the hop!
Tuesday 11/15: Chris from made by ChrissieD
Friday 11/18: Kristen from KD-Quilts
Monday 11/21: Benartex blog design team
Wednesday 11/23: Wendy from Ivory Spring
Love It? Share It! Facebook Twitter Google Pinterest Email

Monday, November 21, 2016

Dreamscape Block Blog Hop: Day 5

Hello, fabric lovers! We're continuing to share our Dreamscape Block Blog Hop today. Welcome back to week 2! Today is the fifth day of seven different block tutorials for you featuring our luscious Dreamscape prints. For this blog hop, we selected a six-color palette to play with: Navy, Cloud, Lime, Grape, Daffodil and Lead. You'll love the variety of blocks our designers have created! And make sure you enter each day's giveaway for a chance to win fat quarters of these six Dreamscape prints! Enjoy!


Today, our Benartex blog design team is sharing a block with you--the Twisted Square block. This block is fun on its own, but wait until you see what it looks like in a quilt! After you read through the tutorial, make sure to enter at the end of the post to win a bundle of these six prints.


Cutting:
From the lime:
(1) 6-1/2” square

From the grape:
(4) 2-1/2” squares
(4) 2” squares
(4) 2” x 3-1/2” pieces

From the daffodil:
(4) 2-1/2” squares
(4) 2” squares

From the navy:
(4) 2-1/2” squares
(4) 2” squares

From the cloud:
(4) 2” x 5” pieces
(4) 2” x 3-1/2” pieces
(8) 2” squares

Make the Block:
1. Draw a diagonal line on the wrong side of the (4) 2” grape squares. Place a marked square in each corner of the 6-1/2” lime square, noting orientation of the lines. Stitch on the drawn lines, trim seam allowance to 1/4”, and press open to complete the center block unit. 


2. Draw a diagonal line on the wrong side of (4) daffodil 2-1/2” squares and (2) 2-1/2” navy squares. Pair (2) marked daffodil squares right sides together with unmarked 2-1/2” navy squares. Pair (2) marked daffodil squares and (2) marked navy squares right sides together with 2-1/2” grape squares. Sew 1/4” on either side of the line, cut on the line, and press HST units open. Trim each HST unit to measure 2” square. 


3. Lay out the center block unit, the HST units, and four each daffodil and navy 2” squares as shown. 


4. Sew three HST units and (1) 2” navy square together as shown, noting orientation of the HSTs. Make (2) pieced side units.


5. Sew to the left and right sides of the center block unit. 


6. Sew together three HST units, (1) 2” navy square and (2) 2” daffodil squares together as shown, noting orientation of the HSTs. Make (2) pieced top/bottom units. 


7. Sew the top/bottom units to the top and bottom of the block. 


8. Draw a diagonal line on the wrong side of (8) 2” cloud squares. Lay a marked square right sides together on one end of (1) 2” x 3-1/2” grape piece. Stitch on the drawn line, trim seam allowance to 1/4”, and press open. 


9. Repeat on the opposite end to make a flying geese unit. Make (8).


10. Sew 2” x 3-1/2” cloud pieces to both short ends of a flying geese unit. Make 2. Sew 2” x 5” cloud pieces to both short ends of a flying geese unit. Make 2. 


11. Sew the shorter units to the sides of the block. Sew the remaining units to the top and bottom of the block. 

And you're done!


Here's our quilt design made with the Twisted Square block done in two different background colors (Cloud and Lead). 

And just for fun, here's the design (just four blocks) shown with the colors rearranged:


For a chance to win a bundle of the six Dreamscape prints we used, leave a comment below letting us know that you follow us on at least one of our social media platforms (either right here on the blog--options in the right hand sidebar, FacebookInstagramPinterest), as well as telling us what your Thanksgiving plans are. We'll randomly pick a winner and announce it next week! Giveaway is open through Sunday, November 27th at 11:59 pm EST. 

Follow along each day of the hop!
Tuesday 11/15: Chris from made by ChrissieD
Friday 11/18: Kristen from KD-Quilts
Monday 11/21: Benartex blog design team
Wednesday 11/23: Wendy from Ivory Spring
Love It? Share It! Facebook Twitter Google Pinterest Email

Friday, November 18, 2016

Weekend fun: Charm Quilts!

Here's a little weekend fun for you--charm square inspiration! 

Annie's Quilting recently released "Just Charm Quilts," a 48-page book featuring 11 different projects. Gotta love projects when much of the cutting is already done for you! 
Find the book here.
 One of the projects featured in the book is the Linear Quilt by Nancy Scott, featuring our Sevilla prints by Andrea Komninos. 

Look at all that black, gray and yellow loveliness! 


The back of the book--a peek at some of the other projects inside! Something to add to your Christmas list... 

Click here to find the "Just Charm Quilts" book.

p.s. We'll be back with three more days of the Dreamscape Block Blog Hop on Monday!
Love It? Share It! Facebook Twitter Google Pinterest Email

Dreamscape Block Blog Hop: Day 4

Hello, fabric lovers! We're continuing to share our Dreamscape Block Blog Hop today. It's Friday! ...and the fourth day of seven different block tutorials for you featuring our luscious Dreamscape prints; we'll be featuring a tutorial each day through next Wednesday (we're taking the weekend off!). For this blog hop, we selected a six-color palette to play with: Navy, Cloud, Lime, Grape, Daffodil and Lead. You'll love the variety of blocks our designers have created! And make sure you enter each day's giveaway for a chance to win fat quarters of these six Dreamscape prints! Enjoy!


Today, Kristen from KD-Quilts is here with her twist on a traditional favorite block. You'll love how it shines with these bold colors! After you read through the tutorial, head over to her blog to enter to win a bundle of these six prints. 


Hello, everyone!  I'm very excited to be back here on Benartex's blog to show you an easy 12 inch quilt block using their Dreamscape line.
I wanted a block with larger pieces to showcase these fabrics,  but I also felt they needed something as bright and bold as they are.  I came up with what I am calling Star Flower.  A little twist on a very traditional quilt block.


::Cutting::
(4)3.5 inch light gray background squares
(8) 4.5 inch colored squares (2 of each of four different colors)
(4) 4.5 inch light gray background squares
(4) 3 inch black squares


::Sewing::
This block consists of a few half square triangles.  I like to make all these first.  You need to make 1 set consisting of a background square and one of the colors. Pair together one light gray with one lime, one light gray with one blue, one light gray with one gold, and one light gray with one magenta. (Making one set of half square triangles, with a background square and a color square makes two finished squares). 
You will then be making a half square triangle set with two colored squares. They will need to match up with the layout. Pair together one lime with one blue, and one gold with one magenta. The easiest way to explain this is to show you with a picture. Trim all squares to 3.5 inches.


This is the layout of the half square triangles.  Are you with me so far?  Good!  This layout is a very traditional block and I wanted it to be more Flower-like and more me.
You will be modifying the four units in the middle.  Be sure to note how they lay for this part or else you could be having to make more half square triangles....trust me, I know!
Place a black square on the inner most corner of one of the inside squares.  It will cover both colors.


Now with this part you can make your centers as wonky as you would like by changing the angle of how you lay the black square.
Sew 1/4 inch away from the edge.


Trim the bottom square to 1/4 inch. 

Press the seam.

Recut the square to 3.5 inches--you'll have one black corner now.


Once you have done this for all four inner squares, you are ready to assemble the block. Leave the block laid out next to your machine as to not mix up the order or direction everything should be sewn. All black corners should be pointing to the center.


That's it! I hope you enjoyed this twist on a modern block. Thank you to Benartex for having me take part in the Dreamscape block blog hop. These fabrics were so bright and lovely to work with!
Thanks, Kristen! Head over to her blog to enter for a chance to win a FQ bundle of the six Dreamscape prints you see here. 


Follow along each day of the hop!
Tuesday 11/15: Chris from made by ChrissieD
Friday 11/18: Kristen from KD-Quilts
Monday 11/21: Benartex blog design team
Wednesday 11/23: Wendy from Ivory Spring

Love It? Share It! Facebook Twitter Google Pinterest Email