Pages

Friday, January 30, 2015

Poppy Panache in Print!

Yesterday we showed you Sundance, Ann's newest collection. Today we're showing off Poppy Panache in two different looks from two different magazines. If you missed our feature on Poppy Panache, including a video interview with Ann, click here.

First, Carol Lampe created "Steppin' Stripes" for the winter 2014 issue of Easy Quilts magazine. The focal print of this simple-to-sew quilt is the signature stripe from Poppy Panache.
"Steppin' Stripes" by Carol Lampe; machine quilted by Ann Lauer;
featured in Fons & Porter's Easy Quilts winter 2014
Ann talks about the stripe:
The stripe was one of the highlights of that collection--it goes from narrow to wide, with poppy bouquets on it splashed over the entire thing. Depending on where you cut it, you either see a lot of the white part in there, or mostly stripe, narrow or wide. It gives the whole quilt nice variety from just cutting out one fabric.

Carol talks about the Steppin' Stripes quilt:
How did you come up with this design?
I wanted to use the stripe somewhere besides a border. It's so dramatic, with the wide and narrow bands, that even without fussy-cutting it, you et so much variety in the block just from one piece. Ann and I wanted to keep the block simple so the beautiful stripe would be the show. I started twisting the block in Electric Quilt, trying out different things. Using the darkest black coordinate in the block made the steps (and gave us the name for the quilt!).

What do you like about the fabric?
The whole line is so gorgeous—so much fun to work with. Ann is very talented, and such a nature lover that she sees details that some of the rest of us don't, and I feel that shows up in the fabric. When this stripe fabric arrived at my house, I couldn't sleep, I was so excited. I had to get started on it right away. It was so gorgeous, so much prettier in person. 


How did you choose the red for the border?
I auditioned some other prints and the minute I put the red on it, it was perfect. It brought out the red in those poppies. I wanted a wide enough border so you can really see that pop of red.


Click here to see the Poppy Panache collection.
Click here to learn more about Ann and find the kit for Steppin' Stripes.
Click here to find Easy Quilts.


****************************************************************
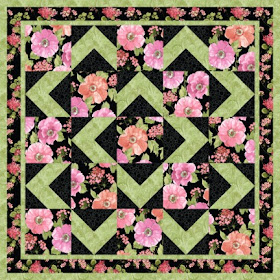
Ann designed this stunner, "Poppies in Bloom," for the December 2014 issue of American Patchwork & Quilting. The wall hanging features fussy-cut poppy blocks with triangular "surrounds" that create a circular look.
"Poppies in Bloom" by Ann Lauer
N
OTE:This pattern and material is used with the permission of APQ Magazine, December 2014, 

Meredith Corporation. ALL RIGHTS RESERVED.


Tell us about the design.
I've used a half rectangle tool to create the triangles to surround the poppy blocks, which has a circular effect from a distance. Putting the surround (the triangles) in a light print adds to the circular effect, and then the black around the blocks is so dramatic. The blocks show off the large poppy print. I also used the same triangle technique in the border.

And what about your fabric choices?
The poppy fussy cuts so well—there are opportunities to fussy cut one, two or three poppies. I just love the black tonal. It has a variety of gray circles in it—enough of a contrast to show off nicely without being too busy. I used red and green prints, but you could choose different coordinates for less of a Christmas feel.


What's your favorite thing about this quilt?
There's a lot of design packed into a small quilt. I really like the circular look created with the poppy impact in the middle.


Click here to see the Poppy Panache collection.
Click here to learn more about Ann and find the kit for Poppies in Bloom.
Click here to find American Patchwork & Quilting magazine.


Thursday, January 29, 2015

Sundance

If you liked Ann Lauer's first collection, Poppy Panache, you're in for a treat. Because she's back with another line, Sundance! Sundance stands on its own--a beautiful collection of poppies, geraniums, and more--but if it has a familiar feel, that's because Ann designed the line to coordinate with Poppy Panche, both in color and style. We asked Ann to introduce us to the Sundance prints and share some designs featuring these spring-like watercolor florals.


Tell us about Sundance.
The prints and colors in the collection all work with Poppy Panache. I wanted to have a second collection that would continue the same theme as Poppy Panache but give fresh new images and colors as well. We've done poppies again, but larger, and also added geraniums. The geranium is with the poppy, but it's also a medium-scale design on its own.


The field of flowers print is also medium scale. It's a little different direction from Poppy Panache--a field of flowers rather than bouquets, so it can be cut anywhere rather than trying to center bouquets.


The colors are so summery, so pretty.
We're looking at pinks and light orange, a reddish-orange with the geranimums. We've also added yellow. The large poppy is on a real light yellow, which creates a kind of a spring coloring. The style is true watercolor. The designs are painted on fabric with watercolor to start. I like the watercolor look—it's my style.

Why geraniums?
They're small, and a different shape than poppies, and I really like the clump look. Color-wise, I like that it bridges a touch of yellow with the pinks. In the large print, quilters can fussy cut it into all different size of blocks without worrying about fussy cutting and waste to get bouquets. You can almost cut anwyere and get some poppy and some geranium. In smaller blocks, the print gives you a Georgia O'Keefe feeling—with the watercolor feel and detail in such a large image. Plus it makes gorgeous backings. 


Do you have a favorite print?
I really ike the diagonal stripe. I drew every single line of it on the computer and played with the scale. Because it's printed on the the diagonal, there are so many fun opportunities to use it—for borders, for blocks, for bindings—and still have the outside edges on the straight of grain.

I do love the marble look—a real pretty hand marbled tonal coordinate in seven colors. I didn't add a whole lot of new coordinates because all of the ones from Poppy Panache work here as well.

I'm also really happy with the large poppy and the field flowers. That large poppy print is showy as heck, and it works really well in some of our popular patterns that call for big prints. I've also used it in bargello quilts, and it adds a huge amount of movement.


Ready for some quilt inspiration for Sundance? 
These first two can be downloaded from our website.

"A Secret Garden" (quilt and runner) by Tailormade by Design

Star Dance by Ann Lauer


And here are a few of Ann's patterns, available through her website, Grizzly Gulch Gallery, featuring Sundance. Find the patterns for these quilts, as well as kits, here.

"Free Fall" by Ann Lauer

"Imagine This" by Ann Lauer

Morning Melody by Ann Lauer

Turn About by Ann Lauer

"Walkabout" by Ann Lauer

Click here to see the entire Sundance collection, and here to see Ann's previous collection, Poppy Panache.
Click here to find the free patterns made using Sundance.
Click here to learn more about Ann and find her patterns and kits featuring both Poppy Panache and Sundance.

Tuesday, January 27, 2015

We {Love} Vintage!

The definition of "vintage" may change slightly over the years, but the concept will never go out of style! 

Our definition of vintage? The new French Quarter collection. Vintage florals combine with soft butterflies and parchment-style paper in fabrics with a layered scrapbook look and a French feel. The color palette is soft and soothing--muted teals, a soft coral and aged beiges--so pretty and so home dec-inspired! Cozy up under a quilt made out of this collection and imagine yourself on a balcony in New Orleans or a cafe in Paris.


Because the beauty is in the details...take a closer look at these prints:


Here's a quilt pattern (shown in two colorways) to get you started:

"Jackson Square" by Stitched Together Studios
Click here to download the free pdf pattern

Click here to see the entire French Quarter collection.
Click here to download the free Jackson Square quilt pattern.

Monday, January 26, 2015

Novelty Prints Blog Hop: Day 5

Start out your Monday here! This blog hop is all about novelty prints from Kanvas--fun designs that make you smile--and our talented designing friends are offering up great ideas for using them! Use the links at the bottom of this post in case you missed one of the earlier tutorials.


Today Debby from Debby Kratovil Quilts is here, with a salute to local heroes. See how she has used the Firefighters Rock and Boys in Blue collections from Kanvas to make some adorable accessories for her grandsons. Enjoy the tutorial, and then scroll to the bottom of the post to see how you can win a fat quarter bundle of these local hero prints.


I have two little grandsons who are into ACTION! They don't play with stuffed toys or little blankets and quilts. They just run through the house pretending to be super heroes. Firemen and policemen are superheroes, right?
Let's hear it for our local fire fighters! Firefighters Rock Collection

My grandsons LOVE policemen. Boys in Blue Collection 


I made two things for them using these prints. One I'll share with you as show and tell, and the second I'll show you how to make yoursel. The first thing I made was a karate robe for each of them (2 and 4 years old). I used a commercial pattern by McCall's which also includes pajamas. Let me say, they don't make patterns the way they used to! I had to remake the neck interfacing 3 times, with the last time making my own pattern! I wasted a lot of fabric!

First robe with reworked neck facing; for Miles (4)
 Easy to make the second robe after I "learned" on the first one
Firemen fabric robe for Matteo (2)
 Now for the tutorial I can share using a free pattern I found on the Internet. I made them vests using the Vest Pattern by Marzipan.

Two easy pieces; I decided to line the vest
I chose the fingerprint fabric for the lining. This vest is for Miles.

Cut out the lining using the same pattern pieces; back is cut on the fold
 Here are the pieces cut out:

Outside and lining pieces ready to be sewn together
Since it had been a REALLY LONG TIME since I sewed garments like this, I had to do some research for making a lined vest without any raw edges showing. This is what I found:

1.  Join the front pieces to the back piece, at the shoulders, for both the outside and lining parts.
2. Press shoulder seams open.
3. Sew the lining piece and outside piece together along the armholes (see below)

Sew the lining and outside pieces together at the armholes
 4. Now this is where I got real excited, because I couldn't believe this would really result in no raw edges showing! Sew the lining and outside pieces together from the bottom of one front edge, around the neck, and then back down to the other front edge bottom.

Sew the front and neck edges from the inside
 5. Now it gets a little tricky, but it's doable. Turn the whole vest right side out. It's time to sew the side seams (yes, that's right, and we won't have any raw edges showing, I promise).

Vest ready for side seams to be sewn
6. I don't have a picture for this, but this is what I did: open up the sides and pin the main print sides together (right sides together). Stitch. Sew the lining pieces together, right side of fabric together. You can open the vest up from the bottom and press those seams (it's a bit awkward, but it will work).

 7. This is what the vest looks like after the sides are sewn:

The entire bottom of the vest is open for the next step
8. Last seam: turn the vest inside out and stitch the long bottom opening closed, leaving about 4-6" open in order to turn.
Last seam with opening
9. Turn vest right side out; stitch opening closed (I used my sewing machine)


Police vest for Miles with NO raw edges showing
And what about the firemen fabric? I didn't have enough and had to improvise with more of the fingerprint fabric? Pretty clever, huh? And I added big patch pockets

Firemen vest for Matteo
The Vest Pattern by Marzipan is a free download and fits size 2-4T.

What's a boy to do wearing a police vest if he doesn't have handcuffs and badges?

Dollar store finds; I had enough fabric to make a pillowcase
These handcuffs have a safety spring. I gave the keys to the "Sheriff" (my daughter). The boys had a great time locking all the family members us with these things!

Gotta have handcuffs!

And one more pillowcase!

Little boys like action toys and these two collections fit the bill.

Thanks, Debby, for all the inspiration for using these the Firefighters Rock and Boys in Blue collections! Head over to Debby's blog to learn more about her work and find out how to enter to win a fat quarter bundle of the fabrics she used. 


Don't miss our other novelty print tutorials!
Day 1: Reverse applique pillow by Lisa from Stubbornly Crafty
Day 2: Boxy make-up bags by Jennie from Clover & Violet
Day 3: Drawstring camera bag by the Benartex blog design team
Day 4: Pillow organizer by Wendy Sheppard from Ivory Spring


Friday, January 23, 2015

Novelty Prints Blog Hop: Day 4

Happy Friday! This blog hop is all about novelty prints from Kanvas--fun designs that make you smile--and our talented designing friends are offering up great ideas for using them! Be sure to stop back Monday for one last novelty print tutorial, and see the links at the bottom of this post in case you missed one of the earlier tutorials.


Today Wendy from Ivory Spring is here, using the whimsical Leap Frog prints to make a pillow storage project. This handy design will help reduce random clutter in the car; the bonus is that it's made from such cute fabrics that it's useful and fun to look at! Enjoy the tutorial, and then scroll to the bottom of the post to see how you can win a fat quarter bundle of the Leap Frog prints.

Hello Benartex fans, it's good to see you here again!  I am Wendy from Ivory Spring, and it is fun to be able to share a quick project with you again.
Today, I am sharing with you a pillow storage project that is easily customized for your needs.  You all have seen pocket storage system like this to store things on the road or just things in general.  They work great!

However I find that sometimes it is hard for a child to transfer the storage system from one place to another without spilling out the contents (like markers etc) with the strictly pocket system.  I know my daughter has done her share of spilling!   So, I came up with the idea of using the pillow form to sort of provide a "snug" fit for the stuff she is storing in the pockets.

***
This project is easily customized for your own needs.  All you need is fabric and a piece of hanging ribbon to length.  For this tutorial, I am using a 12" x 16" pillow form.  SO... from these fabrics 

You will need to cut:
3 (12 1/2" x 16 1/2") rectangles (focal print)
1 (6 1/2" x 16 1/2") rectangle (blue fly print)
4 (4 1/2" x 6 1/2") rectangles (blue fly, orange fly, light lily pad, dark lily pad prints)

***
Let's get sewing, shall we?
1.  Sew the 4 (4 1/2" x 6 1/2") rectangles into a row.  Add 1 (6 1/2" x 16 1/2") blue fly rectangle to the top of pieced row.  

2.  Press seam open.  And matching wrong sides together, fold and press so that on one side, you have the pieced row, and the blue fly rectangle.

3.  Place the unit made in step 2 on 1 (12 1/2" x 16 1/2"), right sides together, with the blue fly rectangle facing downward.  Pin to hold the fabric layers in place.

4.  Sew along the seams of the pieced rows to make pockets.  You may sew along all the seams to make 4 pockets.  I only made 3 pockets for mine because I needed 1 larger pocket.


5.  You now have the completed pillow front assembly.

6.  Tack hanging ribbon in place on pillow front.

7.  Completing pillow.  You may use method of choice to complete your pillowcase.  
a.  Place pillow top wrong side down.  Then lay the pillow backing rectangles (two 12 1/2" x 16 1/2" rectangles) on pillow top, right sides together.  Adjust the pillow backing rectangles accordingly, and trim off any excess from the 12" x 16” area that is not covering the pillow top.

b.  Pin and stitch the pieces together.  

c.  Trim around the corners.  Finish by zig-zagging the seam allowance to reduce the bulk of all the pieces stitched together.

d.  Turn the pillowcase right side out.  Press and insert pillow form.

8.   I used mine as a stitching pillow/pseudo-purse for my daughter as she likes to have a pillow to rest her little hands while she stitches.  The big pocket holds her hooped piece.  The rest holds her notions etc.  Even turned upside down, the pillow form holds the pillow contents nicely... we no longer have spillage problem!  


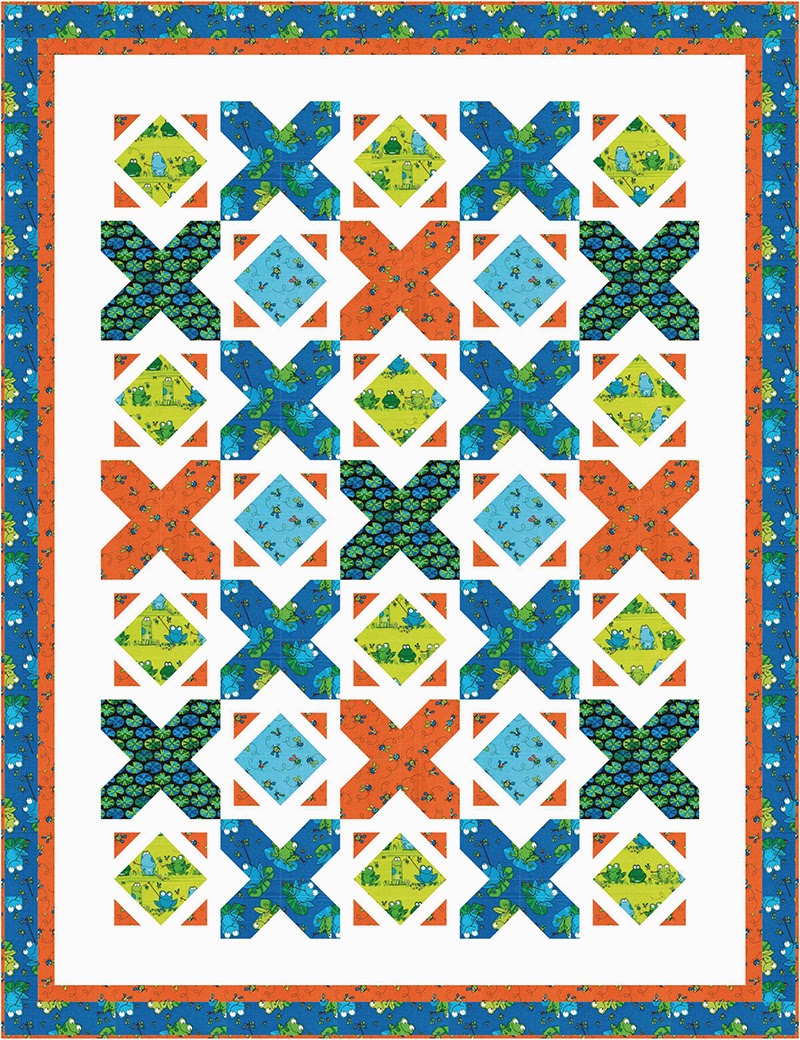
I hope you have enjoyed seeing how the Leap Frog fabrics are used in this tutorial.  Have you seen my Hoppity Hop quilt featured in Fons & Porter's Easy Quilts (Winter 2014), as well as the free-to-use downloadable design In The Pond?

"Hoppity Hop" by Wendy Sheppard; featured in Easy Quilts winter 2014


"In the Pond" by Wendy Sheppard; free pattern download

Thanks Wendy!
Head over to Wendy's blog to learn more about her work and these designs featuring the Leap Frog fabrics. For a chance to win a fat quarter bundle of Leap Frogsign up to follow our blog either by email or through a blog reader (see both options in the right hand sidebar) or follow us on Facebook. Leave a comment letting us know that you follow, and let us know--do you sew in the car? The giveaway is open through Wednesday, January 28 at 11:59 pm EST.


Don't miss our other novelty print tutorials!
Day 1: Reverse applique pillow by Lisa from Stubbornly Crafty
Day 2: Boxy make-up bags by Jennie from Clover & Violet
Day 3: Drawstring camera bag by the Benartex blog design team
Day 5: Children's vests by Debby from Debby Kratovil Quilts