It's Day 1 of our Holiday Headstart Blog Hop, chock full of gift ideas you can sew for a friend for the holidays! Today Tessa from The Sewing Chick is here, sharing how she transformed the border print from the Cachet collection into a traveling sewing tote. Enjoy Tessa's tutorial, and then head over to her blog to check out her beautiful work and find out how you can enter to win a fat quarter bundle.
Hello everyone! My name is Tessa Walker and I blog at TheSewingChick.blogspot.com. My friends and I often take sewing classes together or meet at each other's homes for some girlfriend sewing time. It always seems we are walking in the door dropping rulers and cutting mats so I designed a zippered tote that accommodates a 12 x 18 mat and has enough pockets to hold a wide assortment of rulers. I am delighted to share the tutorial with you today.
- 4 Fat quarters for front, back, and linings (or half a yard off the bolt for each) If using a border print as I did, you will need 1-1/4 yards)
- 3 Fat quarters for inside pockets (or 1/2 yds off the bolt of two fabrics)
- 1 Fat quarter for straps (or 1/4 yard off the bolt)
- 1 yd. Fusible Fleece 1 yard mid-weight fusible interfacing, such as Pellon 911FF Nylon Upholstery Zipper, at least 48" (NOT metal or plastic) I purchased one 72" at JoAnn Fabrics, in the upholstery notions section
- Basic sewing supplies: pins, rotary cutter, long ruler and mat, thread, marking pen
ALL SEAM ALLOWANCES ARE 1/2" UNLESS NOTED OTHERWISE.
With a rotary cutter, ruler and mat, cut:
Fabric:
2 pieces 15" x 21" for outside
2 pieces 15" x 21" for lining
2 pieces 18" x 21" for large inside pockets
1 piece 11" x 21" for small inside pocket
2 strips 4" x 31" for straps (if using fat quarters, you will need to piece two shorter strips)
2" x 3" scrap for zipper tab
Interfacing:
2 pieces 8 1/2" x 20"
1 piece 5" x 20"
2 strips 2" x 30"
Fusible fleece:
2 pieces 14" x 20"
Stack the outside pieces and the lining pieces and gently round the upper corners (not the bottom ones). I use a spool of thread to mark the curves and cut with scissors.
Following manufacturer's directions, fuse a piece of fusible fleece to the wrong side of each of the two outside pieces. There should be a 1/2" seam allowance around the outside edge.
Make inside pockets. With each of the inside pocket pieces, fold in half along the 21" side and press. Open up and align the edge of a piece of fusible interfacing with the fold line. Fuse in place.
Refold the pieces in half and press. Top stitch 1/4" from the folded edge.
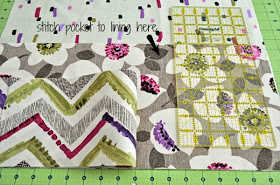
Then stack the pocket on top of a lining piece, matching bottom raw edges. To create a divided large pocket, fold back the smaller pocket, mark a line 7-1/2" from the edge and stitch the large pocket to the lining. I wanted to accommodate a 12-1/2" ruler but you may choose to make your pockets any size.
With right sides together, sew the two lining/pocket pieces together along the lower edge.
This is a bulky seam. to keep it laying flat, press well with the seam open and top stitch 1/4" on both sides of the seam.
Repeat step three for the two outside pieces of the tote.
Make straps. Fold the two 4" x 31" strips in half lengthwise and press. Open up and then fold the long raw edges to meet the center fold line. Press well.
Open up and place a 2" wide by 30" strip of interfacing between the two outer fold lines and 1/2" from each end. Fuse according to the manufacturer's directions.
Time to attach the zipper. I promise it will be easy! You basically just sandwich it between the tote and lining layers. First, let's make a cute zipper tab. With the 2" x 3" scrap, fold in the 3" edges 1/2" and press. Then fold in one 2" edge and press. Zipper tape widths can vary, so test to see that it will completely cover the tape and adjust if necessary. Then trim off the closed end of the zipper to remove the metal tab.
With the right side of the tab and the right side of the zipper together, line up the raw edges and stitch. Go slowly over the zipper teeth. I like to take my foot off the pedal and use the hand wheel for this.
Press seam toward the cut end and fold tab in half so that the folded edge meets the stitching line. Pin and stitch around the edge to secure.
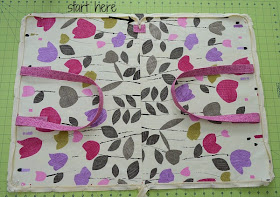
Open the zipper. Place the outside of the tote right side up on a flat surface. Beginning with the closed end of the zipper at the tote bottom seam line and with right sides together, pin the zipper around the edge of the tote. Fold the straps in and out of the way.
Make several small snips at the corners to help the zipper make a nice curve.
This is how the open ends of the zipper should look. Trim the ends of the zipper to extend 2" - 3" beyond the stitching.
Using a zipper foot, stitch all the way around the edge. Again, zipper tape widths can vary, but you want to stitch about 1/4" away from the zipper teeth. Continue the stitching straight across the teeth at the open and closed ends of the zippers. Go carefully!!
Place the lining panel and the outside panel right sides together. Pin well. Start at the center where the seams line up, then pin the corners and lastly along the edges. With the outside panel facing up, stitch through all layers on top of the previous stitching. Leave an opening about 8 - 10" for turning.
At the curved corners, make several notches in the seam allowances, being sure not to cut through the stitching.
Reach through the opening and turn right side out.
Press well.
Slip stitch the opening closed.
For a nice finish, top stitch 1/4" from the zipper tape all the way around.
Zip it up and you are done!!
Fill it up with your favorite rulers and take it to class, a friend's house or a sewing retreat! I love that it lays flat - you can take the cutting mat out of the pocket and use it right on top of the open tote, keeping all your rulers handy!
Don't miss the other tutorials featured in our Holiday Headstart blog hop:
Day 2: Window Zip Pouch by Emily from Mommy's Nap Time
Day 3: Squared Stripe Pincushion from the Benartex blog design team
Day 4: Bold Braid Quilt by Kelly from My Quilt Infatuation


Thanks for a fabulous tutorial Tessa - I love the fabrics you used!
ReplyDeleteBeautiful bag and great tuto.Love your fabrics combo!
ReplyDeleteTessa, thank you for the great tutorial! I love that you put in a zipper.
ReplyDeleteTessa just love the tutorial! I really like the zipper around the outside -- how nice is that for getting your mats and rulers in and out! I can't wait to try this.
ReplyDeleteKaren on Keuka
Great tutorial it will make a great gift. Maybe make two one to give and one to keep.
ReplyDeleteWhat a cooool Tote!! Great Tutorial...easy to understand...love pictures showing the steps too! :)
ReplyDeleteWhat beautiful fabric for this tote! Thanks for sharing.
ReplyDeleteThanks--I've been needing a better way to carry my mat to classes!
ReplyDeleteThank you so much for featuring my tutorial. The gorgeous fabrics were a joy to work with!!
ReplyDeleteThanks for the tutorial. What fun it would be to carry something so beautiful to a class. Thanks again.
ReplyDeleteThank you so much for this great tutorial for the perfect solution to making our tools travel so much easier. Wonderful instruction and pictures. And that fabric is so pretty too.
ReplyDeleteI have just read through your tutorial, and it is straight-forward - the photos are excellent, and I'm excited to install a zipper as you show, going around curves! As a calligrapher, this bag will do double-duty, carrying artwork to and fro as well as quilting supplies when I attend a sew-in! Thanks a bunch!
ReplyDeleteThanks, this is great!
ReplyDeleteThat's so cool, love the fabrics and the simplicity of something so very useful....
ReplyDeleteI would love to make myself one of these bags, but the zipper scares me.
ReplyDeleteI made one of these, and they are awesome! I used velcro instead of the zipper!
ReplyDeleteGreat Tutorial!! I want to make one. I am a new follower. Glad I found you!
ReplyDeleteTHANKS FOR A GREAT TUTORIAL!
ReplyDeleteHAPPY STITCHING!
msstitcher1948@yahoo.com
Just finished this wonderful bag. Great instructions. Went together beautifully.
ReplyDeleteI really like this - thank you for this great tutorial, I will be trying this soon. ☺
ReplyDeleteI love the tote and love how it folds down flat but I have a question? I travel a lot and need to take my small iron, an extension cord, and my small ironing mat. Can you think of a way to add some kind of pocket to carry these in. I hate having to carry half a dozen bags with me.Lol. and I agree with some of the other ladies, the zipper scares me. Lol. I have seen a few ones similar to what I need but they are usually either to large. To small, and way to many pockets.They are by a pattern you pay for and they look way above my talents as a seamstress. Lol
ReplyDelete