Friday, May 31, 2013

May Blog Hop: Day 4

It's the last day of May and the last day of our May blog hop! I don't know about you, but this week sure passed quickly! Katie Blakesley from Swim, Bike, Quilt is here today, sharing her {reversible} Summer Tote tutorial, made with prints from The Big Apple collection. Have you visited Katie's blog? She has some stunning modern designs and spearheads an online effort to donate quilts to children. (Plus, she's giving away a fat quarter bundle of The Big Apple in conjunction with this tutorial!) 


My name is Katie Blakesley (Swim, Bike, Quilt) and I love to sew and spend lots of time in the great outdoors.  Each year, I host a charity quilt drive (where quilters donate quilts in their own communities) called 100 Quilts for Kids. This year, the online event will be held from July 1- September 30--I would love to have you join me! I am also thrilled to share that my first book Vintage Quilt Revival: 22 Modern Designs from Classic Blocks (co-authored with Faith Jones and Lee Heinrich) will be published later this year.
Moving to Wordpress


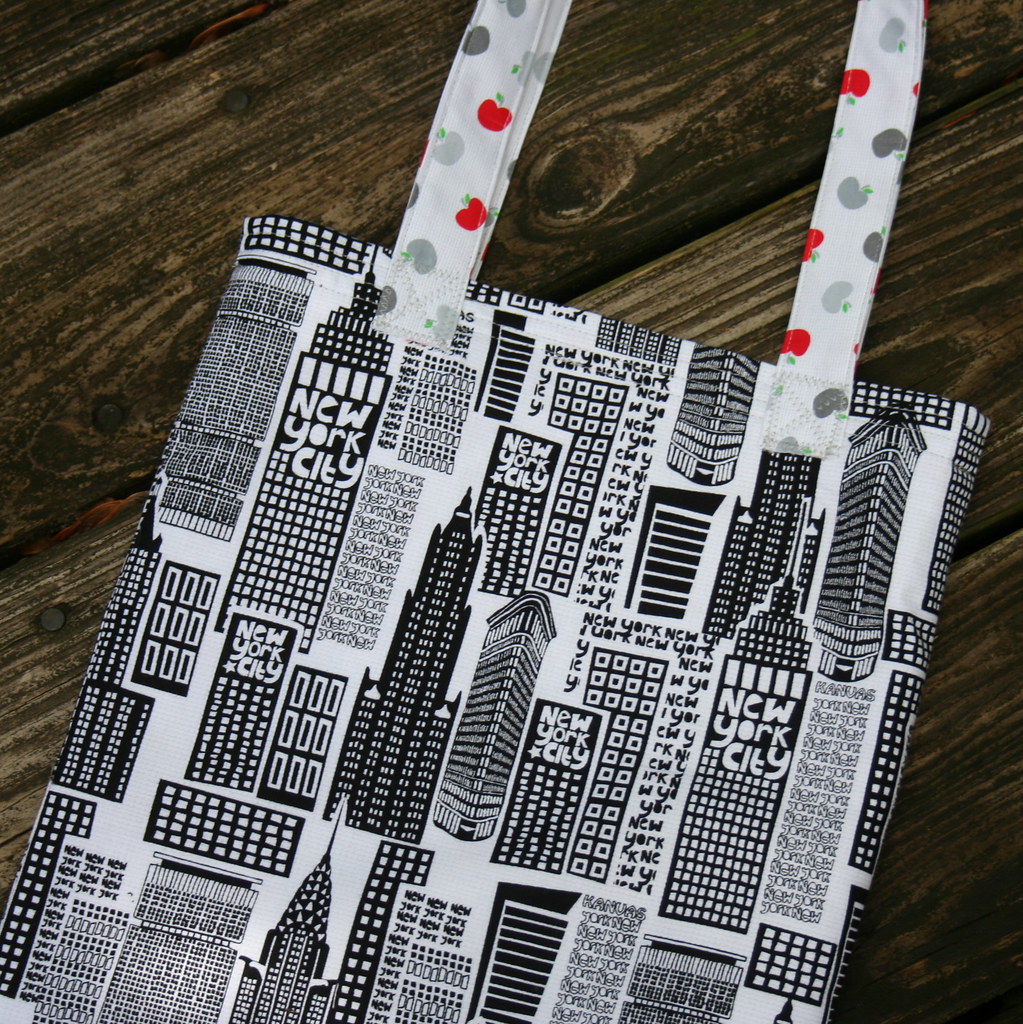
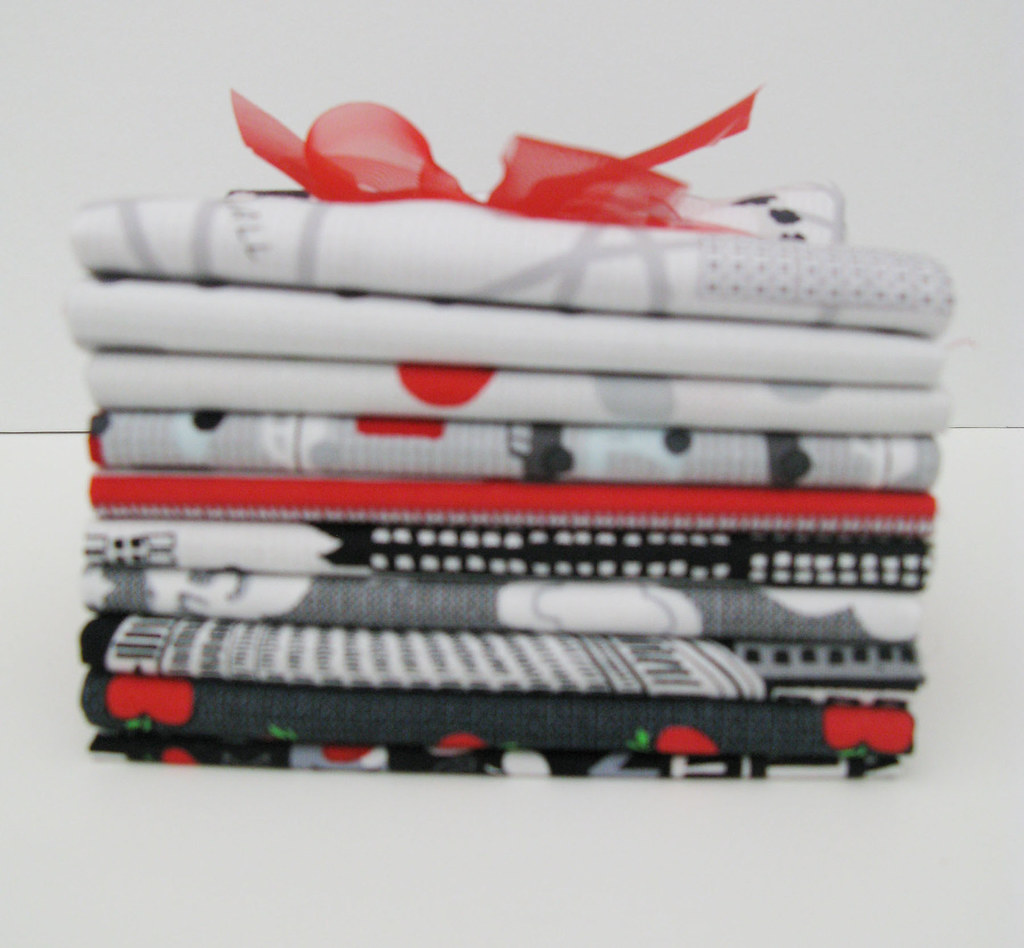
I am excited to share this {reversible} Summer Tote tutorial with you today.  I made several versions of this simple, versatile tote out of The Big Apple, a new fabric line by Greta Lynn for Kanvas Studios. The Big Apple is my favorite Benartex line--I thought it was fun for adults and kids alike. Who doesn't love New York City?  I wanted to make a few tote bags that would be perfect for summer--lightweight, casual, able to hold lots of library books (tested by my 6 year old), and reversible.


reversiblesummertote_tutorial_swimbikequilt_bag


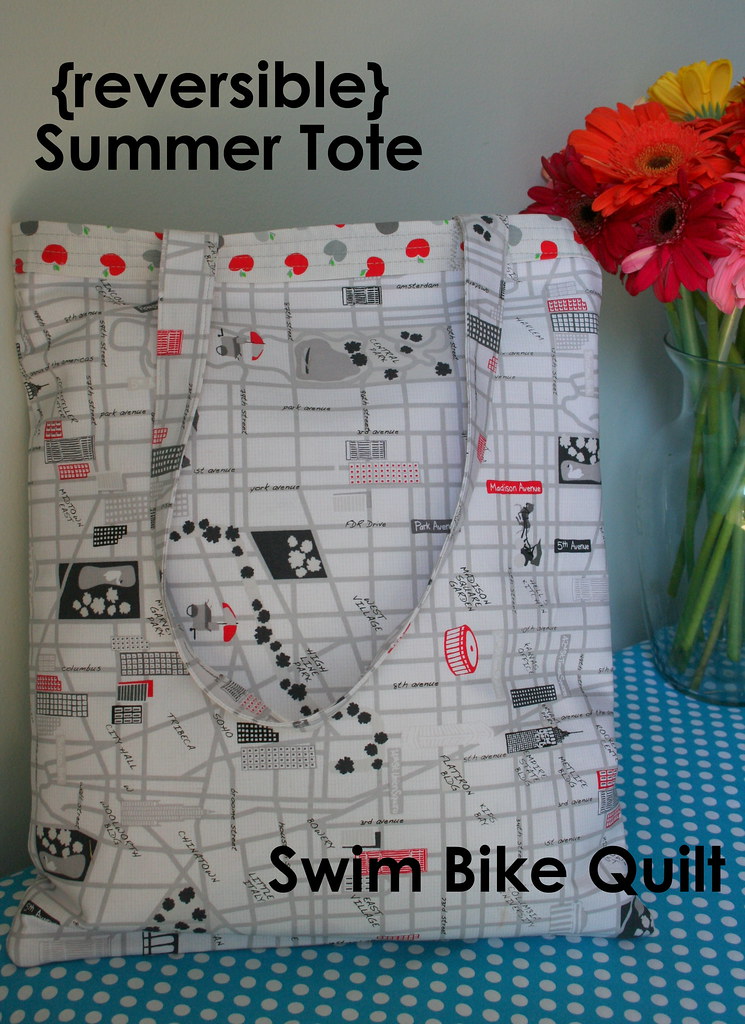
Note: All seams are 1/2'' and if you are using directional fabric, please pay attention when cutting. Finished bag measures approximately 14'' (w) x 16'' (h).

Materials:

1 yard feature fabric
1 yard fusible interfacing (I chose a lightweight Pellon)
1/2 yard lining fabric

Cutting Directions:

Feature Fabric:
(2) 15'' x 17.5'' rectangles
(2) 3'' x 26'' strips
(1) 7'' x 10'' rectangle for each optional inside pocket

Fusible Interfacing:
(2) 15'' x 17.5'' rectangles
(2) 2.5'' x 26'' strips
(1) 7'' x 10'' rectangle for each optional inside pocket

Lining Fabric:
(2) 15'' x 16.5'' rectangles

Assembly Directions:

Fuse Interfacing to Fabric

1. Cut all fabric according to measurements above. If you are using a directional fabric (such as the map fabric in this tote) pay attention to fabric direction and placement.


2. Follow the manufacturer's instructions to fuse the (2) 15'' x 17.5'' rectangles to the (2) feature fabric rectangles. Also fuse the 7'' x 10'' interfacing to the 7'' x 10'' feature fabric for each (optional) pocket.  Note: This is the perfect size for a smart phone and a set of keys; vary the size and number of pockets if you wish.

Make the Handles

3. Center the (2) 2.5'' x 26'' pieces of interfacing (fusible side down) on the wrong side of the (2) 3'' x 26'' feature fabric strips. Turn them over carefully, and fuse according to the manufacturers directions.

4. Place one 3'' x 26'' strip of feature fabric wrong side up, fold over one edge 1/4'' and press; repeat with the other side.


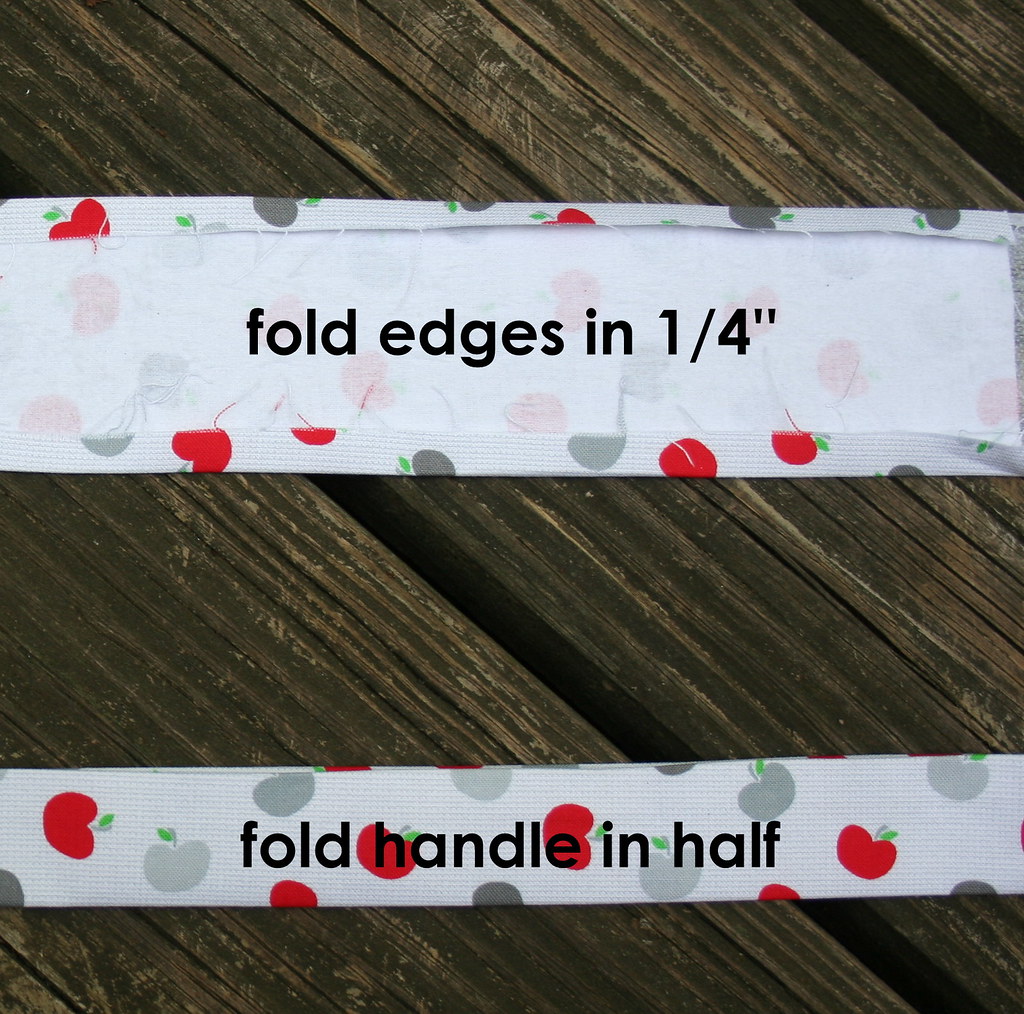
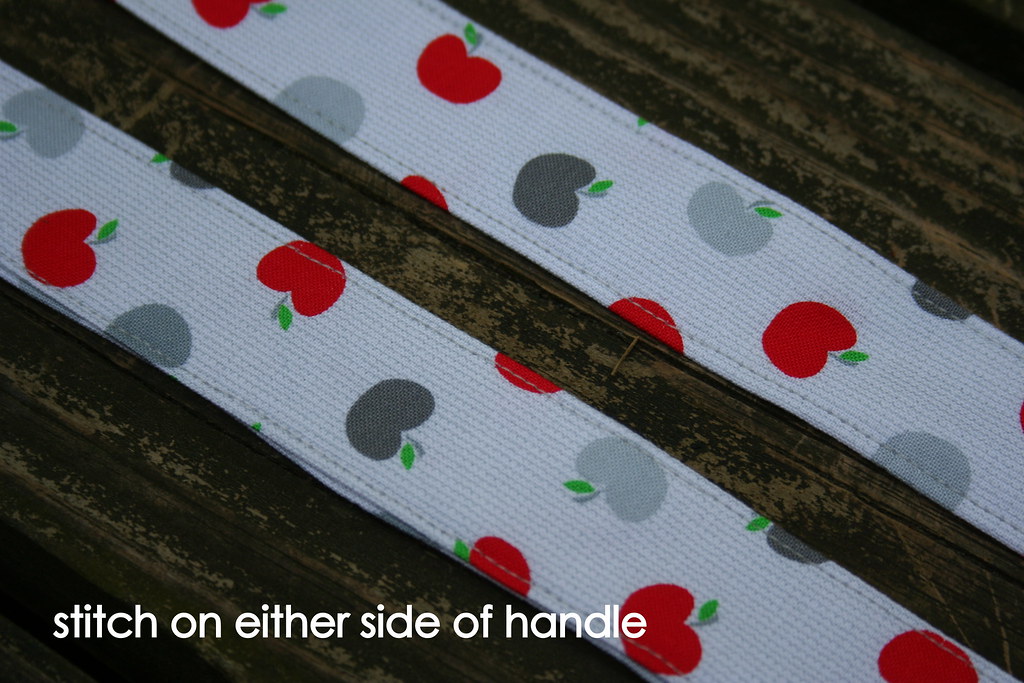
5. Fold the strip in half (wrong sides together), pin if desired, and first stitch along the "raw" edge of the strip, close to the edge.  Stitch along the folded edge of the strip.


6. Repeat steps 4 and 5 for the other strip. Measure the two strips against each other, and trim if necessary, so they are the same size. Set aside the finished tote handles.

Make the (optional) pocket)

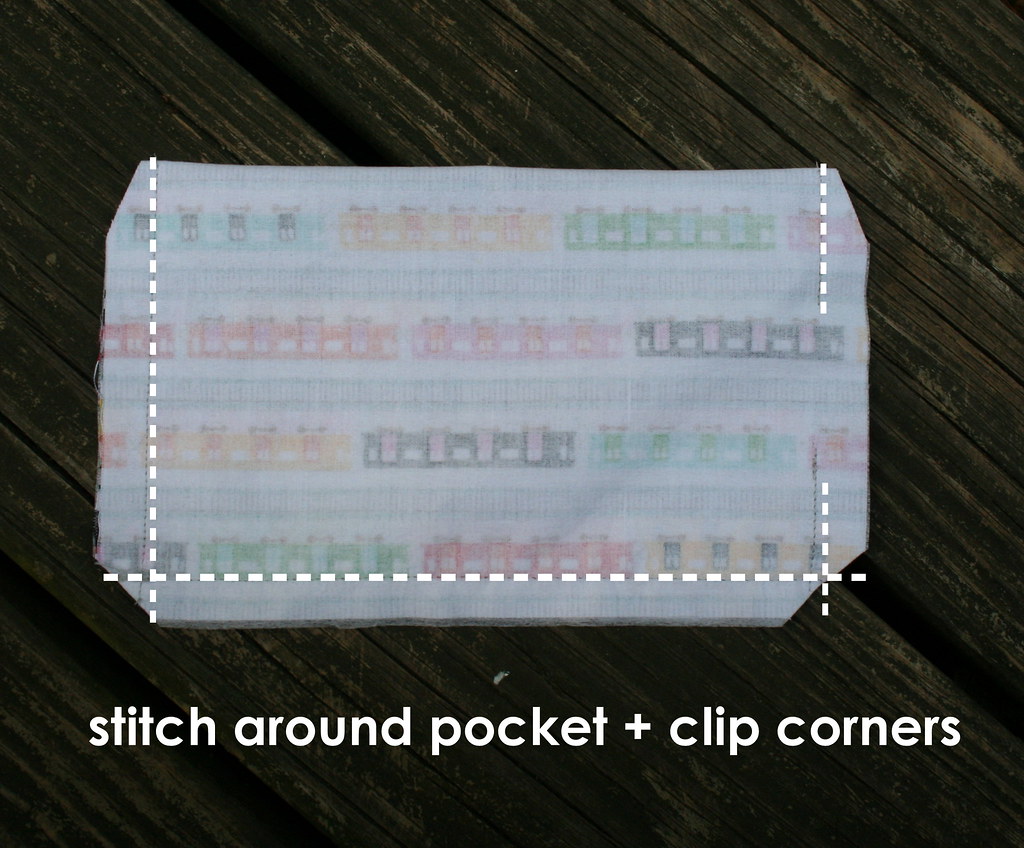
7.   Fold the 7'' x 10'' fused fabric, right sides together. Stitch a 1/2'' seam along the bottom and one side of the pocket (remember to backstitch on each end). On the remaining side, stitch a 1/2'' seam for about an inch and back space. Leave a 2.5'' opening, and then stitch the rest of the seam closed. Trim the corners as shown.


{reversible} Summer Tote Tutorial
8. Turn the pocket right side out; use a point turner or a chopstick to press out the corners and make them crisp. Press the pocket open and top stitch along the top (folded side) of the pocket and set aside until step 13.

Assemble the Tote 

9.  Place the two outer pieces right sides together. Pin if desired, sew a 1/2'' seam along the bottom (backstitch at the ends), and press.

10. Sew a 1/2'' seam on both sides of the tote, backstitching at the top and bottom. Trim the corners as shown in step 7. Press seams as desired (I pressed the seam towards the front of the tote).

11. Turn the tote inside out. Use a chopstick or point turner to press out the corners and make them crisp. Press the outside of the tote.

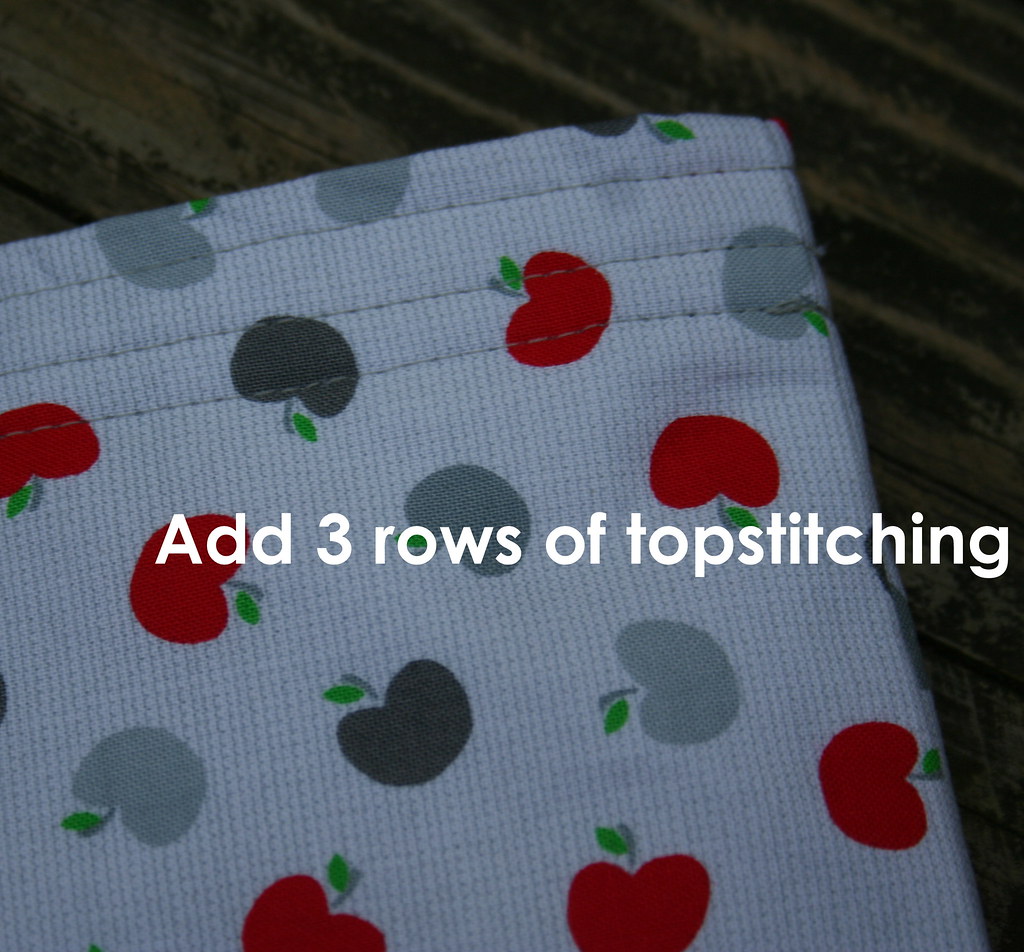
12. Place the outer shell on your ironing board, and carefully fold the top of the tote towards you 1/2''; press. Then, fold it an additional 1'' and press.


{reversible} Summer Tote Tutorial


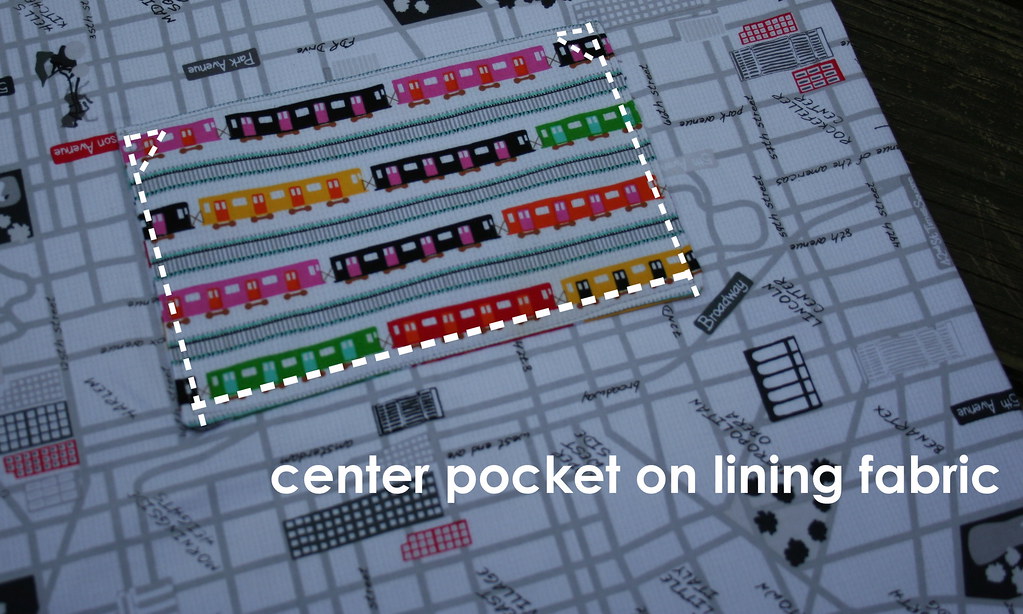
13. Center the pocket on one of the lining pieces (about 3'' from the top). Stitch around the 3 edges of pocket; I usually stitch a little triangle at the top of both sides of the pocket to reinforce the pocket.


14. Place the two lining pieces right sides together. Pin if desired, sew a 1/2'' seam along the bottom (backstitch at the ends), and press.

15. Sew a 1/2'' seam on both sides of the tote, backstitching at the top and bottom. Press seams as desired (I pressed the seams towards the back of the tote). Do not turn the lining right side out.

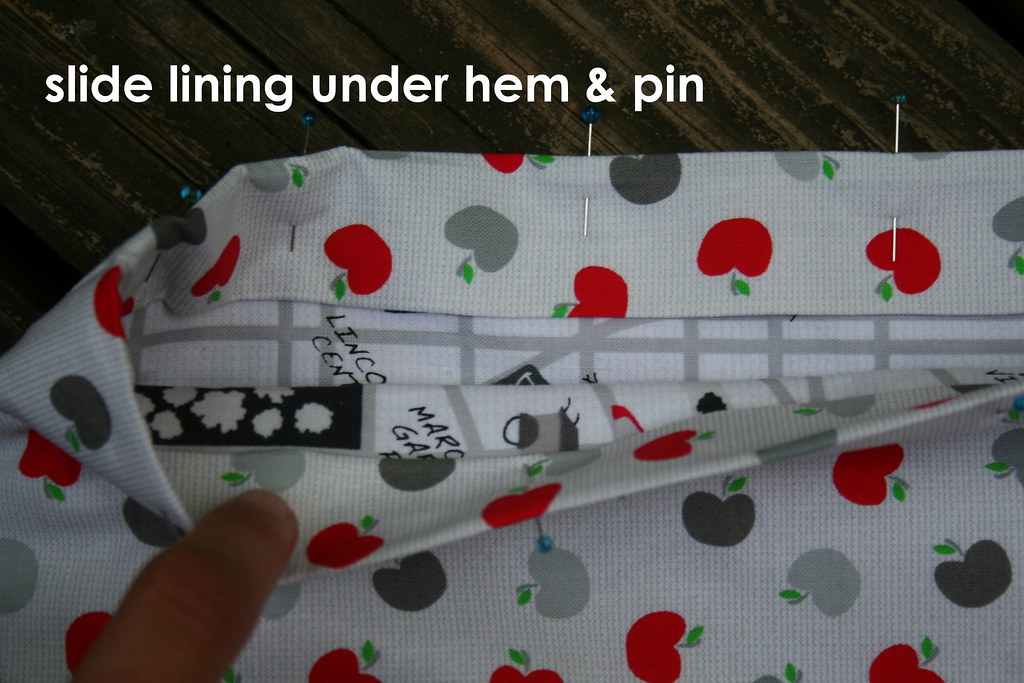
16. This is the part where you need some finesse. Place the lining inside the (right side out) outer shell. Slide the lining under the "hem" you pressed in step 12. You may have to do some wiggling until the lining fits smoothly under the hem.


{reversible} Summer Tote Tutorial
17. Pin the lining and outer tote in place. Stitch about 1/4'' from the top around the entire circumference of the tote. Stitch 2 more rows of stitching under your first line of stitching.

{reversible} Summer Tote Tutorial

Attach the Handles

18. You are almost done! Pin the handles as shown, 3.5'' from either side of the side seam and 1.25'' from the top. Note: Be sure not to twist the handles when pinning them.


{reversible} Summer Tote Tutorial


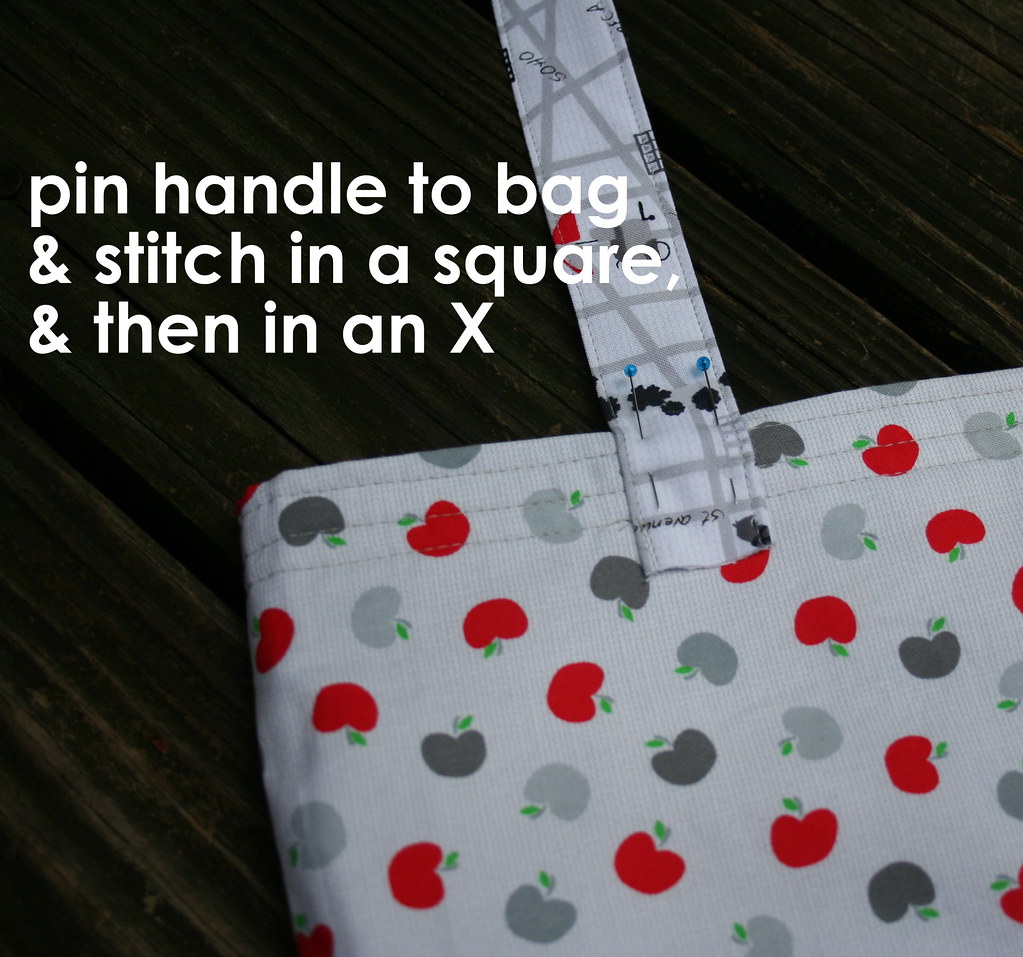
19. Use a zig zag stitch, and start at the bottom (raw edge) of the handle. Stitch right along the raw edge, and then stitch in a square. I also added an X through the middle of the square. Repeat with the other side of the handle.


20. Repeat steps 18 and 19 with the second handle on the other side of the tote.

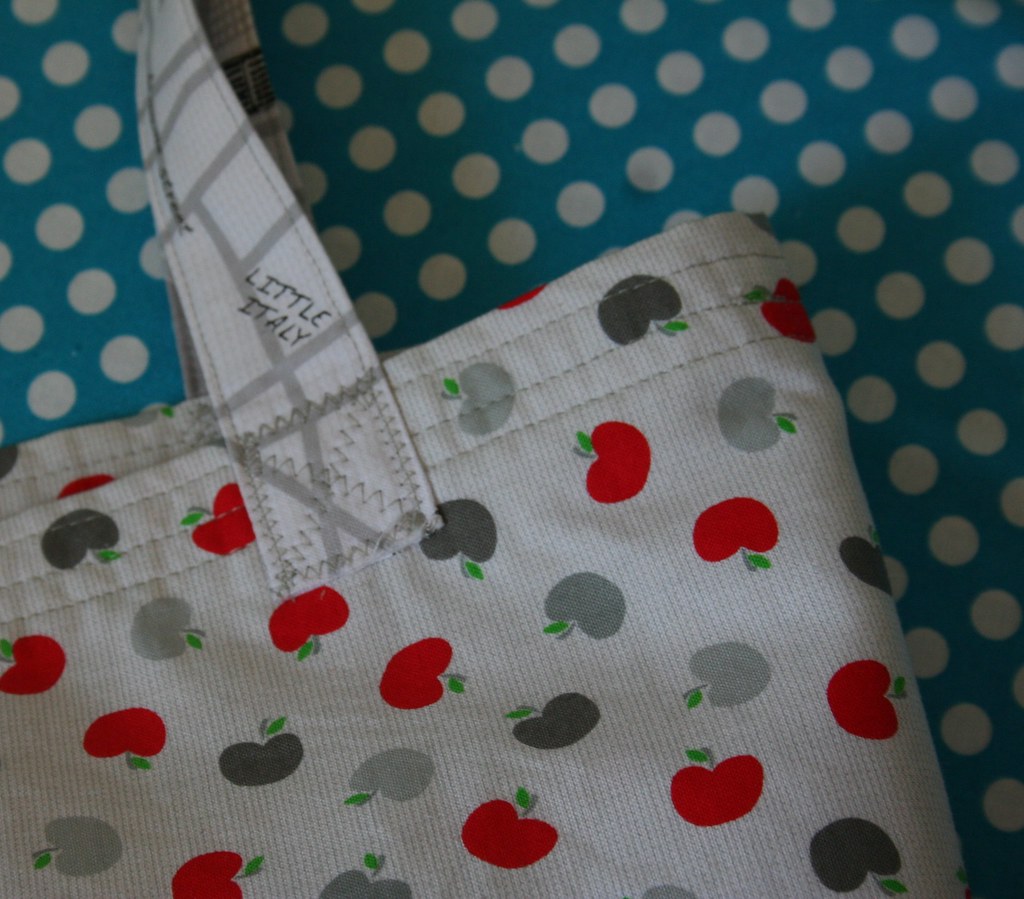
Enjoy the tote as is, or "inside out," and have fun making one or many! I made 2 additional bags out of The Big Apple--one is for my son, and one was a thank you gift for my daughter's preschool teacher.


{reversible} Summer Tote Tutorial

Now for the giveaway! Head to my blog, Swim, Bike, Quilt, to enter the fabric giveaway for a Fat Quarter Bundle of The Big Apple.


benartex_bigapple_swimbikequilt_giveaway

Thanks Katie! 
And thanks to everyone who stopped by our blog during the May hop. We hope you'll visit often!
Love It? Share It! Facebook Twitter Google Pinterest Email

Thursday, May 30, 2013

May Blog Hop: Day 3

Happy Thursday! (And for U.S. readers, this short week is almost over!)
We hope you've enjoyed the first two tutorials from our May Blog Hop. Today we have Debby Kratovil sharing her Magical Mitering technique using the Savannah collection. If you've ever feared making a mitered corner, you'll love this! After you read through Debby's tutorial, head over to her blog for an inspiring virtual gallery of quilts, techniques (including an entire section on using 60 degree angles!) and more--she's incredibly prolific and well-known throughout the industry! Also, Debby is hosting a giveaway for a fat quarter bundle of Savannah--don't miss out on the chance to enter!

Hi, I'm Debby over from Debby Kratovil Quilts
I like to say: All quilts. Only quilts. All the time.
My 14 years as Special Projects Editor for a quilting magazine required me to come up with all sorts of tips and tricks and techniques which I love to share. I chose the Savannah Collection to showcase my much-requested Magical Mitering technique because of the small panels of flowers that resemble windows. I enjoy showing quilters easy ways to approach otherwise difficult quilting challenges. I try to include tutorials often at my blog along with many of the pictures of quilts I've had published over the years. 

Lovely garden themed fabrics: Savannah Collection by Benartex
One of my most requested techniques is that which I refer to as "Magical Mitering." The Savannah Collection is perfect for this in that I will treat groups of 4 small panels as a "window" unit. For example:
 Two sections of 4 small panels
Two groups of panels with "attic window" strips
Each set of 4 panels measures 9-1/2". I commend Benartex on making sure that the black sections between each panel measures 1/2" so that I didn't have to destroy one panel to cut out another. I was able to get the required 1/4" around the outside.

I cut the two contrasting strips (yellow and black prints) at 2-1/2" x wof. Because I am mitering, the strips have to be longer that the 9-1/2" sides by at least 2-1/2" twice. So, I cut them at 9-1/2" + 2-1/2" + 2-1/2" , which equals 14-1/2". You can throw in an extra inch for safety. So, what does this look like?
The first strips extend at least 2-1/2" beyond the two sides as shown
Center the first two strips (yellow) and sew with 1/4" seam to panel center. Note that my stitching goes BEYOND the end. We do NOT begin and end 1/4" away as in traditional mitering. This is important, as you will see in the next photos. I used black thread for demonstration only, so you can see the seam.


Press seams TOWARD the center, so you can see the inside edge of the strips
You now see the extended stitching AND the inside edge of the strips
This stitching will be your visual guide when placing the next set of strips.
Now it's time to add the next set of strips. Using the extended stitching as your guide to place your sewing machine needle EXACTLY, begin sewing at the stitching and end at the stitching on the other side.
Begin stitching as shown; it's ok to backstitch to lock in place
How do we press the seams of this second set of strips? AWAY from the center. Then we fold the black strips at a 45 degree angle as shown, which amazingly resembles a miter.


WAIT! IT IS A MITER!
This magically forms the miter without having to wrestle an alligator

Remember I told you that pressing the first set of strips TOWARD the center was important? Here's why: You use the raw edge of that strip as your guide for aligning the second set of strips (in this case, the black floral). That's how you get a true 45 degree miter:

Notice how the fold begins right at where you dropped your machine needle

This works on ALL corners
All corners can be folded in the same way

Fold back, pin and get ready to stitch.
Yes, this is stitched with a tiny zig zag and monofilament thread.
Wait? Can I see the back?
Look closely; you can see the stitching. Trim away the excess folded under fabrics.
And now for the reveal of the entire block using my Magical Mitering technique:
Magically mitered strips. You can call this Attic Windows, also.
Remember: First two strips get pressed TOWARD the center. The last two strips are pressed AWAY from the center.

I made 4 of these panels. Two of the blocks have yellow on the side and two have yellow on the top and bottom. This way the same colors don't touch. Well, what does it look like?
13" blocks and YES! I mitered the borders, too!
For some reason I get carried away when I start sewing. I almost never make something small. Don't these Savannah panels look like window panes viewing a lovely English garden?

Thanks Debby! 
Don't forget to head over to her blog to enter the giveaway! 
And stop back here tomorrow for the last day of this month's hop!
Love It? Share It! Facebook Twitter Google Pinterest Email

Wednesday, May 29, 2013

May Blog Hop: Day 2


Today we're back with Ebony Love from Love Bug Studios, who is using Extreme Colors to make an e-reader case. Do you know Ebony? She's a fantastically talented designer and machine quilter and you'll find plenty of eye candy on her site. 

Hi, I'm Ebony Love, and I'm a quilt designer, author, and lover of Benartex fabric. I have been designing and making quilts for Benartex for just over a year now, and it's thrilling to work with fabric before it's released to the general public. The only drawback to that is not being able to share my projects with you until the fabric line is released! 

One of my favorite fabrics this year has been the Extreme Colors line by Paula Nadelstern, and it's no wonder. This fabric is bright and cheerful, and comes in 13 different color ways. There's enough pattern in the fabric that it provides interest and texture, but not so overwhelming that you can't coordinate it with other fabrics. I was so excited when the quilt I made using this fabric made the cover of Quilt Magazine last month, and I just can't help making more projects with it. One of my friends pointed out to me the other day that I'm always making things for other people, but I rarely make anything for myself. So I decided that before my entire stash of Extreme Colors disappears, I would make myself something from the line. A sleeve for my Kindle seemed the perfect thing, since I take it with me everywhere.  
This sleeve fits my Kindle whether it's inside or outside the leather case; if you want to make a similar case for your e-book reader, you might need to adjust the dimensions slightly. My pouch finishes at 6-1/2" h x 10" w.  

Materials

  • Assorted pieces of Extreme Colors for exterior
  • Approximately 1/2 yard coordinating solid for exterior
  • Fat quarter for lining
  • 2" fusible hook and loop tape
 

Cutting and Piecing

The exterior of this pouch was made using die-cut triangles and 2-1/2" strips, which I pieced using an improvisational technique. If you don't have a die cutter, you could rotary cut these pieces instead. I'm aiming for a piece that's approximately 11" x 18".
 
You can chain piece triangles to strips, which I have done here, but if you want to be able to cut the triangles apart at an angle, you need to leave plenty of space between your shapes. I did not do this (which is perfectly fine too) but it meant having more odd angles to work with and pieces to fill in.  
As you get more pieces stitched and cut, you can start piecing them together to form interesting shapes. Don't be afraid to hack off pieces of the triangles and strips in order to get the shapes you need to piece together.  
At some point, you need to start squaring off the shapes so you can get the size fabric you need for the exterior of the pouch. I selected these two large pieces plus an extra strip to stitch together into my final base fabric.  

Quilting and Assembly

Once you have the size fabric you need, square it up, and baste it to a layer of batting only.
 
Secure the pouch exterior to the batting using whatever quilting you like. I just used a straight stitch across the width of my pouch, and aligned previously stitched lines with various places on my presser foot to get different spacing between the lines. The thread I'm using is a 50 wt cotton thread by Aurifil that matches my solid fabric.
 
Once you have finished the quilting, square up your exterior fabric to 10-1/2" x 17-1/2". Depending on how densely you quilt your piece, you may lose a little bit of length and width anyway, so squaring it up is a good idea! You also should cut a lining piece to the same measurement. Now here's the scary part of the pouch making: cutting the angles for the flap closure. Because of the random angles in the piecing, I thought it appropriate to also have random angles for the flap closure. A little tip here when you are cutting off corners: make sure you aren't cutting more than 5" deep along the longest side so your pouch folds correctly. I have aligned one side of my ruler with the 45-degree angle, and you can see that I'll be cutting off about 5" of length on that side.  
Rotate the piece and cut another angle, this time a little shallower than the first. It's up to you whether you want your angles to meet in a point or if you want a straight section at the edge.
 
Layer your pouch right sides together with your lining piece. Cut the lining to match the angles on the exterior piece.
 
Pin the pieces together, leaving a few inches on the edge opposite your flap open for turning. I've marked the starting and stopping points with two pins.  
Use a 1/4" seam allowance and stitch around your pouch between the pins. Backstitch at each corner to reinforce those areas. Cut away the seam allowances at each corner, close to your backstitches. This will allow us to get nicely squared & full corners when we turn our pouch right side out.  
Turn your pouch right side out, using a point turner to square the corners. Press the piece flat around all sides. Fold under the opening 1/4" and pin closed.
 
Topstitch the opening close to the edge or handstitch closed. Here is where the straight line quilting on my pouch comes in handy - my topstitching blends in with the rest of the quilting so no one knows that's where I closed my pouch. Except you, 0f course! Before we finish up the pouch, let's position the hook and loop closure. Cut down the hook side only to approximately 3/4" and round off the corners. I wrapped the pouch around my Kindle to get a rough position for the hook tape. You want to position the hook side so that it is well inside the flap (about 1" to 1-1/2" from the tip.)
 
 Follow the manufacturer's instructions to fuse the hook tape to the outside of the pouch. (You can also secure the tape with stitching if that makes you feel better.) Fold up the pouch and pin the sides.  
Starting at the folded edge of the pouch, stitch approximately 1/4" from the sides around the entire edge of the pouch, backstitching in the corners and where the two pouch layers meet. Stitching 1/4" from the edge allows you to stitch through only 6 layers of fabric instead of 10, and adds a nice pop of color by exposing the lining along the sides.
 
 The last step is to position the loop closure on the inside flap. Leave the piece long, but round the edges before fusing it to the flap. This allows you to adjust the flap closure for the contents of the pouch. For example, if I wanted to carry my phone and my keys in the pouch, there's enough room in the flap to expand and still close with the hook side without seeing it. I like using hook and loop tape for the quick closures it makes, but it's not the most attractive to look at.  
That's all there is to it! This is such a great gift for the bibliophile in your life, or for yourself if you want to carry around bits of your favorite fabric with you everywhere you go.
 

Now, if you're sad because you don't have any Extreme Colors of your own to work with, Benartex has a special prize for you. You can enter to win an awesome fat quarter pack of the entire line of Extreme Colors (that's 13 fat quarters!) by doing just two things. 
 
First, sign up to follow the Benartex blog (either by Google Friend Connect or email) - both options are in the right hand sidebar. Then, pop over to the LoveBug Studios Blog and leave a comment on my blog hop post telling me what you would make with this fat quarter pack if you win. You need to do this by 11:59pm on May 31st in order to win, so good luck!

Thanks Ebony! 
Love It? Share It! Facebook Twitter Google Pinterest Email

Tuesday, May 28, 2013

May Blog Hop: Day 1


We're finishing off the month of May with a bang: a 4-day blog hop of tutorials and giveaways!
Today, Kristen from KD-Quilts is visiting, sharing her quilt-as-you-go sewing machine cover made from the Needles and Pins collection from Kanvas. Kristen is a modern quilter in the Virginia Beach area and her blog features her modern quilt designs, patterns, and how-tos. Check it out! She's also holding a giveaway for a pack of 10" squares of the Needles and Pins collection, so be sure to head over and find out how to enter.

Hello, Kristen here from KD-Quilts!  I am so excited to be here on the Benartex blog today, sharing a tutorial for a quilt as you go sewing machine cover.  We all have our precious machines, and yes, they usually come with a boring cover, but why stick with a boring cover?!  Believe me, having a super cute cover to keep your baby clean and protected will make you remember to actually cover it up!
I used prints from the Needles and Pins line to make my cover.  Have you seen these?  They just scream to be made into something for the sewing room....like a sewing machine cover!

 Materials:
  •                 Scrap batting
  •                 Inside (foundation) fabric.  This doesn’t have to be anything pretty, it won’t be visible unless the cover is off and upside down
  •                 Exterior fabric (I used 6 prints from Kanvas' Needles and Pins line)
  •                 Basic quilting supplies (you know: scissors, pins, sewing machine etc.)
  •                 Binding clips…not a necessity, but I HIGHLY recommend them!


First and foremost, you will need to know how big your machine is.  Obviously, all machines are different sized and you will need to adjust the tutorial accordingly.  Don’t panic, it’s not hard to do at all!

I have a Janome Memorycraft 6600P, so if you do too you are all set with my measurements! I will include these measurements in italics.

TOP
19 x 6

SIDES

7.5 x 13

FRONT AND BACK
19 x 13

Since we will be using 1/2 inch seam allowances, you will need to add ONE inch to all of your measurements.  

Once you have your measurements, you will need to cut sides, main panels, and top from the interior fabric as well as from the scrap batting. 
*Cut batting a little wider to allow for shifting in the quilting.*
I wanted solid exterior sides on mine, so I just cut one piece of fabric large enough for each side.

Now it is time to quilt!
If you are unfamiliar with the quilt-as-you-go method, here’s a little recap on how I did it on my cover’s front panel:

Place your first scrap fabric face up on top of the batting.  

Straight line quilt (or quilt however desired) until this whole piece is quilted.
Place your next scrap right sides together with the edges in line.  Sew a 1/4 inch seam joining the two.

Flip this second piece over and continue quilting.
Keep quilting, seaming together, flipping and quilting until the whole piece is covered. On mine, I chose to do a small pieced section in the front, and then solid on the sides.

To make the patchwork back part of the cover, assemble the squares into 4 rows of 3. Quilt each row of three, then attach the next row using the QAYG method described above.

 Now quilt all of your pieces: front, back, both sides and top.
 
Trim any extra batting and fabric so that your pieces are the size of the interior fabric.

Lay the interior fabric onto each piece it goes to.  Fold under the bottoms of the front and back and both sides 1/2 inch and sew down.  This makes the bottom finished.

Remember those binding clips I said I recommended?  This is one of the times they will come in use!  

Baste the interior fabric for the top to the top exterior using a 1/4 inch seam.

NOW, ONTO ASSEMBLY!
Using a 1/2 inch seam allowance, sew the sides to the front panel, right sides together.  Then attach the back panel.  This will make one long tube.

Keeping the right sides facing in.  Set the top inside.  Here is where binding clips are a REALLY good thing!

Sew around all four sides.  I find it helpful to open the seam allowances on the corners and to pivot once you get the the middle of the seam and onto the next side. Really just try it.  It makes a lot more sense when you are actually doing it instead of just reading.

Once you get all the way around, flip right side out.
Ta Da!!  You’re finished!  Now go cover that machine!
Thanks Kristen! Head over to her blog to enter to win some Needles and Pins fabric for yourself!
Love It? Share It! Facebook Twitter Google Pinterest Email